Exercise Bands for Ankles: An Anatomical Guide to Lower Body Strength
You’ve probably never thought much about your ankles, right? They’re just… there. But from an anatomical perspective, they are the sophisticated, load-bearing foundation of your entire body.
The strength, stability, and mobility of the ankle joint—specifically the talocrural and subtalar joints—dictate how well you balance, generate power, and maintain posture. The simplest, most effective key to unlocking this foundational power is the humble exercise band.
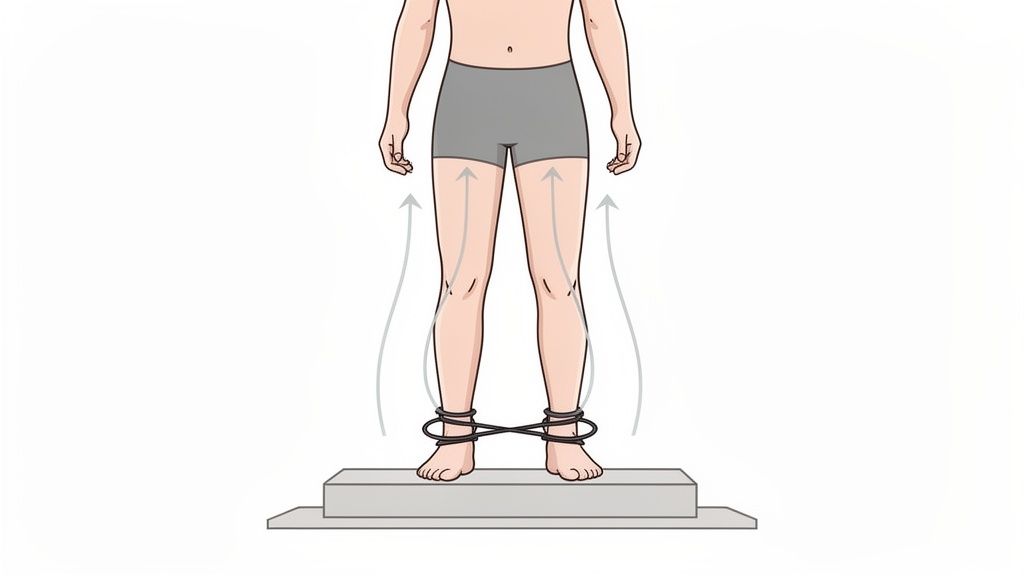
These elastic loops are incredible tools for isolating and strengthening the intricate network of muscles crossing the ankle joint. When you activate these muscles, from the large gastrocnemius to the smaller peroneal muscles, you create a chain reaction of stability. This travels up the kinetic chain, influencing the alignment of your knees, hips, and even your core.
Simply put, a stronger anatomical base means better movement quality and a much lower risk of injury.
Building Your Foundation from the Ground Up
Ankle stability isn't just for athletes landing a jump or dancers on pointe. It’s for everyone, every single day. Weakness in the key stabilizing muscles can lead to a host of issues, from common lateral ankle sprains to chronic instability that can shake your confidence with every step you take.
Your body is a deeply interconnected system. Strengthening the muscles around your ankles is like reinforcing the ground floor of a building—it makes the entire structure more resilient and secure from the ground up.
This becomes especially vital as we get older, when maintaining balance is a primary concern for staying active and independent. Using ankle bands is a fantastic way to build that strength, but it's just one piece of the puzzle. For a broader perspective, it's worth reviewing essential tips for preventing elderly falls.
Why Anatomy-Informed Movement Matters
At WundaCore, we don't just give you exercises; we teach you how to move with purpose. Understanding the why behind the movement—the anatomy of the ankle—transforms a simple exercise into an intelligent practice. It ensures you’re targeting the exact muscles needed for maximum benefit.
Here’s what this focused approach unlocks:
- Targeted Muscle Activation: You learn to feel and engage small, often-ignored stabilizers like the tibialis posterior and peroneal muscles, which provide crucial support to the joint.
- Improved Proprioception: This is your nervous system's ability to sense the position and movement of your body. Ankle exercises enhance the feedback from mechanoreceptors in your ligaments and tendons, sharpening your balance and coordination.
- Enhanced Functional Strength: The strength you build with bands translates directly into safer, more efficient movement in daily life, from walking on uneven ground to your Pilates routine.
By focusing on how your body is designed to move, you start building a smarter, more resilient lower body—one controlled, mindful repetition at a time.
Understanding Your Ankle Anatomy for Better Results
To get the most out of every single movement with your ankle bands, it helps to understand the incredible engineering happening just beneath the skin. Think of your ankle not as a simple hinge, but as a complex synovial joint system—primarily the talocrural joint—built for power, stability, and precision. Knowing which muscles you're targeting transforms an exercise from just going through the motions into a purposeful act of building strength.
This is the heart of what we call anatomy-informed movement. It's about forging a mental link to the specific muscles you're working. That connection leads to better activation, more efficient results, and a much lower risk of injury. When you can actually visualize the muscles contracting against the band, you gain total control over your workout.
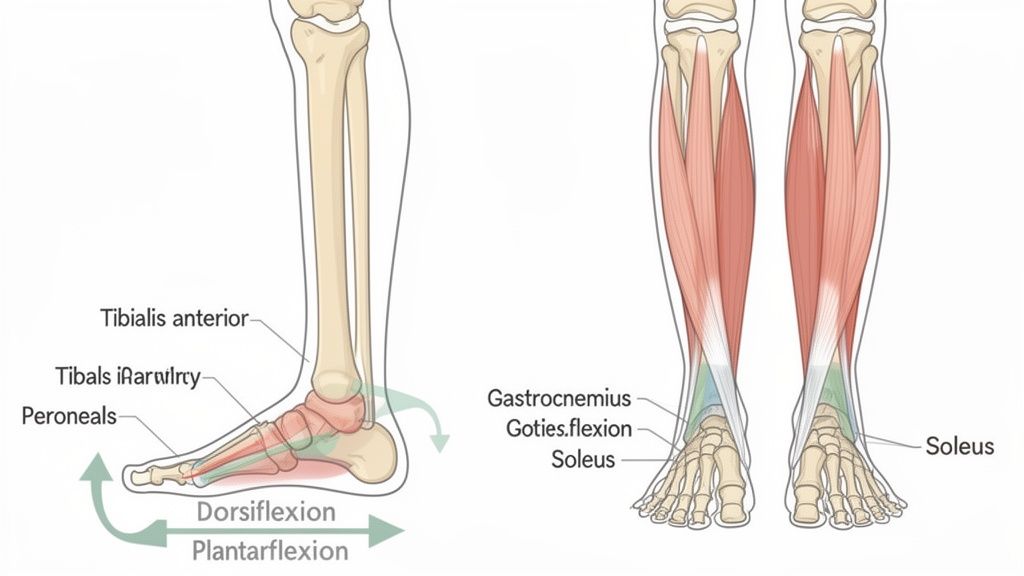
The Key Players in Ankle Movement
Your lower leg and ankle are a dynamic team of muscles, bones (like the tibia, fibula, and talus), and ligaments all working in perfect harmony. While the whole structure is complex, we can zero in on the main muscles that exercise bands are exceptionally good at targeting.
- Tibialis Anterior: Located on the front of your shin, this is the primary muscle responsible for dorsiflexion—lifting your foot up. Every time you flex your foot, you're activating the tibialis anterior.
- Peroneal Muscles (Fibularis Longus and Brevis): Running along the outside of your lower leg, these muscles are your key stabilizers for eversion (turning the foot outward). They are crucial in preventing common inversion ankle sprains.
- Gastrocnemius and Soleus (Calf Muscles): These two muscles form the Achilles tendon and are the primary drivers for plantar flexion (pointing your toes). The gastrocnemius is the larger, more superficial muscle, while the soleus is a flatter, deeper muscle critical for endurance.
- Tibialis Posterior: A deep muscle behind the shin bone, it's the main muscle for inversion (turning the foot inward) and plays a vital role in supporting the arch of your foot.
These muscles work in agonist-antagonist pairs to control the ankle's essential movements. Getting to know them is the first step toward mastering your ankle band exercises.
The Four Core Ankle Movements
Exercise bands are brilliant because they provide targeted resistance, forcing these key muscles to work harder through their complete range of motion. This is far more effective than simply moving your ankle against gravity. Let's break down the four primary movements.
- Dorsiflexion (Flexing Up): Pulling your toes towards your shin, controlled by your tibialis anterior. Weakness in this muscle can lead to "foot drop" and increase the risk of tripping.
- Plantar Flexion (Pointing Down): The opposite of dorsiflexion, like pressing a gas pedal. This powerful move is driven by your gastrocnemius and soleus.
- Inversion (Turning Inward): Rolling the sole of your foot inward. This is primarily controlled by the tibialis anterior and posterior.
- Eversion (Turning Outward): Rolling the sole of your foot outward. Your peroneal muscles (fibularis longus and brevis) are the stars of this show, providing critical lateral stability.
Ankle sprains are one of the most common musculoskeletal injuries, often happening from a sudden, uncontrolled inversion. By strengthening the muscles responsible for eversion—the peroneals—you essentially build a natural "brace" around the joint, making it far more resilient.
Why Bands Are the Perfect Tool for Ankle Anatomy
Resistance bands are uniquely suited for ankle training because they provide consistent tension through an entire movement. Unlike a dumbbell, where gravity's pull varies, a band's resistance increases as you stretch it. This challenges the muscle most intensely at its point of peak contraction.
This continuous tension is what builds real, functional strength. It forces the small stabilizing muscles—the ones often overlooked in traditional workouts—to fire up and do their job. This not only strengthens the muscles themselves but also fine-tunes something called proprioception.
Think of proprioception as your brain's awareness of your body's position in space—it's like your internal GPS. By challenging your ankle against the band's resistance, you're sending a constant stream of feedback from nerve receptors in your muscles and joints to your brain, sharpening this sense. A well-honed sense of proprioception allows your body to react instinctively to uneven ground or a sudden loss of balance, preventing a fall before it even starts. If you want to dive deeper into ankle mechanics, you can learn more in our guide on Phase 1 of ankle mobility.
This neurological training is just as crucial as building bigger muscles. It’s the reason why using exercise bands for ankles is a cornerstone of both high-performance athletic training and effective physical therapy. When you know the anatomy, you're not just exercising; you're intelligently re-educating your body from the ground up for superior stability and control.
How to Choose the Right Exercise Bands for Your Ankles
Picking the right tool for any job is half the battle, and that’s especially true when it comes to exercise bands. Not all bands are created equal, and choosing the perfect one for your ankles is a critical first step that directly affects your safety, comfort, and results.
The wrong band can roll up, snap, or provide inconsistent resistance, turning a great exercise into a frustrating mess. Your choice should align with your specific anatomical goals, whether that's gentle rehabilitation, building functional strength, or enhancing athletic performance.
Let's break down the common types of exercise bands for ankles so you can find exactly what you need.
Comparing Different Types of Ankle Bands
You’ll typically run into three main styles of bands for lower body work. Each has its own characteristics and is better suited for certain movements and muscle groups.
-
Loop Bands (Mini Bands): These are the classic, versatile closed-loop bands you see everywhere from Pilates studios to physical therapy clinics. Made from latex or a non-latex alternative, they come in a whole rainbow of resistance levels. Their simple design is perfect for exercises where the band wraps around both ankles or thighs, like lateral walks (targeting gluteus medius) and clamshells.
-
Cuffed Tube Bands: Picture a resistance tube with a comfortable cuff on each end that straps right around your ankles. These are fantastic for exercises needing a bigger range of motion, like standing kickbacks or abduction, because the tube allows for more distance between your feet without overstretching the band itself.
-
Fabric Bands: A popular twist on the loop band, these are made from a blend of fabric and elastic. Their biggest selling point is comfort—they’re wider, don't roll up your legs, and won’t pinch your skin the way some latex bands can. They usually offer heavier resistance, making them a go-to for strength-focused moves targeting larger muscles like the glutes.
The goal isn't to find the single "best" band out there, but to find the best band for you and the specific movements you're doing. Many people find having a couple of different types on hand gives them the most versatility for a well-rounded routine.
To make things even clearer, let's look at them side-by-side.
Your Guide to Ankle Exercise Band Types
This table breaks down the most common types of bands you'll find for ankle exercises, helping you decide which one fits your routine best.
| Band Type | Material | Best For | Pros | Cons |
|---|---|---|---|---|
| Loop Bands | Latex or TPE | Versatile lower-body exercises like glute bridges, lateral walks, and clamshells. | Widely available, affordable, huge range of resistance levels. | Can roll, snap, or pinch skin. Latex can cause allergic reactions. |
| Cuffed Tube Bands | Rubber Tubing, Nylon Cuffs | Exercises requiring a large range of motion, such as standing kickbacks and abduction. | Comfortable cuffs, allows for greater distance between ankles. | Bulkier to store and transport, can be more expensive. |
| Fabric Bands | Woven Fabric & Elastic | Strength-focused exercises like squats and hip thrusts; great for those who find latex bands uncomfortable. | Comfortable, durable, non-slip, and won't roll. | Often have fewer, heavier resistance options; less stretchy than latex. |
Ultimately, the right band comes down to personal preference and the specific exercises you have in mind. Don't be afraid to try a couple of different styles to see what feels best for your body.
Selecting the Right Resistance Level
Choosing the right resistance is a delicate balance between safety and creating enough stimulus for muscle adaptation. If you start with a band that’s too heavy, you risk poor form and compensatory movements, which can strain surrounding joints and ligaments. Conversely, a band that's too light won’t provide enough of a challenge to promote muscular hypertrophy or endurance.
The golden rule? Start light. Always begin with the lowest resistance level, especially if you’re new to ankle exercises or are recovering from an injury.
Your focus should be on perfect form and feeling the target muscles activate. A good benchmark is being able to complete 12-15 repetitions with flawless control. If your form breaks down before you hit that number, the resistance is too high. Only progress to the next level once you can comfortably complete multiple sets.
For a deeper dive, check out our complete guide to the best resistance bands for Pilates.
It's clear that more and more people are discovering just how effective these simple tools can be. The global market for exercise resistance bands is booming, reflecting a huge shift toward accessible, home-based fitness. Valued at USD 1.21 billion in 2025, the market is projected to jump to USD 3.12 billion by 2034, all driven by the demand for low-impact solutions like exercise bands for ankles that are perfect for Pilates and at-home strength training. You can read more about these market trends on ResearchAndMarkets.com. This growth just goes to show how many people are realizing the power of these incredible tools.
Mastering Key Ankle Strengthening Exercises
Alright, you've got the right bands and understand the anatomy. Now it's time to put that knowledge into practice. This is where we move from theory to action, guiding you through the essential exercises that build true, functional strength and stability in your ankles.
Think of this as your personal playbook for creating resilient, powerful ankles right from your living room. Every exercise comes with clear, step-by-step instructions focused on impeccable form. This is the heart of the WundaCore method—moving with intention and anatomical awareness to get the best possible results.
Laying the Foundation with Proper Form
Before you even start an exercise, I want you to remember one thing: quality trumps quantity, every single time. Rushing through repetitions with sloppy form won't just shortchange your results; it can increase the risk of injury. The goal here is controlled, mindful movement.
Focus on these core principles for every single rep:
- Maintain a Neutral Spine: Keep your back straight and your core gently engaged to stabilize your pelvis and trunk.
- Move Slowly and with Control: Avoid using momentum. The band's resistance should be the primary force you're working against.
- Isolate the Ankle Joint: Try to initiate movement purely from the ankle (talocrural and subtalar joints), minimizing any compensatory movement from the knee or hip.
When you prioritize these principles, you're not just exercising—you're building functional strength safely and effectively.
Foundational Ankle Band Exercises
These four movements are the cornerstones of any good ankle strengthening program. They directly target the muscles responsible for the four primary motions of the ankle joint, creating balanced, 360-degree strength.
1. Banded Dorsiflexion (Foot Flex Up)
- Target Muscle: Tibialis Anterior.
- How to Do It: Sit on the floor with one leg straight out. Secure one end of a band to something stable (like a heavy table leg) and loop the other end around the top of your foot. Scoot back until there’s light tension. Slowly, pull your toes toward your shin against the band's resistance, hold for a breath, and then slowly return to the start.
2. Banded Plantar Flexion (Toe Point Down)
- Target Muscles: Gastrocnemius and Soleus.
- How to Do It: Sit in the same position, but this time, loop the band around the ball of your foot and hold the ends. Gently pull to create some tension. Now, slowly point your toes away from you, as if pressing a gas pedal. Feel the deep contraction in your calf, then control the movement all the way back.
3. Banded Eversion (Ankle Turn Out)
- Target Muscles: Peroneus longus and brevis.
- How to Do It: Sit on the floor with your legs out in front. Place a loop band around both feet. Keeping your heels down and one foot perfectly still, slowly rotate the other foot outward against the band. You should feel the muscles on the outside of your ankle and shin engage. Return to the center with control.
4. Banded Inversion (Ankle Turn In)
- Target Muscles: Tibialis anterior and posterior.
- How to Do It: In the same seated position, cross the leg you're working over the other one. Loop the band around the top of that foot and use your other foot to anchor it. Slowly turn the working foot inward and slightly upward against the resistance.
Pro Tip: Aim for 2-3 sets of 12-15 repetitions for each of these exercises. If you can't finish a set with perfect form, it’s a sign you might need a lighter band. Consistency is what will get you real, lasting improvements in strength and stability.
The flowchart below can help you visualize which type of band works best for different needs.
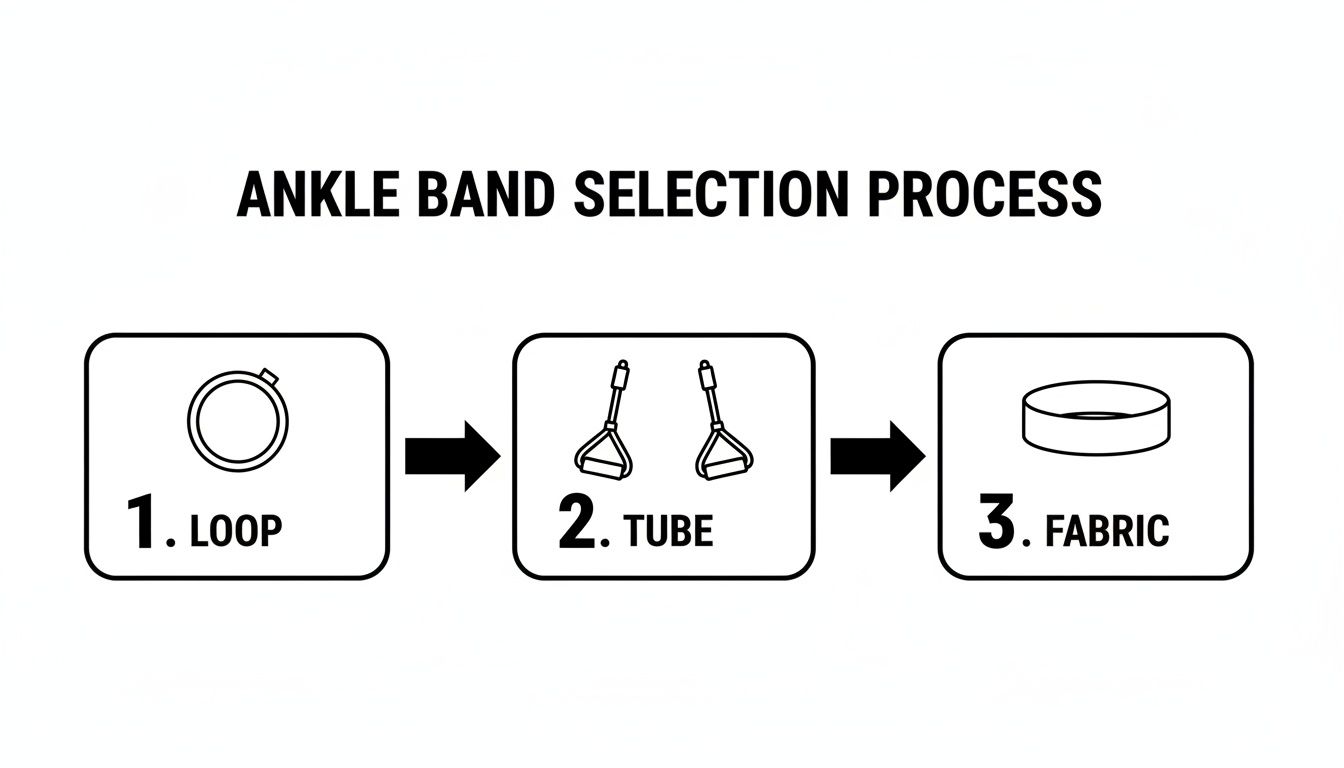
This helps break down your options, from the versatile loop band to more specialized tube and durable fabric bands, each suited for different exercises and resistance levels.
Progressing Your Ankle Workouts
Once you've mastered the basics and they start to feel easy, it’s time to apply the principle of progressive overload. This is how you continue to challenge the muscles and avoid hitting a plateau.
You can progress your routine in a few simple ways:
- Increase Resistance: Grab the next band level up.
- Add an Isometric Hold: At the point of peak contraction (e.g., when your foot is fully everted), pause and hold for 3-5 seconds before returning.
- Introduce Instability: Try performing standing exercises on an unstable surface, like a cushion or balance disc. This forces your ankle's stabilizing muscles and proprioceptive system to work much harder.
These small tweaks can make a huge difference in the intensity and effectiveness of your workout. For more advanced movements, you can explore our complete library of ankle band exercises.
These simple tools have become mainstays in both preventive training and physical therapy. The broader resistance bands market, which includes exercise bands for ankles, has grown to meet the needs of everyone from Pilates lovers to pro athletes. The global market was valued at USD 1.66 billion and is projected to hit USD 2.92 billion by 2030, largely because of how effective they are in helping people restore joint function and strength.
Remember, a strong body is an integrated one. Beyond these ankle-specific movements, incorporating other targeted lower body strengthening exercises, especially for the glutes, contributes to your overall stability. When your hips and glutes are strong, they provide a solid base that takes the burden off your lower legs and ankles, creating a more resilient body from the ground up.
Weaving Ankle Bands into Your Pilates Routine
Isolated ankle exercises are fantastic for building targeted strength, but the real magic happens when you integrate that stability into your broader fitness practice. This is where we connect the dots, showing you how to seamlessly integrate exercise bands for ankles into your WundaCore Pilates routine for maximum, full-body benefits. Think of it as upgrading your body’s foundation before you build the house.
A brilliant place to start is using banded movements as an intelligent warm-up. Before your main Pilates session, just a few minutes of targeted ankle work can activate those deep stabilizing muscles in your lower legs, like the peroneals and tibialis anterior. This "wakes up" the neuromuscular pathways, getting your body ready for more stable, controlled, and intentional movements from the very first exercise. You’re essentially pre-activating your support system.
Amplifying Classic Pilates Movements
This is where things get really interesting. When you add bands directly to classic Pilates exercises, you're not just making them harder; you're making them smarter. By introducing that external resistance, you force your body to maintain stability from the ground up, deepening the muscular challenge and amplifying your results.
Let’s look at a few examples:
- Leg Circles with an Ankle Band: Wrapping a light loop band around your ankles during leg circles forces your stabilizing leg to work overtime to prevent any wobbling. At the same time, the moving leg has to fight the band’s tension, which engages your glutes and core more deeply to maintain a smooth, controlled circle.
- Side-Lying Leg Series: Adding a band around the ankles here changes everything. During a leg lift (abduction), the band provides constant resistance, targeting the gluteus medius with incredible precision. You’re no longer just lifting against gravity; you’re pushing against active tension, building functional hip strength that supports the entire kinetic chain.
- Banded Footwork on the Mat: You can mimic reformer footwork by lying on your back with a band looped around the balls of your feet. Performing plantar and dorsiflexion against the band’s resistance strengthens the entire foot and ankle complex, creating a more powerful push-off for everything from walking to jumping.
Building a Stronger Foundation for Every Movement
This integration isn’t just about adding another tool to your kit; it’s about enhancing the entire WundaCore experience. Every single Pilates movement originates from your core and is expressed through your limbs. When your ankles—the very base of that expression—are weak or unstable, the entire movement pattern is compromised.
By strengthening your ankles with bands, you’re creating a more reliable foundation. This allows your larger muscle groups, like your glutes and hamstrings, to work more efficiently because they aren’t busy compensating for instability down below. Every movement becomes more effective and intentional.
This approach is gaining incredible traction, especially as more people embrace home-based fitness. The market for exercise resistance bands is projected to hit USD 2.8 billion by 2034, with a huge part of that growth driven by at-home applications like ankle-focused training. These simple bands are central to the home Pilates revolution because they help build inner strength and improve ankle dorsiflexion—a key factor in preventing up to 70% of lower-body injuries. You can explore more detailed insights about these exercise band market trends on usdanalytics.com. This data highlights a clear shift toward smarter, anatomy-focused training at home, which is exactly what this integration accomplishes.
Your Ankle Band Questions, Answered
Starting any new fitness routine brings up questions. It's only natural. When you're working with something as foundational as your ankles, getting the right answers is key to moving forward with confidence.
Let's clear up some of the most common questions about using exercise bands for your ankles. Think of this as your go-to guide for making sure every movement is safe, effective, and perfectly in line with your goals.
How Often Should I Do Ankle Band Exercises?
When you're starting out, consistency beats intensity every time. The small, stabilizing muscles around your ankles—like the peroneals and tibialis anterior—need time to adapt, just like any other muscle group.
For general strength and injury prevention, aim for 2-3 sessions a week on days you're not doing other intense leg work. This gives the tissues proper time to recover and rebuild. If you're using bands for rehab, however, your physical therapist is your guide. Always follow their specific instructions.
Can I Use Ankle Bands If I Have an Injury?
This is a big one. While ankle bands are a staple in physical therapy, it’s a bad idea to use them on an active injury without getting a green light from a professional. You could easily make an undiagnosed sprain or strain worse by adding resistance, setting your recovery back.
Your first step should always be to see a doctor or physical therapist. They can tell you exactly what’s going on and map out a safe plan. Once they clear you, bands become an incredible tool for carefully rebuilding strength around the joint.
There's a huge difference between the discomfort of a hard workout and actual pain. Muscle fatigue is normal. A sharp, stabbing feeling in the joint is your body's signal to stop immediately and get professional advice.
What Resistance Is Best for Beginners?
Always, always start with the lightest band you can find. Your goal here isn't to max out the muscle; it's to wake it up. You're building that crucial mind-muscle connection and locking in perfect form. Remember, the small muscles around the ankle are built for control and endurance, not for heavy lifting.
A good rule of thumb: pick a resistance that lets you complete 12-15 repetitions with pristine form. If you find yourself cheating, using momentum, or breaking form just to finish a rep, the band is too heavy. Only move up to the next resistance level when you can confidently complete multiple sets with perfect control.
How Do I Care for My Exercise Bands?
A little bit of care goes a long way in making your bands last. Whether they're latex or fabric, the material can break down over time if it’s not treated well.
Here are a few simple tips to keep them in top shape:
- Store them properly: Keep your bands out of direct sunlight and away from extreme temperatures. Heat and cold can make the material brittle.
- Clean them gently: A quick wipe-down with a damp cloth after your workout is all you need to get rid of sweat and dirt. Steer clear of harsh chemical cleaners.
- Inspect them regularly: Before you start a session, give your bands a quick once-over. Look for any nicks, small tears, or worn-out spots. A damaged band can snap, so it’s always best to replace it if you see any signs of wear.
Ready to build a stronger foundation from the ground up? The WundaCore Loop is expertly designed to provide the perfect resistance for targeted ankle strengthening and full-body Pilates workouts. Discover how anatomy-informed movement can transform your practice. Explore the WundaCore collection today.