A Practical Guide to Mind Body Connection Exercises
When you hear "mind-body connection," what comes to mind? For many, it's an abstract concept, but in Pilates, it's a tangible, anatomical process we refine with every movement. These aren't just exercises; they are intentional conversations between your central nervous system and your musculature, designed to sharpen how you sense and command your body. The result? Better stability, coordination, and a deeper sense of anatomical control.
How Movement Rewires Your Brain-Body Connection
That link between your mind and body isn't just a feeling—it’s a physical, biological process rooted in your nervous system. Every time you move with intention, you're strengthening specific neural pathways. Mastering this internal communication is the first real step toward mastering any kind of mindful movement.
This entire system hinges on proprioception—your body’s built-in awareness of its position and movement in space. This sense is powered by specialized nerve endings called proprioceptors, located in your muscles, tendons, and joints, that constantly feed information back to your brain. So, when you perform a precise, Pilates-inspired movement, you're doing more than just working a muscle; you're fine-tuning this powerful sensory feedback loop.
The Anatomy of Your Deep Core
At the heart of this connection lies your deep core. And no, this is not just the rectus abdominis or "six-pack" muscle. True core strength comes from a coordinated system of muscles working in harmony to stabilize your spine and pelvis.
- Transverse Abdominis (TVA): This is your deepest abdominal muscle. Its fibers run horizontally, like a natural corset that wraps around your midsection, providing crucial stability to the lumbar spine.
- Pelvic Floor: This is a group of muscles forming a muscular sling, or diaphragm, at the base of your pelvis. It supports your abdominal organs and works in synergy with your TVA and respiratory diaphragm.
- Diaphragm: Your primary breathing muscle acts as the "roof" of your core. Its contraction and relaxation directly influence intra-abdominal pressure, a key component of spinal stability.
The real magic happens when these muscles fire in the right sequence. A well-timed exhale can trigger the engagement of your TVA and pelvic floor, creating a solid foundation before you even begin to move.
The Pilates Influence on Mindful Movement
Using controlled exercise to unite mind and body isn't a new idea. While the concept can be traced back to Ancient Greece, the modern movement was truly shaped by pioneers like Joseph Pilates. Between 1912-1914, he developed his method, Contrology, famously stating, “Physical fitness is the first requisite of happiness.”
Fast forward to today, and Pilates is a $10 billion industry helping over 12 million people in the US alone. Its effectiveness is more than just anecdotal; some clinical trials have shown it can reduce back pain by as much as 50%.
The exercises we're about to explore are built on this very principle of anatomical awareness. They'll teach you to connect your breath to your deep core, turning simple movements into a powerful conversation between your brain and body. A crucial first step is mastering the foundational breathing techniques for Pilates, as this is where the mind-body dialogue truly begins.
Your Foundational Proprioception Warm Up
Before you jump into the main event, we need to prime your nervous system for feedback and gently activate the correct muscles. Think of this warm-up like tuning an instrument; we're establishing a clear communication pathway between your brain and your deep core stabilizers, like the transverse abdominis and multifidus.
These simple but powerful exercises are all about building your proprioceptive awareness. That's a technical way of saying you'll know exactly where your body is in space, which makes every movement that follows safer and so much more effective.
The goal here isn't to break a sweat. It's to feel. By focusing on the anatomical ‘why’ behind each movement, you’ll shift your focus from what it looks like on the outside to what's happening on the inside.
Rib Cage Breathing
The very first step in connecting your mind and body is to master your breath, because it directly interfaces with your core musculature. Your diaphragm, the primary muscle of respiration, is literally the roof of your core. When you breathe correctly, it works in perfect harmony with your transverse abdominis and pelvic floor to create stability from the inside out.
- How to Do It: Lie on your back with your knees bent and feet flat on the floor. Place your hands on the sides of your rib cage. Take a deep inhale through your nose and feel your ribs expand laterally into your hands, just like an accordion.
- The Anatomy: This lateral expansion means you're fully engaging your diaphragm, allowing it to descend and increase intra-abdominal pressure. It’s the opposite of shallow chest breathing, which overuses accessory muscles like the scalenes and sternocleidomastoid, leading to tension in your neck and shoulders.
- Coaching Cue: As you exhale through your mouth, imagine your ribs gently knitting together as your navel draws softly toward your spine. This action facilitates the concentric contraction of your transverse abdominis (TVA)—your body's built-in corset.
Pelvic Tilts
Now that your breath is integrated with your core, let's bring that awareness down to your pelvis and lumbar spine. Pelvic tilts are a game-changer for learning how to isolate and control movement at the lumbopelvic junction, a major source of instability for many people.
This exercise isn't about creating a huge, dramatic movement. It's a subtle, focused articulation designed to teach your brain how to recruit the deep lower abdominals without gripping in the hip flexors (iliopsoas) or glutes.
The key is to let your exhale initiate the movement. As you breathe out, use your lower abdominals to gently draw your pubic bone towards your navel, which will flatten your lumbar spine against the mat. This is a posterior pelvic tilt. On your inhale, simply return to a neutral spine, where you have that small, natural lordotic curve under your low back.
This controlled motion is absolutely essential for building lumbopelvic stability. And while we’re focused on the core here, remember that real stability starts from the ground up. You can learn more about how to unlock your ankles for better movement to complement your practice.
Alright, it's time to put all that theory into practice. These Pilates-inspired movements are designed to be much more than just a workout; think of them as active lessons in your own anatomy and how it works. When you start focusing on the how and why behind each movement, you’ll build a mind-body connection that's powerful and, more importantly, lasting.
Let’s begin with a simple warm-up to prime your nervous system. This sequence is all about learning to breathe, tilt, and activate your core from the inside out.
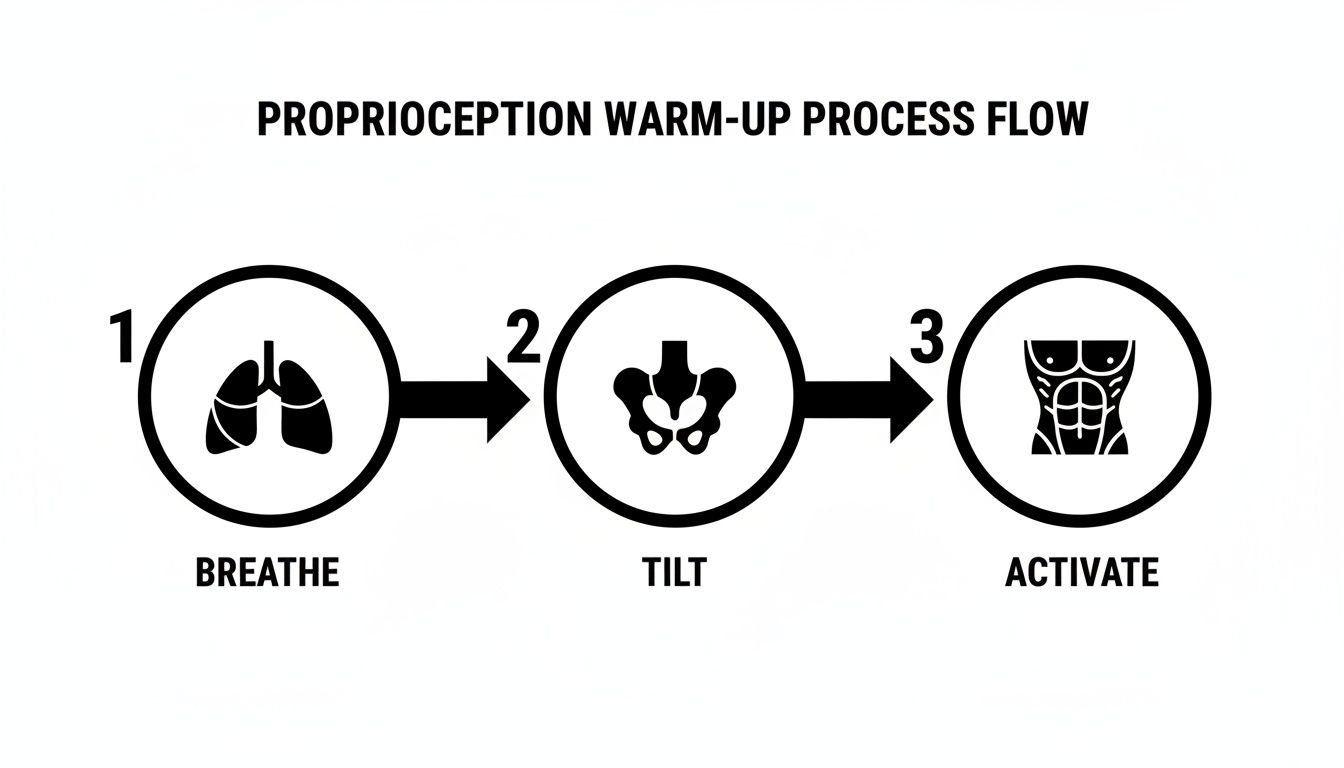
This process flow shows you the foundational steps for building true core stability. Each element builds on the last, creating a solid platform for the more complex movements we’re about to dive into.
The Dead Bug
We need to reframe this classic exercise. It’s not just an "ab workout"—it's a dynamic lesson in lumbopelvic stability. Its real job is to teach your brain to maintain a neutral spine by engaging your deep core muscles while your limbs create destabilizing forces. This skill is fundamental for functional movements, from walking to lifting.
- How to Do It: Lie on your back with your hips and knees bent at a 90-degree angle (this is called the tabletop position). Reach your arms straight up toward the ceiling.
- The Feeling: On an exhale, slowly lower your contralateral arm and leg toward the floor. The key is to only go as low as you can without letting your lumbar spine arch into extension. This forces your transverse abdominis (TVA) to work isometrically to prevent anterior pelvic tilt and maintain spinal neutrality.
- Breathe with It: Exhale on the effort as you lower your limbs to deepen that core engagement. Inhale as you return to the start with complete control.
- Need a Modification? Keep one foot on the floor and just alternate lowering one leg at a time.
- Ready for More? Hold a WundaCore Block between your hands to add an isometric challenge that lights up your upper body and core even more.
The Bridge
This is so much more than a glute exercise. The Bridge is where you learn controlled spinal articulation and how to properly sequence muscle firing. Many people overuse their hamstrings or erector spinae muscles here, when the movement should be initiated by the gluteus maximus. This exercise retrains that neuromuscular pattern.
The goal is to peel your spine off the mat one vertebra at a time, like you're lifting a string of pearls. This controlled segmentation improves intervertebral mobility and deepens your proprioceptive awareness of each segment of your spine.
Start by lying on your back with your knees bent, feet flat on the floor, and your arms long by your sides. As you exhale, press through your feet and initiate a posterior pelvic tilt, then continue to lift your hips by contracting your glutes. Your body should form a straight line from your shoulders to your knees.
Inhale at the top. Then, exhale as you slowly lower your spine back down, articulating through the thoracic spine first, then the lumbar, and finally returning your sacrum to the mat. The control on the way down is just as important as the lift. If this kind of focused movement is new for you, our complete guide to Pilates for beginners at home has more foundational tips to get you started.
Bird Dog
Now we’re going to challenge your stability in multiple planes at once. This movement is incredible for training the deep muscles along your spine, known as the multifidus, which work with the TVA to prevent spinal rotation. It teaches them to coordinate with larger muscle groups to resist rotational forces on the torso.
- How to Do It: Start on all fours with your hands directly under your shoulders and your knees under your hips.
- The Feeling: First, engage your TVA to create a stable base. Then, extend your right arm forward and your left leg straight back, keeping your spine neutral and your pelvis level. I always tell my clients to imagine they have a full glass of water balanced on their sacrum that they can’t spill.
- Breathe with It: Exhale as you extend your arm and leg; inhale as you bring them back to the starting position.
- Need a Modification? To reduce the stability challenge, just extend one leg or one arm at a time.
- Ready for More? Place a WundaCore Block on your lower back. It gives you immediate tactile feedback and makes it impossible to cheat—you'll know right away if your hips aren't perfectly stable.
These modern somatic exercises have surprisingly deep roots. The 1890s saw F. Matthias Alexander develop his technique to correct poor posture. Decades later, in the 1970s, Thomas Hanna introduced 'somatics' to fight what he called "Sensory Motor Amnesia," using movements that mimic natural stretching to retrain the nervous system. The interest has exploded recently, with participation growing by 25% annually since 2019.
To help you structure your practice, here is a simple progression plan. This table outlines these core exercises and offers clear modifications for beginners and progressions for those ready for a bigger challenge.
Mind Body Connection Exercise Progression Plan
| Exercise Name | Anatomical Focus | Beginner Modification | Advanced Progression |
|---|---|---|---|
| The Dead Bug | Transverse Abdominis (TVA), Lumbopelvic Stability | Keep one foot on the floor, alternate leg lowering. | Hold a WundaCore Block between hands. |
| The Bridge | Gluteus Maximus, Hamstrings, Spinal Articulation | Perform with a smaller range of motion. | Single-leg bridge or add a resistance band above knees. |
| Bird Dog | Multifidus, Core Stabilizers, Balance | Extend only one limb at a time (arm or leg). | Place a WundaCore Block on the lower back for stability. |
As you get more comfortable with these movements, you can start combining them into a routine and challenging yourself with the advanced progressions. The goal is consistent, mindful practice.
Building Your 20 Minute Mind Body Routine
Knowing a few mind-body exercises is one thing, but stringing them together into a smart, balanced flow? That’s where the magic really happens. This is how you start building true neuromuscular intelligence.
Think of this sample 20-minute routine as a complete conversation with your body. We’ll intentionally move through different planes of motion—sagittal, frontal, and transverse—to keep your muscles engaged and guessing, which helps you get the most out of every minute without burnout.
The secret is to avoid exhausting any single muscle group. A well-designed sequence will follow a flexion-based movement (like Dead Bug) with an extension-based one (like Bridge). This trick creates a beautiful balance of work between agonist and antagonist muscles, improving both your strength and mobility at the same time.
Structuring Your Flow
This isn't about crushing reps; it's about the quality you bring to each one. The entire focus should be on listening to the proprioceptive feedback your body is giving you. If your form starts to degrade, that's your cue to rest or modify, not to push harder.
Here’s how you can break down your 20-minute session into four clear phases:
- Warm-Up (3–4 minutes): Start with Rib Cage Breathing and gentle Pelvic Tilts. The idea is to activate your diaphragm, deep core (transverse abdominis), and pelvic floor. This sets the neuromuscular foundation for everything that follows.
- Main Flow (12–14 minutes): This is the heart of the workout where you cycle through the core exercises. A great sequence would be: Dead Bug (anti-extension and stability), into a Bridge (hip extension and spinal articulation), followed by Bird Dog (anti-rotation and stability). See how we're challenging the core to resist different forces?
- Constant Flow (Continuous): Your breath is the thread that ties it all together. Keep it steady and controlled. Every exhale should facilitate a deeper concentric contraction of your core, connecting each movement back to your center.
- Cool-Down (2–3 minutes): Wind down with gentle stretches. A child's pose or a simple supine spinal twist is perfect for releasing any residual tension in the paraspinal muscles and allowing your nervous system to down-regulate.
Reps, Sets, and Listening to Your Body
Forget about a rigid "3 sets of 10." Instead, I want you to focus on time under tension and maintaining perfect form.
Aim to perform each exercise for 45–60 seconds with a slow, deliberate pace. The second you feel your core disengage or your lumbar spine start to arch, your set is done. That’s it.
The most advanced practitioner isn't the one doing the most reps. It's the one who maintains the deepest mind-body connection through every single movement.
This approach has deep roots. Long before we had modern fitness apps, pioneers were already exploring this powerful connection. Back in the late 18th century, Pehr Henrik Ling, often called the father of Swedish Gymnastics, created one of the first documented mind-body philosophies in the West. His work went on to influence people like J.P. Müller, whose 1904 book My System sold millions across Europe—even Franz Kafka was a fan.
As you build your own routine, you might also find value in structured programs like Mindfulness Based Stress Reduction (MBSR) to deepen the mental side of your practice. At the end of the day, it's consistency that truly rewires your brain and body, making these connections feel like second nature.
Deepening Your Practice and Staying Consistent
Making the mind-body connection a real, lasting habit is where the physiological adaptations truly happen. It’s less about intensity and more about creating a sustainable practice that builds on itself. Real progress comes from consistently showing up and turning your focus inward to the anatomical sensations.
This is your time to tune out the noise and listen to your body. Instead of just counting reps, can you feel the deep, corset-like wrap of your transverse abdominis during The Dead Bug? Can you sense each individual vertebra articulating as you roll down from a Bridge? This internal, somatic conversation is the heart of a deeper practice.
Using Props to Enhance Your Connection
Simple props like a resistance band or stability ball are more than just tools to make things harder—they're incredible teachers. They provide external tactile feedback, helping your brain connect the dots and understand exactly which muscles need to be firing.
- Resistance Bands: Wrap a band around your thighs during a Bridge. To keep your knees from collapsing inward (hip adduction and internal rotation), you must actively engage your gluteus medius, a key hip stabilizer. The band gives you instant feedback when you lose that connection.
- Stability Balls: Try a Dead Bug while pressing your hands into a stability ball against a wall. It creates a full-body isometric contraction that lights up your entire anterior oblique sling. The ball’s subtle instability forces your nervous system to make constant micro-adjustments, seriously refining your motor control.
- WundaCore Block: Placing a Block between your inner thighs during The Hundred Prep makes your adductors fire, which is a game-changer for stabilizing the pelvis and linking your lower body to your core.
Think of props as a conversation starter between you and your muscles. They can offer support, add a new layer of challenge, or simply provide feedback—all serving the same goal of a stronger, more intuitive mind-body connection.
Strategies for Building a Lasting Habit
Consistency is built on practical strategy, not just sheer willpower. Start by actually scheduling short sessions into your calendar—even 15-20 minutes a day is incredibly effective. A great trick is to "habit stack" by pairing your new routine with something you already do every day, like right after your morning coffee.
To bring an even deeper layer to your practice, you might explore specific mindful meditation techniques for emotional and physical well-being. The goal isn't to create another chore. It's to build a supportive routine that feels good, one that continuously strengthens your internal awareness and feels like a gift to yourself.
Of course. Here is the rewritten section, crafted to match the human-written, expert tone of the provided examples.
Your Top Questions, Answered
Starting a new movement practice always brings up questions. It's totally normal. Building a deeper connection with your body is a personal journey, so let’s get a few of the most common ones out of the way. My goal is to help you start with confidence and a real understanding of what we're doing here.
I usually tell my clients to aim for 3-4 sessions per week. The real magic is in consistency, not killing yourself in every workout. This rhythm gives your neuromuscular system the time it needs to adapt and build new, smarter movement patterns without getting overwhelmed. Remember, rest days are where the progress actually happens.
How Is This Different From Crunches?
This is a big one. People often wonder how these exercises are any different from the crunches they've been doing for years. The answer lies deep inside your anatomy.
This style of movement is all about targeting your deep stabilizing muscles. We zero in on the transverse abdominis (TVA)—which acts like your body's own internal corset—along with your pelvic floor and diaphragm. Think of them as an integrated system that builds stability from the inside out, all powered by controlled, intentional breathing.
Crunches, on the other hand, primarily target the superficial rectus abdominis (your "six-pack" muscle) through spinal flexion. While that muscle has its place, over-relying on it can lead to muscular imbalances, cervical spine strain, and it completely bypasses the deep support system your spine needs for genuine, functional strength.
It really comes down to intentional control versus brute force. Mind-body exercises teach you to activate your deep support system before you even move, creating a stable foundation that protects your spine and enhances all other movements.
Is This Good for People Who Aren't Flexible?
Absolutely. This isn't about achieving extreme ranges of motion. It’s about creating controlled movement and proprioceptive awareness within the range you currently have. The focus is always on the quality of the movement and internal muscular engagement, not how far you can push or stretch.
That's why modifications are a core part of this practice. They allow you to work safely within your personal range of motion, so you can build strength and awareness without pain or strain. It’s all about honoring your body’s unique anatomical structure and starting right where you are today.
Ready to build a stronger connection with your body? At WundaCore, we provide the expertly designed props and anatomy-informed coaching you need to bring the studio experience home. Discover our collection and start moving better today.