The Ultimate Guide to Anatomy-Focused Ankle Resistance Bands Workouts
Ankle resistance bands are a precision tool for building a stronger, more resilient lower body. These simple loops are exceptionally effective for targeting the key stabilizing muscles of the hip complex, particularly the often-neglected gluteus medius and minimus. A deep understanding of the anatomy at play transforms these exercises from simple movements into a powerful method for enhancing stability, improving posture, and preventing injury.
Why an Anatomy-First Approach Is Crucial

To unlock the full potential of ankle bands, we must shift our focus from "feeling the burn" to feeling the correct muscles working. This is the essence of intelligent training. It's not about mindlessly counting repetitions; it's about forging a powerful mind-muscle connection that allows for precise muscular engagement and activation.
When you understand the why behind each movement, the exercise is fundamentally transformed. A simple lateral walk, for example, is no longer just shuffling side-to-side. It becomes a conscious, targeted activation of the gluteus medius, a critical muscle for pelvic stability that often becomes dormant due to modern sedentary lifestyles.
Awakening Neuromuscular Pathways
Modern life often leads to significant muscular imbalances. Hours spent sitting can cause our larger, more dominant muscles, like the quadriceps and hip flexors, to become overactive. Simultaneously, crucial stabilizers like the glutes weaken from disuse. This phenomenon, often called "gluteal amnesia," is a primary cause of faulty movement patterns and instability.
Ankle resistance band workouts are a powerful antidote. They provide targeted, external resistance that forces the central nervous system to recruit and strengthen muscles that traditional exercises can miss. The constant tension from the band essentially "wakes up" these dormant neuromuscular pathways.
By focusing on anatomy, you build strength from the inside out. This isn't just about aesthetics; it's about creating a resilient musculoskeletal foundation that supports every movement, from walking to high-intensity athletic performance.
Correcting Imbalances for Optimal Biomechanics
Targeted resistance helps realign the body and improve fundamental movement patterns. When key stabilizer muscles like the gluteus medius and minimus are strong and active, they effectively control pelvic position and femoral tracking. This creates a cascade of positive biomechanical effects:
- Improved Pelvic Stability: Strong hip abductors prevent the contralateral pelvic drop (Trendelenburg sign) during walking or running.
- Reduced Injury Risk: Proper alignment distributes forces correctly, taking undue stress off the knees, sacroiliac joint, and lumbar spine.
- Enhanced Performance: A stable pelvis acts as a solid base for generating force, allowing for more powerful and efficient movement in all athletic endeavors.
This deliberate, anatomy-first approach is central to creating lasting physiological change. For a deeper dive into this philosophy, you can learn more about how to build functional strength and make every workout count. By understanding precisely which muscles to engage, you turn a simple band into a precision tool for building a stronger, more balanced body.
Connecting With Your Lower Body Anatomy
To maximize the efficacy of your ankle resistance band workouts, it's essential to understand the primary muscles involved. Think of your lower body musculature as an integrated system—when all muscles perform their intended function, your movement is powerful and pain-free. However, when some muscles become inhibited, others must become synergistic dominants, leading to imbalances and dysfunction.
This is where a basic anatomical understanding becomes your superpower. It’s not about memorizing complex charts; it’s about visualizing and feeling the target muscles engage with every single repetition. Let's meet the key players.
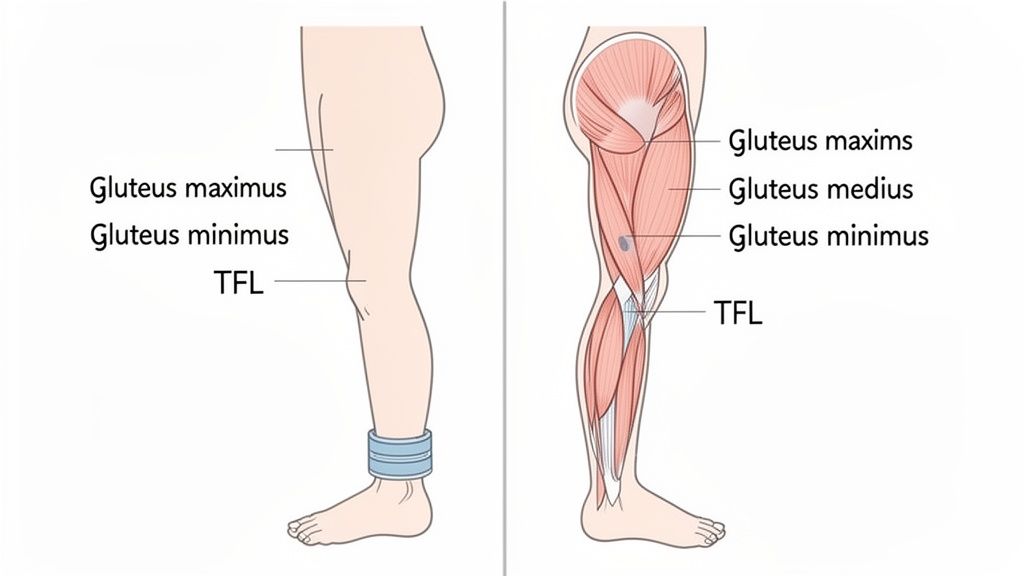
Your Gluteal Complex: The Hip's Control Center
The glutes are not a single muscle but a group of three, each with a distinct biomechanical role. While most people know the gluteus maximus—the largest and most powerful hip extensor—the real magic for stability comes from its supporting partners:
- Gluteus Medius: Located on the lateral aspect of the hip, this muscle is a primary frontal plane stabilizer. It prevents the pelvis from dropping on the opposite side during single-leg stance and is a key hip abductor.
- Gluteus Minimus: Situated deep to the gluteus medius, this smaller muscle assists in hip stabilization and abduction (moving the leg away from the body's midline) and also contributes to internal rotation of the hip.
Ankle band exercises excel because they directly target the often-underdeveloped medius and minimus. These muscles are crucial for pelvic stability and preventing common issues like knee valgus (knock-knees). This focus on functional anatomy is a major reason for the growth in portable fitness equipment. The global resistance bands market is projected to hit USD 1.82 billion by 2025, a significant increase from USD 1.48 billion in 2024. This trend highlights a growing awareness of the benefits of targeted, corrective exercise.
Re-educating Your Musculature
Prolonged sitting can lead to a condition known as "gluteal amnesia," where the glutes become neurologically inhibited. When this happens, other muscles must compensate, a common one being the Tensor Fasciae Latae (TFL), a small muscle located on the anterolateral aspect of the hip.
When the gluteus medius is weak, the TFL often becomes overactive, attempting to perform the role of hip stabilizer. This is problematic because it's not designed for that sustained load. An overworked TFL can lead to hip tightness, contribute to IT band friction syndrome, and cause anterior knee pain. Ankle band workouts help correct this by providing a stimulus that forces the gluteus medius to activate and perform its primary function.
By placing the band around your ankles, you create abduction resistance that makes it nearly impossible for the gluteus medius and minimus to remain passive. You are actively re-educating your neuromuscular system to fire the correct muscles in the correct sequence.
This re-education process is fundamental. As you perform exercises like lateral walks, you're not just strengthening muscles; you're rewiring motor patterns. When you build this on a foundation of good ankle mobility, these movements become even more potent. Check out our guide on how to unlock your ankles for better movement to complement your training.
This conscious engagement is how you build a body that is strong, balanced, and resilient from the ground up.
Your Foundational Ankle Band Exercises
Now that you have a clearer anatomical map, it's time to put that knowledge into practice. Mastering a handful of foundational movements with impeccable form is far more effective than performing numerous exercises with poor technique. We are chasing neuromuscular precision, not just muscular fatigue. The goal is to feel the target muscles contract, keeping your joints safe and aligned.
Let's break down the essential movements for building a strong, stable lower body. The detailed form cues are the key to transforming these simple movements into powerful, corrective exercises. These details differentiate between isolating the glutes and unintentionally compensating with the lumbar spine or TFL.
Lateral Band Walks for Hip Stability
The Lateral Band Walk is a cornerstone of any effective ankle resistance bands workouts. Its primary function is to target the gluteus medius and minimus, the key muscles for hip abduction and frontal plane pelvic stability.
Place the band around your ankles and stand with feet hip-width apart, establishing initial tension. Assume a slight athletic stance with soft knees and a neutral spine, engaging your core musculature. Take a controlled step laterally, leading with the heel to ensure the toes remain pointing forward. Critically, focus on pushing the floor away with the stance leg, rather than just reaching with the moving leg. This action drives the work into the stance leg's gluteus medius.
Common errors include external rotation of the feet (duck feet), lateral trunk flexion (torso rocking), or allowing the feet to touch between steps, which releases the muscular tension. Maintain constant tension by keeping feet hip-width apart. This builds endurance in these crucial postural muscles.
An excellent kinesthetic cue: Imagine your pelvis is a bowl of water. You must keep it perfectly level throughout the movement. Any tipping or twisting indicates compensation. Reduce your step size until you can maintain a perfectly still pelvis.
Glute Kickbacks for Hip Extension
Glute Kickbacks are exceptional for isolating the gluteus maximus, the primary hip extensor responsible for powerful movements and maintaining an upright posture.
Begin in a quadruped position (on all fours), looping the band around the arch of both feet. Before moving, engage your transverse abdominis to create a stable, flat back. Maintaining a 90-degree angle at the knee, slowly press the sole of the working foot back and up toward the ceiling in a pure hip extension movement.
The most critical element is to drive the movement from the glute, achieving a full contraction at the peak of the motion. Avoid the common mistake of swinging the leg or hyperextending the lumbar spine to gain height. The movement should originate entirely from the hip joint. The eccentric phase (lowering the leg) should be slow and controlled, which is equally important for muscle development.
Clamshells to Isolate the Gluteus Medius
The Clamshell is a classic physical therapy exercise renowned for its ability to isolate the gluteus medius, a muscle often found to be weak or underactive. This is a small, precise movement where form is paramount.
Lie on your side with knees bent at approximately a 45-degree angle, ensuring your hips and shoulders are stacked vertically. Place the band just above your knees. Support your head with your bottom arm and place your top hand on the floor for stability.
Keeping your feet in contact and your core engaged to prevent torso rotation, lift your top knee toward the ceiling. The movement must be initiated by the glute medius, not by rocking the pelvis backward. If your hips begin to roll, you have exceeded your active range of motion. This precision strengthens this key stabilizer, which is vital for preventing knee valgus and associated hip and knee pain.
Essential Ankle Band Moves and Their Anatomical Targets
This table is your quick-glance guide to the foundational exercises. Use it to reinforce which muscles you're targeting and the key biomechanical cue to ensure you're getting the most from every repetition.
| Exercise | Primary Muscle Target | Key Performance Cue |
|---|---|---|
| Lateral Band Walk | Gluteus Medius, Gluteus Minimus | Push the floor away; maintain a level pelvis. |
| Glute Kickback | Gluteus Maximus | Initiate from the glute; prevent lumbar hyperextension. |
| Clamshell | Gluteus Medius | Keep feet together; prevent pelvic rotation. |
Think of these three exercises as the foundational motor patterns for hip health. Once you master them, you can progress to more complex and challenging movements.
How to Progress Your Ankle Band Workouts
Mastering the foundational exercises is a significant achievement. However, the human body adapts to stress, a principle known as the General Adaptation Syndrome. To continue making progress, you must systematically increase the demands placed on your muscles. This is the principle of progressive overload, the cornerstone of any effective strength program.
Progress doesn't always mean using the heaviest band. For beginners, the most critical progression is mastering form. Before increasing resistance, focus on increasing reps or sets with a lighter band. This builds muscular endurance and, more importantly, reinforces correct neuromuscular firing patterns. Ensure you are working the target muscles, not compensating with synergists.
When to Increase the Challenge
When you can complete your target sets and reps with perfect form—and the final few reps no longer feel challenging—it’s time to progress. This is a crucial step in any successful ankle resistance bands workouts. You have several variables you can manipulate.
A deeper understanding of the science behind this can be found by exploring the principles of what is progressive resistance training.
The most straightforward progression is using a band with higher tension. This directly increases the mechanical load on the muscles, stimulating further strength adaptations. But it's not your only option.
This infographic illustrates a classic sequence of foundational exercises, perfect for applying these progression principles.
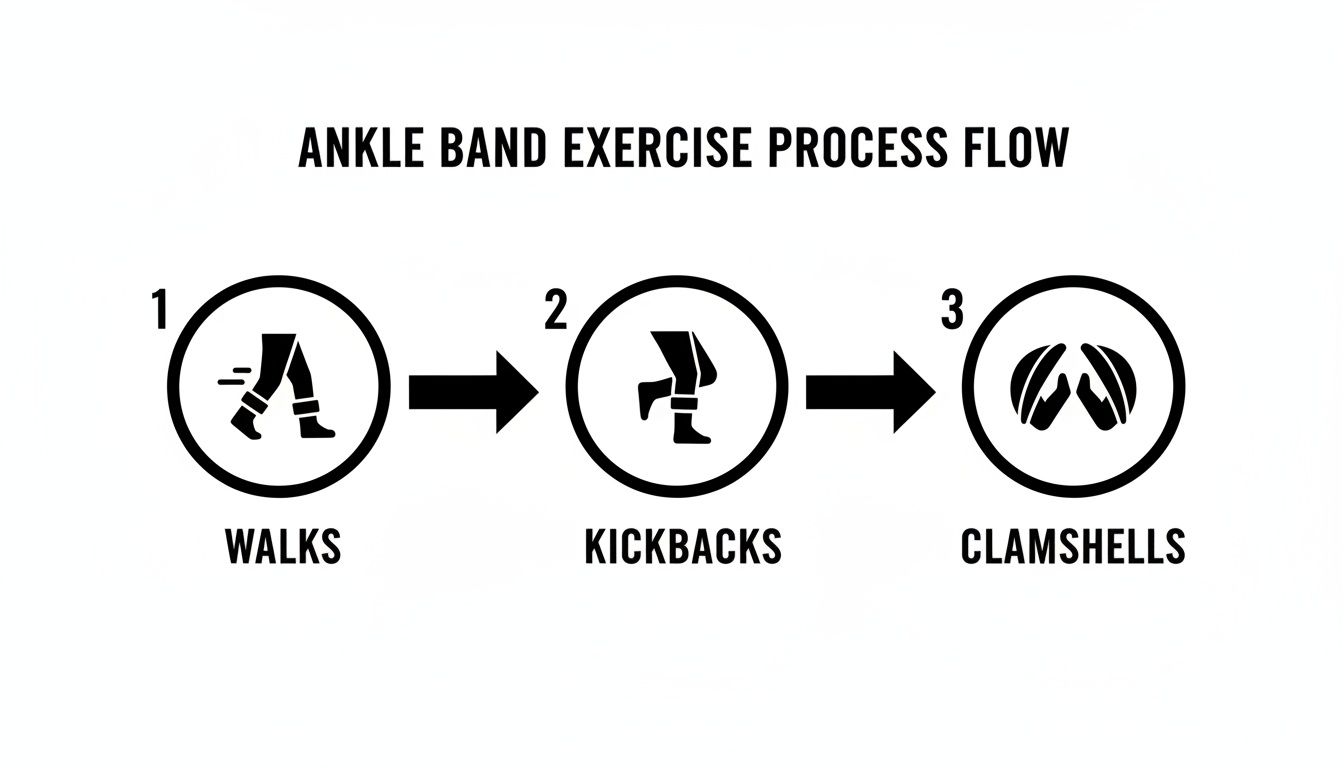
Starting with dynamic movements like walks to warm up the hip complex, then moving to isolated exercises like kickbacks and clamshells, creates a comprehensive activation and strengthening sequence for the gluteal muscles.
Advanced Progression Techniques
For those ready for a greater neuromuscular challenge, it's time to introduce more complex variables. These techniques demand more from your stabilizers, enhancing not just raw strength but also proprioception and balance.
- Add Pulses: At the end range of a movement—like the top of a clamshell—add several small, controlled pulses. This significantly increases the muscle's time under tension, a key driver of hypertrophy and strength.
- Create Supersets: A superset involves performing two exercises back-to-back with no rest. For example, immediately follow a set of lateral walks with a set of glute bridges to target the gluteus medius and maximus in quick succession, inducing greater metabolic stress.
- Introduce Instability: Perform exercises on an unstable surface, such as a foam pad or balance disc. This forces the small intrinsic stabilizer muscles around your ankles, knees, and hips to activate and work harder to maintain balance.
The most crucial principle is to listen to your body. Progression should be challenging, but never painful. If your form degrades, you are likely compensating, which negates the purpose of these targeted exercises. Regress to a level where you can maintain perfect form.
As you advance, exploring broader strategies to get stronger faster can provide more ideas to enhance your overall results. By combining intelligent progression with a solid anatomical understanding, you can continuously evolve your workouts for long-term, sustainable gains.
Designing Your Perfect Workout Routine
Individual exercises are the building blocks, but a well-structured routine is the architectural plan. This is where you strategically sequence movements to achieve a specific physiological outcome. Let's explore some practical templates you can use with your ankle resistance bands, designed for efficiency and maximum anatomical impact.
Think of these routines as more than a list of exercises. They are strategic sequences designed to activate, strengthen, and stabilize key muscle groups, starting with short, targeted circuits and progressing from there.
The 10-Minute Glute Activation Circuit
This rapid circuit is an excellent pre-workout primer for activities like running or lifting, but it's also effective as a standalone routine to counteract the effects of prolonged sitting. The goal is pure neuromuscular activation—waking up your gluteus medius and maximus so they are prepared to stabilize the pelvis and hip.
- Lateral Band Walks: 30 seconds per side. Maintain a level pelvis and drive the movement from the stance leg's glutes.
- Standing Glute Kickbacks: 10 reps per side. Focus on a slow, controlled hip extension, achieving a peak gluteal contraction without lumbar hyperextension.
- Bodyweight Squats (with band above knees): 15 reps. Actively drive the knees outward against the band. This external rotation cue keeps the gluteus medius engaged throughout the squat pattern.
Perform this circuit twice with minimal rest between exercises. You are essentially priming your neuromuscular system, reminding the glutes of their role before you place greater demands on them.
The popularity of effective, home-based fitness solutions is clear. North America is the leading regional market for resistance bands, holding approximately 40.2% of the global market share. This reflects a fitness culture that values accessible, efficient, and intelligent training. You can explore the full resistance bands market report for more on this trend.
The 25-Minute Lower Body Strength Session
This session progresses from activation to building genuine strength and endurance in the hip musculature. It combines dynamic and isolated movements for a comprehensive lower body workout.
- Warm-up: Begin with one round of the 10-Minute Glute Activation Circuit.
- Banded Glute Bridges: 3 sets of 15 reps. Place the band just above the knees. Focus on achieving full hip extension while maintaining tension on the band by driving the knees apart.
- Banded Clamshells: 3 sets of 12 reps per side. Emphasize isolating the gluteus medius by keeping the pelvis stable and the movement deliberate.
- Monster Walks (Forward and Backward): 2 sets of 20 steps each way. This challenges the hip stabilizers in both the sagittal and frontal planes.
While ankle resistance bands are phenomenal for targeting the hip complex, a truly balanced physique requires a holistic approach. It is crucial to incorporate a broader range of essential strength training exercises into your overall regimen to ensure no muscle groups are neglected.
Your Ankle Band Questions, Answered
Let's address some of the most common questions about training with ankle resistance bands. Providing clear, anatomy-focused answers is key to building confidence and ensuring every exercise is both safe and effective.
Most of these questions stem from a desire to achieve results without causing injury. Understanding the biomechanical why behind each movement is transformative for your training.
How Often Should I Do These Workouts?
For building strength in crucial hip stabilizers like the gluteus medius, a frequency of two to four sessions per week on non-consecutive days is optimal.
This schedule allows for adequate recovery, which is when muscle tissue repairs and adapts, leading to strength gains. Overtraining these smaller postural muscles can lead to fatigue and a breakdown in form, which is counterproductive.
Shorter activation circuits can be performed more frequently, often as a warm-up before other physical activities. Consistency is more important than sheer intensity. Listen to your body’s feedback.
Can These Exercises Help With Knee Pain?
In many instances, yes. A significant portion of non-traumatic knee pain, such as patellofemoral pain syndrome, is not caused by an issue at the knee itself. It often originates "upstream" at the hip, from weakness in the gluteal muscles, particularly the gluteus medius.
When this muscle fails to properly stabilize the pelvis, the femur (thigh bone) can drift into excessive adduction and internal rotation, altering the tracking of the patella (kneecap) and placing abnormal stress on the joint.
By strengthening these key hip stabilizers with ankle bands, you improve control over the pelvis and femur, promoting proper knee alignment. This can significantly reduce pain. However, if you have sharp or persistent pain, always consult a physical therapist for a proper diagnosis before starting a new exercise program.
This is the essence of anatomy-focused training. You are not just "working your legs"—you are correcting a functional imbalance at the hip to resolve a biomechanical problem at the knee.
What Resistance Level Is Best for Beginners?
Always begin with a light resistance band. The primary objective is not to overcome maximal resistance but to master perfect form and establish a strong mind-muscle connection with the target anatomy.
You must be able to perform the movement without compensation, such as using momentum or arching the lower back. Proper neuromuscular engagement is far more valuable than the amount of external load.
The right resistance level will make the last two or three reps of a set feel challenging, but still allow you to maintain impeccable technique. If your form falters, the band is too heavy. It is always better to progress slowly and correctly.
Will Ankle Bands Make My Thighs Bigger?
This is a common misconception. The short answer is no. These specific exercises are designed to target the abductor and external rotator muscles of the hip, primarily the gluteus medius and minimus, and the deep external rotators.
They are not designed to significantly hypertrophy the large quadriceps femoris muscles on the anterior thigh.
The aesthetic result of this type of training is a more lifted, sculpted appearance in the glutes and a significant improvement in functional strength and stability. The focus is on sculpting and stabilizing the hips, not adding bulk to the thighs.
Ready to build a stronger, more stable foundation with expertly designed equipment? WundaCore brings the anatomy-focused, studio-quality Pilates experience right into your home. Explore our collection of premium props and on-demand classes today.