The 8 Best Exercises for Hip Mobility in 2026: An Anatomy-Focused Guide
Unlock your body's true potential by focusing on one of its most critical hubs: the hips. Too often, we treat hip mobility as an afterthought, only addressing it when stiffness, lower back pain, or limited movement becomes unavoidable. But what if we approached it proactively? Understanding the intricate anatomy of the hip joint, a sophisticated ball-and-socket structure designed for multi-directional movement, is the first step toward reclaiming fluidity, power, and stability. This joint, where the femur (thigh bone) meets the pelvis, is engineered for a wide range of motion, including flexion, extension, abduction, adduction, and rotation.
In this definitive guide, we move beyond generic stretches to explore a prioritized list of the best exercises for hip mobility, all grounded in the principles of movement science and Pilates-informed coaching. We'll delve into why these specific movements work so effectively, targeting key muscles like the deep external rotators, iliopsoas (hip flexors), and gluteus medius that are crucial for both movement and stability. You will learn not just what to do, but how to perform each exercise with precision for maximum benefit.
This guide provides a comprehensive blueprint, offering actionable steps with clear regressions and progressions suitable for any fitness level. For a deeper exploration into maintaining robust hip health and discovering more movements to enhance flexibility and strength, consider exploring these 8 essential exercises for hip strength and mobility. Whether you're an athlete, a desk worker, or someone navigating the changes of midlife, this is your plan for building strong, mobile hips that support a vibrant, active life.
1. 90/90 Hip Stretch
The 90/90 Hip Stretch is a cornerstone movement in any routine focused on improving hip mobility. Its name comes from the precise joint angles it creates: both the front and back legs are bent at 90 degrees at the hip and the knee. This specific alignment allows you to target the intricate network of muscles surrounding the hip joint with remarkable efficiency, making it one of the best exercises for hip mobility you can perform.
This position is unique because it addresses two critical, often opposing, hip movements at once. Your front leg is in a state of external rotation, deeply stretching muscles like the piriformis and gluteus medius. Simultaneously, your back leg is positioned in internal rotation, targeting often-neglected muscles like the tensor fasciae latae (TFL) and adductors. This dual-action approach makes the 90/90 an incredibly effective tool for unlocking rotational stiffness.
How to Perform the 90/90 Hip Stretch
Proper form is essential to maximize the benefits and prevent compensation from the lower back.
- Starting Position: Sit on the floor. Position your right leg in front of you, bending the knee to 90 degrees so your shin is parallel to your hips. Your right thigh should point straight forward.
- Back Leg Alignment: Position your left leg to the side, also bent at a 90-degree angle. Your left thigh should point directly out from your hip, with your shin running parallel to your torso.
- Posture Check: Sit up tall, creating length through your spine. Try to keep both sit bones grounded, though it's common for the hip of the back leg to lift slightly.
Pilates-Informed Cues and Progressions
To deepen the stretch and engage your core, apply these Pilates principles:
- Regression: If you can't sit upright without rounding your back, place a yoga block or folded towel under the hip of your front leg. This elevation helps you maintain a neutral spine.
- Actionable Tip: Actively press the shin of your front leg into the floor. This engagement helps deepen the external rotation stretch in your glute and piriformis.
- Progression: Once you can sit comfortably upright, begin to hinge forward from your hips over your front shin, keeping your back long. To add a dynamic component, you can perform slow, controlled "sweeps," rotating your torso toward your front knee and then back to center.
- WundaCore Integration: For an advanced challenge, place your hands on the WundaCore Resistance Bar in front of you as you hinge forward. Gently press into the bar to activate your lats and core, creating stability as you deepen the hip stretch.
For optimal results, hold this static stretch for 60-90 seconds per side, focusing on deep, diaphragmatic breaths to encourage the muscles to release. Incorporate it into your routine 3-4 times weekly to see significant improvements in your hip's rotational capacity.
2. Clamshells with Resistance
The Clamshell is a foundational exercise renowned for its ability to isolate and strengthen the muscles responsible for hip stability and external rotation. Its name is derived from the motion of the top leg opening and closing like a seashell. While effective on its own, adding external tension with equipment like the WundaCore Resistance Ring or Loop transforms it into a powerful tool, making it one of the best exercises for hip mobility and strength combined.
This exercise specifically targets the gluteus medius, a key muscle on the side of the hip that acts as a primary hip abductor and stabilizer. Strengthening this muscle is crucial for maintaining proper pelvic alignment, which directly impacts walking mechanics, running form, and reduces the risk of knee and lower back pain. Weakness in the gluteus medius often leads to compensatory patterns, so isolating it with the clamshell is essential for restoring functional movement and stability.
How to Perform the Clamshell
Precision is key to activating the correct muscles and avoiding common mistakes like rocking the hips.
- Starting Position: Lie on your side on a comfortable surface like the WundaCore Movement Mat. Bend your knees to roughly a 45-degree angle, stacking them one on top of the other. Rest your head on your bottom arm.
- Core Engagement: Engage your deep core muscles to stabilize your pelvis and spine. Ensure your hips are stacked vertically, perpendicular to the floor.
- Movement: Keeping your feet together, slowly lift your top knee towards the ceiling without allowing your hips to roll backward. The movement should originate purely from the hip joint. Lower the knee back down with control to complete one repetition.
Pilates-Informed Cues and Progressions
To maximize glute activation and ensure proper form, apply these Pilates-centric principles:
- Regression: Begin without any resistance to perfect the movement pattern. Focus on the mind-muscle connection, feeling the gluteus medius contract with each lift.
- Actionable Tip: Imagine a wall behind your back and keep your hips pressed against it throughout the movement. This cue helps prevent you from rolling backward and ensures the gluteus medius does all the work.
- Progression: Place the WundaCore Resistance Ring or Loop just above your knees. The added resistance will challenge your abductors more intensely, leading to greater strength gains.
- WundaCore Integration: As you lift your top knee against the resistance, press firmly into the WundaCore Resistance Ring. This creates an isometric contraction that deepens the engagement of your hip abductors and stabilizers.
Perform 12-15 controlled repetitions per side for 2-3 sets. Physical therapists and running coaches often recommend this exercise to prevent injuries, and it's a staple in WundaCore routines for building a stable, functional foundation. To understand more about the role of these muscles, you can learn more about how to strengthen hip abductors for enhanced performance and stability.
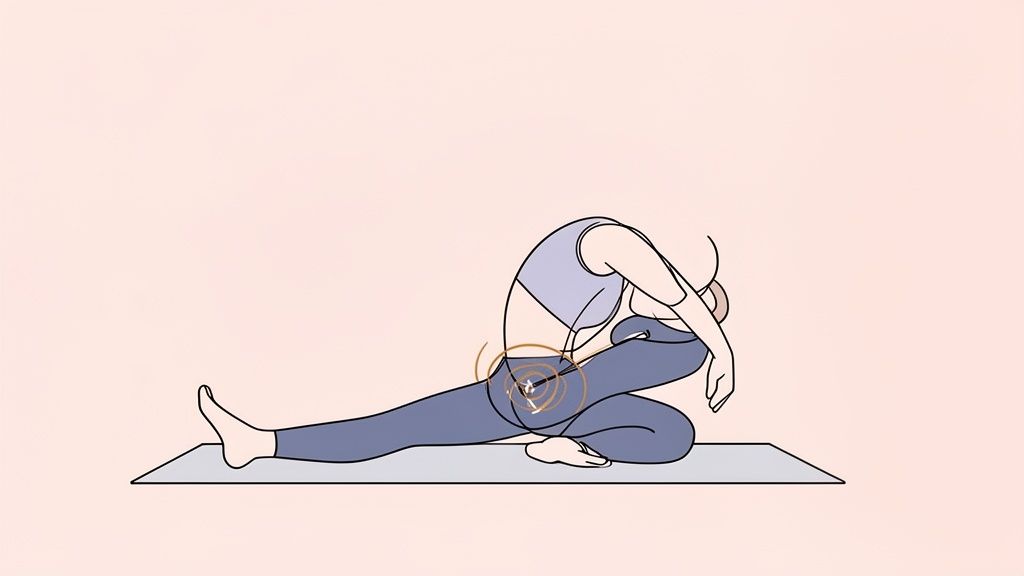
3. Deep Pigeon Pose (Eka Pada Rajakapotasana Prep)
The Deep Pigeon Pose is a potent, yoga-derived stretch that is essential for any serious hip mobility routine. It zeroes in on the external rotators of the hip, delivering an intense, focused release. By flexing one leg in front of the body while extending the other behind, this pose creates a deep stretch through key muscles like the piriformis, gluteus maximus, and the gemelli muscles, making it one of the best exercises for hip mobility, particularly for those with desk jobs or active lifestyles.
This pose is renowned for its ability to address tightness that contributes to sciatica-like symptoms and lower back pain. When the piriformis muscle, which sits deep in the buttock behind the gluteus maximus, becomes tight, it can compress the sciatic nerve. The specific angle of the front leg in Pigeon Pose directly lengthens the piriformis, providing targeted relief and restoring healthy hip function. It's a staple in yoga studios, physical therapy clinics, and post-workout mobility sessions for this very reason.
How to Perform the Deep Pigeon Pose
Proper setup is crucial to protect your knee and maximize the stretch in the target hip muscles.
- Starting Position: Begin in a tabletop position on all fours. Bring your right knee forward and place it behind your right wrist.
- Front Leg Alignment: Angle your right shin so your right foot is somewhere in front of your left hip. The closer your shin is to being parallel with the front of your mat, the more intense the stretch will be.
- Back Leg Alignment: Slide your left leg straight back, keeping your leg and the top of your foot flat on the floor. Square your hips toward the front, ensuring you are not leaning onto your right hip.
Pilates-Informed Cues and Progressions
Focus on alignment and active engagement to get the most out of this powerful stretch.
- Regression: If your right hip is high off the floor or you feel pinching, place a folded blanket or yoga block under your right glute. This support allows your hip muscles to relax into the stretch safely.
- Actionable Tip: Actively press the top of your back foot into the floor. This small action helps to square your hips and deepen the stretch in your hip flexors (psoas and iliacus) on the extended leg.
- Progression: If you feel stable and your hips are squared, begin to walk your hands forward, hinging from your hips to fold your torso over your front shin. Rest on your forearms or stack your fists to support your forehead.
- WundaCore Integration: For enhanced comfort and support, perform this pose on the WundaCore Movement Mat. For a dynamic progression, place your hands on the WundaCore Resistance Bar in front of you and gently press into it as you pulse in and out of the forward fold, engaging your core.
Hold this pose for 60-90 seconds, breathing deeply into the sensation. For a more profound release, you can hold it for up to 2-3 minutes per side. For more ways to improve your body's range of motion, explore these Pilates exercises for flexibility.
4. Fire Log Pose (Agnisthasana)
Often referred to by its Sanskrit name, Agnisthasana, the Fire Log Pose is a powerful and deep-seated stretch that serves as a benchmark for hip-opening progress. Its name visualizes the setup: the shins are stacked one on top of the other, resembling logs ready for a fire. This intense position provides an unparalleled stretch for the external hip rotators, making it one of the most effective and best exercises for hip mobility available.
The primary anatomical target of this pose is the external rotator muscle group, including the gluteus medius, gluteus minimus, and the piriformis. By stacking the shins and flexing the feet, you create a stable lever that allows for a profound release in these often-tight muscles. Physical therapists frequently recommend this pose for individuals experiencing sciatic-like pain, as it can help alleviate tension in a tight piriformis muscle that may be compressing the sciatic nerve.
How to Perform the Fire Log Pose
Precision in setup is key to unlocking the full benefits of Agnisthasana while protecting your knee joints.
- Starting Position: Sit on the floor with your legs extended in front of you. Bend your right knee and place your right ankle on top of your left knee.
- Base Leg Alignment: Now, bend your left knee and slide your left foot underneath your right leg until your left shin is parallel to the front of your mat or room. Your right shin should now be stacked directly on top of your left shin.
- Posture Check: Flex both feet actively to protect your knees. Sit tall, lengthening through your spine, and try to ground both sit bones evenly. If there is a large gap between your top knee and bottom ankle, do not force it down.
Pilates-Informed Cues and Progressions
Use these Pilates-centric cues to refine your alignment and deepen the stretch safely:
- Regression: If you feel intense pinching or your top knee is very high, elevate your hips by sitting on a folded towel or the edge of a WundaCore Movement Mat. This creates more space in the hip socket, making the pose more accessible.
- Actionable Tip: Instead of passively sitting, gently press your top ankle into your bottom knee and your bottom shin into the floor. This active engagement helps the external rotators release more effectively.
- Progression: Once you can sit comfortably upright with your shins stacked, begin to hinge forward from your hips. Maintain a long, neutral spine as you fold, imagining your chest reaching forward rather than down.
- WundaCore Integration: Place the WundaCore Resistance Bar in front of you. As you hinge forward, press your hands firmly into the bar. This action will engage your core and lats, stabilizing your torso and allowing gravity to work more deeply on your hip joint.
For a transformative release, hold this static stretch for an extended period of 90-120 seconds per side. Focus on sending your breath into the sensation in your outer hip, allowing the muscles to soften with each exhale.
5. Lying Hip Internal/External Rotation
Lying Hip Internal/External Rotation is a foundational exercise designed to isolate and improve the rotational capacity of the hip joint in a safe, controlled manner. Performed while lying on your back (supine), this movement minimizes the influence of gravity and the need for spinal stabilization, allowing you to focus purely on the ball-and-socket action of the femur within the pelvis. This makes it one of the best exercises for hip mobility for individuals at any fitness level, particularly those beginning their mobility journey.
The primary benefit of this exercise is its ability to directly address both internal rotation (turning the thigh inward) and external rotation (turning the thigh outward) without compensation. By keeping the pelvis and lumbar spine stable against the floor, you ensure the movement originates purely from the hip capsule. This targeted approach is invaluable for re-educating movement patterns, improving joint lubrication, and gently stretching key muscles like the gluteus medius, minimus, and the deep external rotators (like the piriformis).
How to Perform Lying Hip Internal/External Rotation
Maintaining a stable pelvis and a neutral spine is crucial for isolating the hip joint.
- Starting Position: Lie on your back on a comfortable surface like the WundaCore Movement Mat. Bend your knees and place your feet flat on the floor, hip-width apart. Lift your right leg so your thigh is perpendicular to the floor and your knee is bent at 90 degrees (a "tabletop" position).
- Internal Rotation: Keeping your thigh perfectly still, slowly rotate your shin inward toward the midline of your body. Move only as far as you can without your pelvis rocking or your lower back arching.
- External Rotation: From the center, slowly rotate your shin outward, away from the midline of your body. Again, focus on isolating the movement to the hip joint. Complete 10-12 full rotations before switching to the left leg.
Pilates-Informed Cues and Progressions
Apply these principles to enhance the effectiveness of the movement and connect with your deep core stabilizers:
- Regression: If you struggle to maintain the tabletop position without arching your back, perform the movement with your foot resting on a low stool or yoga block. This reduces the load on your hip flexors and core.
- Actionable Tip: Imagine a laser beam pointing from your kneecap straight to the ceiling. As you rotate your lower leg in and out, that laser beam should not move. This cue helps you prevent your thigh from moving and truly isolates rotation within the hip socket.
- Progression: To deepen the activation of the adductors (inner thighs) and pelvic floor, place the WundaCore Resistance Ring between your knees. Gently squeeze the ring as you perform the rotations on both legs simultaneously.
- WundaCore Integration: For an advanced progression that challenges core stability, perform the exercise with both legs in a tabletop position. Place the WundaCore Resistance Bar across your shins and press gently upward into the bar to engage your core as you perform the rotations.
Focus on coordinating the movement with your breath: exhale as you rotate your shin in or out, and inhale as you return to the center. Perform this exercise 2-3 times per week as part of a warm-up or cool-down to improve functional hip mobility.
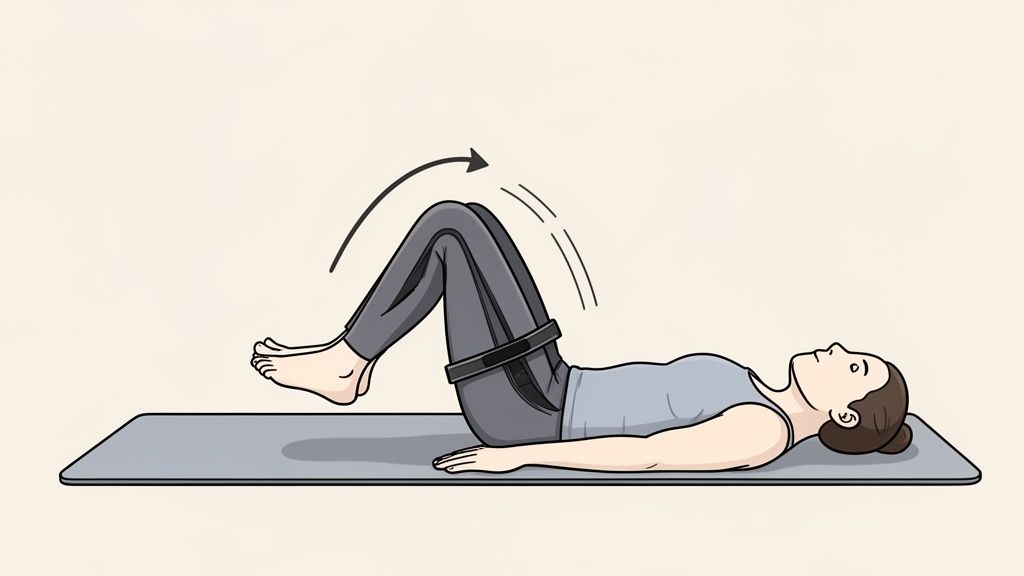
6. Glute Bridge with Hip Abduction Pulse
The Glute Bridge with Hip Abduction Pulse transforms a foundational strengthening exercise into a dynamic mobility drill. This compound movement is far more than just a glute squeezer; it actively targets hip extension and abduction, two critical movement patterns essential for stability, power, and pain-free function. By adding the abduction pulse, you challenge the hip's outer muscles, making this one of the best exercises for hip mobility that simultaneously builds strength.
This exercise directly counteracts the effects of prolonged sitting, which often leads to shortened hip flexors and dormant gluteal muscles. The bridge phase promotes hip extension, lengthening the muscles at the front of the hip (like the iliopsoas). The pulse phase activates the hip abductors, primarily the gluteus medius and minimus. These muscles are crucial for pelvic stability when walking, running, and climbing stairs, and strengthening them is key to improving overall hip joint health.
How to Perform the Glute Bridge with Hip Abduction Pulse
Focus on control and muscle engagement rather than speed to get the most out of every repetition.
- Starting Position: Lie on your back with your knees bent and feet flat on the floor, about hip-width apart and close enough that you can touch your heels with your fingertips. Place a resistance band or ring just above your knees.
- The Bridge: Exhale and press through your heels to lift your hips toward the ceiling until your body forms a straight line from your shoulders to your knees. Squeeze your glutes at the top, ensuring you don't over-arch your lower back.
- The Pulse: At the top of the bridge, press your knees outward against the resistance, hold for a moment, and then return your knees to the starting width with control. This completes one pulse. Perform the desired number of pulses before lowering your hips.
Pilates-Informed Cues and Progressions
Applying Pilates principles will enhance core connection and gluteal activation.
- Regression: If you feel this in your hamstrings or lower back, perform the bridge without the pulse or resistance. Focus on initiating the movement by tilting your pelvis posteriorly (tucking your tailbone) before lifting.
- Actionable Tip: Maintain a constant, light tension on the band even when your knees are not actively pulsing. This ensures your hip abductors remain engaged throughout the entire movement.
- Progression: Increase the challenge by performing the exercise on a single leg. Extend one leg straight out while keeping your hips level as you lift and pulse with the standing leg. This dramatically increases the stability demand on the hip.
- WundaCore Integration: For enhanced comfort and feedback, place the WundaCore Movement Mat under your shoulders. Use the WundaCore Resistance Ring between your knees for a tactile and effective resistance source during the pulsing phase. Pressing into the ring provides consistent tension to maximize muscle recruitment.
For a focused effort, aim for 3 sets of 15-20 pulses. This powerful combination of strengthening and mobilization can significantly improve your hip function when performed 3-4 times per week.
7. World's Greatest Stretch (Hip Mobility Complex)
The World's Greatest Stretch (WGS) earns its ambitious name by being one of the most efficient, full-body mobility sequences you can perform. It's not just a single stretch but a dynamic complex that seamlessly integrates a lunge, a twist, and a hamstring stretch into one fluid movement. This makes it a powerhouse addition to any list of the best exercises for hip mobility, as it targets multiple planes of motion and addresses several key muscle groups at once.
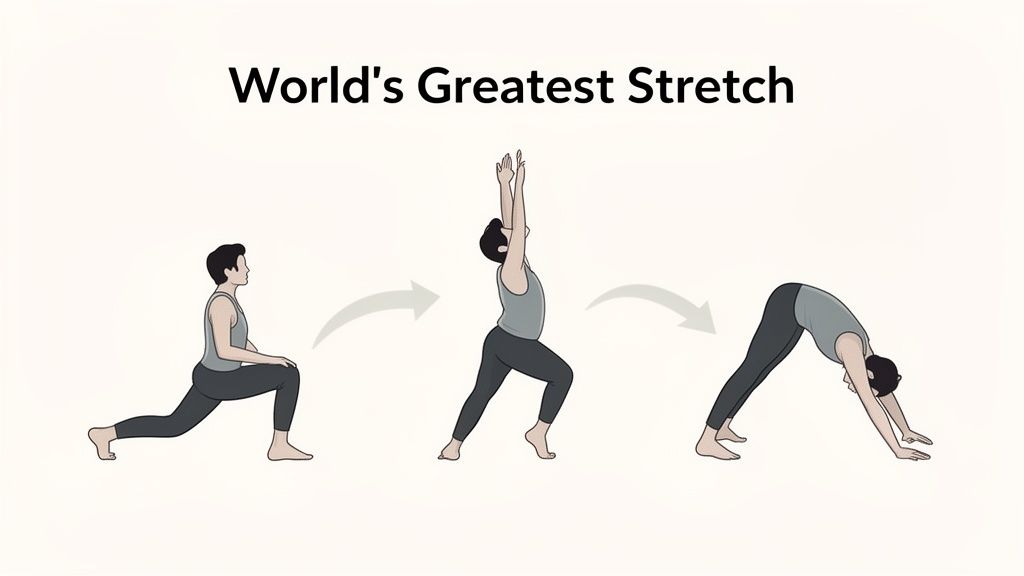
The brilliance of the WGS lies in its multi-joint approach. The initial lunge position creates a deep stretch in the hip flexors (psoas and iliacus) of the back leg while simultaneously opening the hip of the front leg. The subsequent thoracic rotation mobilizes the upper spine and engages the obliques, while the final hamstring stretch targets the entire posterior chain. This integrated flow prepares the body for complex movements, making it a staple in athletic warm-ups and physical therapy protocols.
How to Perform the World's Greatest Stretch
Coordinating your breath with the movement is key to unlocking the full benefits of this sequence. Move with intention, not speed.
- Starting Position: Begin in a high plank position with your hands directly under your shoulders and your core engaged.
- Lunge Forward: Step your right foot to the outside of your right hand, sinking your hips low into a deep lunge. Ensure your front knee is stacked over your ankle.
- Elbow to Instep: Drop your right elbow down toward the instep of your right foot, deepening the stretch in your right hip (adductors) and left hip flexor.
- Thoracic Rotation: Place your right hand back on the floor, then lift it toward the ceiling, twisting your torso to the right. Follow your hand with your eyes to encourage full spinal rotation.
- Hamstring Stretch: Return your hand to the floor. Straighten your front leg as much as possible, hinging at the hips to feel a stretch through the back of your right thigh. Return to the plank position and repeat on the other side.
Pilates-Informed Cues and Progressions
Applying Pilates principles will enhance control, stability, and the overall effectiveness of this dynamic stretch.
- Regression: If you can't get your elbow to the floor, place yoga blocks under your hands to reduce the distance. You can also break the sequence down, mastering each component individually before linking them together.
- Actionable Tip: As you lunge, think of actively tucking your tailbone slightly to intensify the stretch on the back leg's hip flexor. During the rotation, exhale fully to deepen the twist and engage your obliques.
- Progression: To advance the movement, focus on increasing your range of motion in each phase. Sink deeper into the lunge, rotate further through your thoracic spine, and work toward fully straightening your front leg in the hamstring stretch.
- WundaCore Integration: Perform the entire sequence on the WundaCore Movement Mat. The mat's superior grip provides the stability needed to confidently move through each position, allowing you to focus on form and breath without your hands or feet slipping.
Incorporate 5-8 repetitions per side into your warm-up routine. This sequence is particularly effective before a run, a lower-body strength session, or a Pilates class, as it dynamically prepares the hips, hamstrings, and spine for more demanding work.
8. Copenhagen Adductor Activation with Hip Strengthening
While many hip mobility routines focus on stretching and opening the outer hips, strengthening the inner thigh muscles, or adductors, is equally critical for balanced function. The Copenhagen Adductor Activation is a targeted exercise that builds strength in this often-neglected muscle group, making it one of the best exercises for hip mobility through stability. Strong adductors are essential for controlling leg movement, stabilizing the pelvis, and preventing knee and groin injuries.
This exercise directly addresses the adductor longus, adductor brevis, adductor magnus, pectineus, and gracilis muscles. By strengthening this group, you provide crucial support to the hip joint, ensuring it moves correctly within its socket. This stability prevents compensatory movements that can lead to stiffness and pain, particularly in the outer hips and lower back, thereby enhancing overall mobile capacity.
How to Perform Copenhagen Adductor Activation
Proper alignment is key to isolating the adductors and protecting your spine.
- Starting Position: Lie on your side with your hips and shoulders stacked vertically. Bend your knees and place a foam block, folded towel, or the WundaCore Block between them.
- Core Engagement: Gently draw your navel toward your spine to engage your core, creating a stable base. Extend your top arm along the floor for balance or prop your head up on your bottom hand.
- Adductor Squeeze: Exhale and deliberately squeeze the block between your knees, feeling the activation deep in your inner thighs. Hold the contraction for 2-3 seconds, focusing on the quality of the engagement.
- Release: Inhale and release the pressure slowly and with control, without fully disengaging the muscles.
Pilates-Informed Cues and Progressions
Applying Pilates principles will deepen the muscular connection and enhance the effectiveness of the exercise.
- Regression: If you feel any strain in your lower back, ensure your knees are pulled slightly closer to your chest. Focus on a smaller, more controlled squeeze to build foundational strength.
- Actionable Tip: Imagine you are trying to press the block so firmly that it might pop. This mental cue enhances the mind-muscle connection and maximizes adductor recruitment. Maintain a stable pelvis throughout; avoid rocking backward or forward.
- Progression: For a greater challenge, wrap a resistance band, like the WundaCore Loop, around your thighs just above the knees. Squeeze the block while also maintaining outward tension against the band. This progression engages both the adductors and abductors simultaneously for comprehensive hip strengthening. For more ways to incorporate bands, you can explore other powerful exercises with resistance bands.
- WundaCore Integration: Place the WundaCore Block between your knees. Its dense, supportive foam provides consistent feedback, helping you maintain even pressure and proper form throughout each repetition.
For optimal results, perform 15-20 controlled squeezes per side. Incorporate this activation drill into your warm-up or as part of a balanced lower body routine 3-4 times a week to build the stability needed for true, functional hip mobility.
Top 8 Hip Mobility Exercises Comparison
| Exercise | Complexity 🔄 | Resources ⚡ | Expected Outcomes ⭐ | Ideal Use Cases 📊 | Key Advantages 💡 |
|---|---|---|---|---|---|
| 90/90 Hip Stretch | 🔄 Low — simple setup, technique-focused | ⚡ Minimal — mat optional | ⭐ Improves external rotation & hip opening | 📊 Warm-up/cool-down, desk-workers, mobility sessions | 💡 Accessible, scalable, no equipment |
| Clamshells with Resistance | 🔄 Low — form important to isolate glute medius | ⚡ Low — resistance loop/ring + mat recommended | ⭐ Strengthens gluteus medius; improves lateral stability | 📊 Rehab, injury prevention, runners, postpartum programs | 💡 Low-impact, easy progression, targeted abductor work |
| Deep Pigeon Pose (Prep) | 🔄 Moderate — requires hip flexibility and patience | ⚡ Minimal — bolster/mat advised for comfort | ⭐ Deep external rotator stretch; relieves piriformis tension | 📊 Yoga, deep mobility work, post-strength cool-downs | 💡 Very effective for chronic tightness; use props to modify |
| Fire Log Pose (Agnisthasana) | 🔄 Low–Moderate — baseline flexibility helpful | ⚡ Minimal — cushion or elevated seat helpful | ⭐ Balanced bilateral hip opening; reduces sciatic irritation | 📊 Bilateral mobility, accessible alternative to pigeon | 💡 Safer for beginners; promotes even hip development |
| Lying Hip Internal/External Rotation | 🔄 Low — controlled, safe movement pattern | ⚡ Minimal — mat; optional resistance ring | ⭐ Improves internal/external rotation while protecting lumbar spine | 📊 Warm-ups, rehab, proprioceptive work for all levels | 💡 Extremely safe, bilateral, easy to progress with resistance |
| Glute Bridge with Hip Abduction Pulse | 🔄 Moderate — requires glute-dominant activation | ⚡ Low — mat; resistance ring recommended for pulses | ⭐ Builds hip extension and abductor strength; improves function | 📊 Strength training, counteracting prolonged sitting, athletes | 💡 High functional carryover; scalable intensity |
| World's Greatest Stretch (Hip Mobility Complex) | 🔄 High — multi-phase coordination and control | ⚡ Minimal — mat; time-efficient sequence | ⭐ Broad multi-plane mobility gains (hips, thoracic, hamstrings) | 📊 Dynamic warm-up, athletes, busy professionals seeking efficiency | 💡 Efficient full-body mobility; integrates functional patterns |
| Copenhagen Adductor Activation | 🔄 Moderate — mindful activation to avoid compensation | ⚡ Low — block/foam or loop + mat | ⭐ Strengthens adductors; improves frontal-plane stability and alignment | 📊 Injury prevention, team sports, balanced hip programs | 💡 Addresses often-neglected adductors; complements glute work |
Integrating Hip Mobility Into Your WundaCore Practice
True, lasting hip mobility is not a one-time achievement unlocked through a few isolated stretching sessions. It is a dynamic quality cultivated through the consistent, intelligent integration of movement into your regular fitness practice. The roundup of the best exercises for hip mobility you’ve just explored provides a powerful toolkit, but its real, transformative value is unleashed when you weave these movements into a structured, holistic program like the one offered by WundaCore.
Think of your hip joint, the acetabulofemoral joint, as a sophisticated ball-and-socket mechanism designed for multi-directional movement. To unlock its full potential, you need a balanced diet of mobilization, stabilization, and strengthening. This is where a strategic approach becomes paramount.
From Theory to Practice: A WundaCore Blueprint
Simply knowing the exercises is only the first step. The key to unlocking profound and sustainable changes in your hip health lies in thoughtful application. By layering these targeted drills into your WundaCore routine, you create a powerful synergy between building strength and enhancing flexibility, fundamentally transforming how your body feels and performs.
Here is a practical blueprint for integration:
- Warm-Up Activation: Begin each WundaCore session by priming the hip capsule. Incorporate dynamic movements like Lying Hip Internal/External Rotations to lubricate the joint and the World's Greatest Stretch to awaken the surrounding musculature. This sends a clear signal to your nervous system that the hips are preparing for a full range of motion.
- Strengthen and Stabilize: During the core of your workout, layer in the strengthening exercises. Use the WundaCore Resistance Ring to add a new dimension to Clamshells, ensuring the deep external rotators are firing. Integrate the Glute Bridge with an Abduction Pulse using a WundaCore Loop to simultaneously strengthen your glutes and challenge your abductors, the key stabilizers for the pelvis.
- Cool-Down and Lengthen: As you wind down, dedicate focused time to passive and active-assisted stretches. Use the cushioned support of the WundaCore Movement Mat to comfortably hold deeper poses like the 90/90 Hip Stretch or Deep Pigeon Pose. This is your opportunity to release accumulated tension and gradually encourage the tissues to adapt to new, greater ranges of motion.
Key Insight: Mobility is not just flexibility. It is usable range of motion, which requires a foundation of stability and strength. By strengthening the muscles that support the hip (glutes, adductors, core), you provide the joint with the security it needs to move freely and safely.
The Bigger Picture: Beyond the Mat
Mastering these hip mobility exercises is about more than just achieving a deeper stretch or a more fluid squat. It's about restoring a fundamental human movement pattern that impacts everything you do. Enhanced hip mobility translates directly into a more efficient gait, reduced lower back pain, improved athletic performance, and a greater sense of ease in daily activities like climbing stairs or playing with your children.
For those who engage in repetitive-motion activities like running, this work is non-negotiable. Healthy hip function is critical for shock absorption and powerful propulsion, directly impacting performance and injury resilience. To truly optimize your movement and minimize injury risk, consider supplementing your targeted hip mobility work with these essential stretches for runners.
Ultimately, by committing to a consistent practice that prioritizes hip health, you are investing in your long-term physical autonomy and vitality. You are building a body that is not only strong and flexible but also resilient and capable of moving through life with power and grace.
Ready to transform your mobility and build a stronger, more connected core? The WundaCore system provides the tools and guidance to integrate these principles seamlessly into your life. Experience the synergy of dynamic resistance and mindful movement to unlock your body's true potential. Explore WundaCore today and start your journey toward profound, sustainable hip mobility.