How to Fix Anterior Pelvic Tilt: An Anatomical Guide
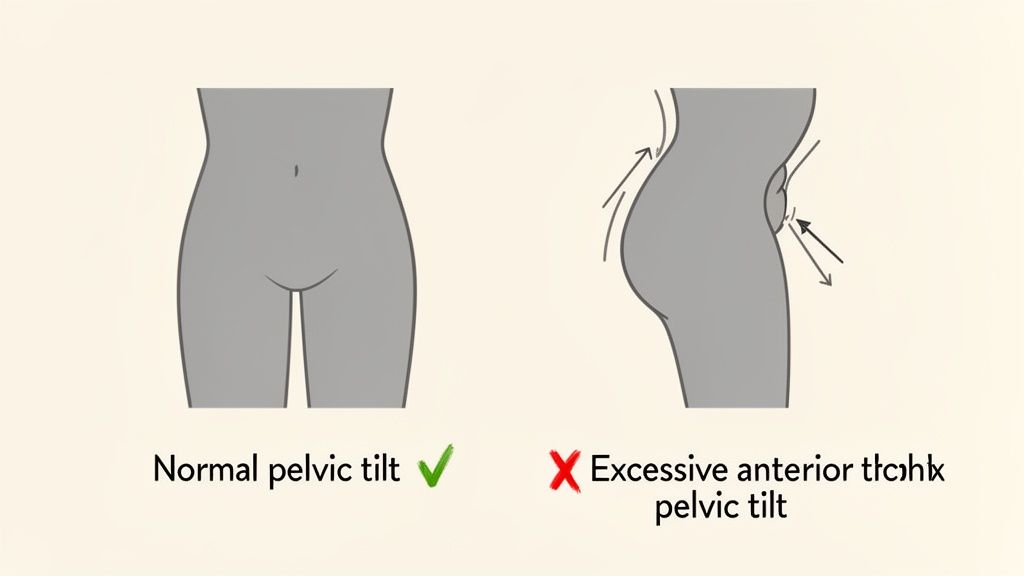
Before we jump into any corrective exercises, let’s get one thing straight: not all anterior pelvic tilt needs "fixing." A slight forward tilt of the pelvis—where the anterior superior iliac spines (ASIS) are slightly lower than the posterior superior iliac spines (PSIS)—is a natural part of human anatomy, especially for women.
The real problem starts when that tilt becomes excessive. That’s when you get the muscular imbalances that can cause a ripple effect of biomechanical issues throughout your body. So, our goal isn't to eliminate the tilt, but to restore a balanced anatomical relationship between the pelvis, lumbar spine, and femurs. It’s all about strengthening the muscles that are lengthened and underactive—like the gluteus maximus and deep core muscles—while releasing the ones that are short and overactive, such as the hip flexors and lumbar erectors.
Is Your Pelvic Tilt Actually a Problem?
I see it all the time. Someone notices a slight arch in their lower back (lumbar lordosis) or that their abdomen protrudes a bit, and they immediately self-diagnose a postural problem that needs an aggressive fix.
But here's the thing: our bodies aren't designed to hold a perfectly flat, rigid "neutral" spine 24/7. Your pelvis is meant to move, and a healthy, functional body can easily shift between an anterior and posterior tilt through the lumbopelvic-hip complex.
Understanding Your Natural Alignment
Your unique skeletal structure—the shape of your iliac crests, the angle of your sacrum—and daily habits play a huge role in where your pelvis naturally sits. For some people, a bit of an anterior tilt is just their anatomical normal. For others, it’s a direct result of spending eight hours a day at a desk, which leads to shortened hip flexors and lengthened, underused gluteal muscles.
The objective isn’t to force your pelvis into some "perfect" alignment. It’s about creating a balanced system where you can move freely and without pain. This means building enough core and glute strength to support a more centered posture while also improving the flexibility of those chronically tight hip flexors and lumbar erector spinae muscles.
A truly functional body isn't one that holds a perfect static posture. It's one that can effortlessly move through various positions, supported by a balanced muscular system, and return to a stable, efficient resting alignment.
The distinction between a natural tilt and an excessive one is key. To help clarify, let's break down the differences.
Natural vs Excessive Anterior Pelvic Tilt
This table summarizes the key distinctions between a normal anatomical position and a tilt that might benefit from corrective work.
| Characteristic | Natural Pelvic Position | Excessive Anterior Pelvic Tilt |
|---|---|---|
| Lower Back | Gentle, natural lumbar curve. | Pronounced "swayback" or hyperlordosis. |
| Abdominals | Deep core muscles provide basal support. | Abdomen protrudes due to organ displacement. |
| Glutes | Appear relaxed and naturally shaped. | Gluteus maximus often appears lengthened and underactive. |
| Symptoms | Generally asymptomatic; moves without pain. | May cause low back pain, hip tightness, or stiffness. |
| Muscle Balance | Balanced tension between antagonistic muscle groups. | Tight hip flexors/erector spinae; weak glutes/abs. |
Ultimately, this isn't about achieving a "perfect" posture, but rather a functional one that serves your unique anatomy.
When Does Pelvic Tilt Become a Concern?
So, how do you know when your natural curve has crossed the line into a problem? An anterior pelvic tilt becomes a real concern when it’s excessive and starts causing symptoms like:
- Chronic lower back pain or a constant feeling of stiffness
- Persistent tightness in your iliopsoas and hamstrings
- Weak, underactive, or "sleepy" glutes (gluteal amnesia)
- A very noticeable "swayback" posture (hyperlordosis)
While many people live with a significant tilt without any pain, it can sometimes contribute to discomfort or more serious issues down the road. If your tilt comes with nagging pain, it might be worth digging a bit deeper. This pelvic pain guide is a comprehensive resource that can offer more insight into the various causes of pelvic discomfort.
At the end of the day, the question isn't whether you have an anterior pelvic tilt. It’s whether that tilt is excessive enough to cause pain or dysfunction in your body. Understanding this difference is the first step toward a smarter, more effective approach to improving your posture and feeling better in your own skin.
The Muscular Imbalances Driving Pelvic Tilt
At its core, an excessive anterior pelvic tilt is a story about opposing muscle groups in a state of imbalance. It’s like a constant game of anatomical tug-of-war happening around your lumbopelvic-hip complex.
Think of your pelvis as the central hub of your skeleton, with muscles attaching from all sides. When these muscles exhibit balanced strength and flexibility, they create a "force couple" that holds your pelvis in a stable, neutral position.
But our modern lives, especially all the time we spend sitting, have a knack for throwing this balance way off. This creates a predictable pattern of dysfunction: some muscles get chronically shortened and overactive, while others become lengthened and weak. This muscular tug-of-war is exactly what pulls your pelvis forward and down, creating that excessive tilt.
The Overactive and Tight Muscles
Let's start with the muscles that are pulling way too hard. These are the main culprits actively yanking the anterior (front) aspect of your pelvis downward. For most of us, these muscles have become shortened and hypertonic due to our daily habits.
The key players on this team are:
- Hip Flexors (Iliopsoas and Rectus Femoris): The iliopsoas originates on the lumbar spine and inside of the pelvis, inserting on the femur. The rectus femoris originates on the anterior iliac spine and also inserts on the tibia via the patellar tendon. When you sit for hours, they're held in a shortened position. That constant tension is what pulls the front of the pelvis downward and forward.
- Lumbar Extensors (Erector Spinae): This group of muscles runs along your spine. With an anterior tilt, they tend to become overactive and tight as they compensate for a weak core and pull the posterior (back) of the pelvis upward, creating the noticeable arch in your lower back.
Just picture a full workday at your desk. Your hip flexors are shortened for eight hours straight. When you finally stand up, they don’t just magically lengthen back to normal. They retain some of that tonicity, maintaining a constant downward pull on the anterior pelvis.
The Underactive and Weak Muscles
On the other side of this tug-of-war are the muscles that have been stretched out and neurologically inhibited. They're supposed to counteract the pull from the tight group, but they’ve become too weak to do their job effectively.
This opposing team includes:
- Abdominals (Transverse Abdominis and Obliques): Your deep abdominal muscles, especially the transverse abdominis, act like a natural corset, providing intra-abdominal pressure to support your spine and posteriorly tilt the pelvis. When weak, they can't provide the counter-tension needed to stop the front of the pelvis from dipping down.
- Glutes (Gluteus Maximus and Medius): Your glutes are powerful hip extensors and external rotators that should be pulling the back of the pelvis down, perfectly balancing the pull of the hip flexors. But chronic sitting leaves them in a lengthened, inactive state—sometimes called "gluteal amnesia." A weak gluteus medius, in particular, can destabilize the pelvis in the frontal plane. You can find some great targeted routines with these exercises for gluteus medius to help wake these crucial stabilizers back up.
This whole dynamic is often called Lower Crossed Syndrome, a concept developed by Vladimir Janda. It perfectly describes the "X" pattern of imbalance: tight hip flexors and lumbar extensors crossing paths with weak abdominals and gluteals. This framework gives us a clear picture of the anatomical tug-of-war behind anterior pelvic tilt.
Beyond the usual suspects, another huge player is the pelvic floor. The importance of pelvic floor health is a critical piece of the puzzle. These deep muscles form the foundation of your core, working in sync with your transverse abdominis and glutes to support proper pelvic alignment.
Understanding this specific pattern of tight-versus-weak muscles is the single most important step in correcting an anterior pelvic tilt. It shows us why our strategy isn't about random stretching or strengthening. It’s about targeted exercises designed to inhibit and lengthen the overactive muscles and activate the underactive ones to restore true anatomical balance.
How to Assess Your Pelvic Alignment at Home
Before we can start correcting anything, we need to get familiar with how your body is currently aligned. Think of this as gathering intel. Gaining this awareness is the real first step toward correcting an anterior pelvic tilt, and the good news is you don’t need any fancy equipment. Just a wall, a flat surface like your bed, and a few minutes to connect with your body.
These simple self-assessments will give you a clear baseline of where you're starting from. You'll begin to understand which muscles are tight and which might be weak, allowing you to approach the corrective exercises we'll cover later with purpose and precision.
The Wall Test for Spinal and Pelvic Alignment
One of the quickest ways to check your standing posture is the Wall Test. It’s a simple diagnostic that instantly highlights the relationship between your spine, pelvis, and core engagement by assessing your lumbar curve.
Here’s how you do it:
- Stand with your back against a solid wall. Your heels should be about two to four inches away from the wall.
- Make sure your head, shoulder blades, and sacrum are all touching the wall. This is your starting position.
- Now, just slide one hand into the space between your lower back (lumbar spine) and the wall.
What you feel in that space tells a story. If there's a small gap where your hand fits snugly, that points to a relatively neutral spinal curve and a balanced pelvic position.
However, if you can easily slide your entire forearm through a large, arched space, that’s a strong sign of excessive lumbar lordosis, which is characteristic of an anterior pelvic tilt. It usually means your lumbar extensors are overactive and your deep abdominal muscles are underactive.
The Thomas Test for Hip Flexor Tightness
The Thomas Test is a classic assessment physical therapists use to check the length of the hip flexor muscles—specifically the iliopsoas and rectus femoris. Tightness here is a primary driver of anterior pelvic tilt, as these muscles pull the anterior aspect of the pelvis down toward the femur.
You can perform a modified version right at home.
- Lie on your back on a sturdy table, a firm bench, or even just the edge of your bed.
- Let your legs hang off the edge from the knee down.
- Pull one knee in firmly toward your chest, holding it there with both hands. This should help flatten your lumbar spine against the surface.
- Allow the other leg to hang completely free.
Now, observe your hanging leg. Does the back of your thigh lift off the surface? If so, that signals tight iliopsoas on that side. If your thigh stays down but your knee starts to straighten (extend), that points more specifically to tightness in the rectus femoris, which crosses both the hip and knee joints.
Key Takeaway: If the back of your thigh can't rest flat on the surface during the Thomas Test, it's a clear indication that your hip flexors are pulling your pelvis forward into that anterior tilt. This simple test directly exposes the "tight" side of the muscular imbalance equation.
This visual gives you a great breakdown of the muscular "tug-of-war" that's happening.
You can see how overactive, tight muscles on one side pull against weakened, lengthened muscles on the other. It's this constant opposition that creates the imbalance.
By doing both the Wall Test and the Thomas Test, you're creating a much more complete picture of your unique postural pattern. The Wall Test shows you the overall result—that excessive low back curve—while the Thomas Test helps you pinpoint one of the main anatomical culprits. This self-assessment is your starting point for tracking progress as you begin your journey to restore balance.
Your Pilates-Based Plan to Restore Pelvic Balance
Okay, you've done the work to understand the muscular tug-of-war behind your anterior pelvic tilt and you’ve even assessed your own alignment. Now for the fun part: putting that knowledge into action.
Fixing this isn't about doing a thousand crunches or constantly tucking your tailbone under. That's just chasing symptoms. Instead, we need a smarter, two-pronged strategy: inhibit and lengthen the short, overactive muscles, then activate and strengthen the long, underactive ones.
This Pilates-based approach is all about creating balance from the inside out. We'll start by unlocking the stiff spots and then build deep, functional strength to teach your body a new, more efficient neuromuscular pattern.
Release and Lengthen Overactive Muscles
First, we must down-regulate the nervous system's input to the muscles that are working overtime—your hip flexors and lumbar extensors. Trying to strengthen your glutes while your hip flexors are still in a death grip is like driving with the emergency brake on. You'll create faulty movement patterns.
We need to release that hypertonicity first. A targeted combo of stretching and foam rolling is perfect for this. The goal is to use autogenic inhibition to send a clear signal to your nervous system to let go of that constant pull.
- Kneeling Hip Flexor Stretch: This is the undisputed champ for isolating the iliopsoas and rectus femoris. From a half-kneeling position, engage your core and glute on the back leg to create a slight posterior pelvic tilt until you feel a stretch in the front of your hip. Hold for 30-45 seconds and breathe into it. The key is to avoid arching your back; the movement must originate from the pelvis.
- Quad Foam Rolling: Your rectus femoris is not just a hip flexor; it's also one of your main quadriceps muscles. Lie face-down with a foam roller under one thigh. Prop yourself up on your elbows and slowly roll from the bottom of your hip (ASIS) to just above your knee. When you find a tender spot, pause and breathe for 20-30 seconds. Let the muscle tissue relax over the roller.
Strengthen and Activate Underactive Muscles
Now that you've created some neurological space, it's time to wake up the dormant muscles: your glutes and deep abdominals. This is where the precision of Pilates really makes a difference. It’s not about how many reps you do, but how you do them—with focused control and deep proprioceptive awareness. We're building endurance in these stabilizers so they can support your pelvic position all day.
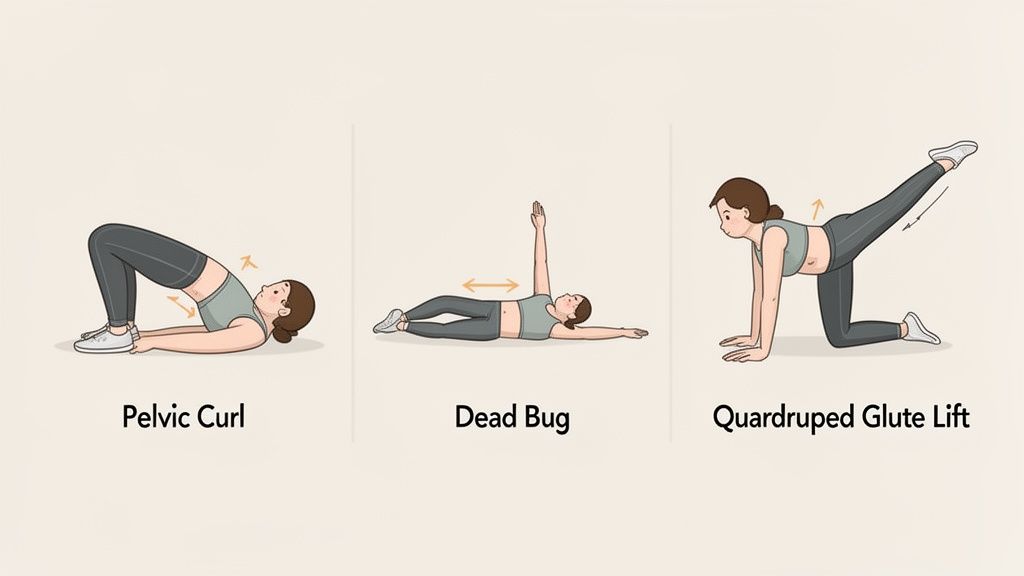
Pelvic Curl (Glute Bridge)
This foundational move is fantastic for activating the glutes and hamstrings as hip extensors while teaching segmental control of the spine.
- Lie on your back, knees bent, feet flat and hip-width apart. Let your arms rest long by your sides. Find your neutral pelvic position.
- Exhale, engage your abdominals to gently press your lumbar spine into the mat, and begin peeling your spine off the floor, vertebra by vertebra.
- Lift until you have a straight line from shoulders to knees. Squeeze your glutes at the top, ensuring hip extension, not lumbar hyperextension.
- Inhale at the top. As you exhale, slowly roll back down, articulating through each vertebra until your pelvis settles back into neutral.
This exercise retrains your body to use your gluteus maximus as the primary hip extensor, which takes a massive load off the overused lumbar extensors. It's all about motor control, not height.
Dead Bug
The Dead Bug is a powerhouse for strengthening the transverse abdominis—your body's deep core stabilizer—while challenging lumbopelvic stability.
- Lie on your back with hips and knees bent to 90 degrees (tabletop position). Reach your arms straight up toward the ceiling.
- Engage your deep core by drawing your navel toward your spine. Maintain a neutral spine, avoiding any arching.
- Slowly exhale as you lower your opposite arm and leg toward the floor. Go only as low as you can without losing the neutral position of your lumbar spine and pelvis.
- Inhale and return to the start with control. Then, switch sides. This emphasis on deep core stability is at the heart of so many effective Pilates exercises for core strength.
Quadruped Glute Lift
This one isolates the gluteus maximus while forcing the core musculature to prevent compensatory movement in the pelvis and lumbar spine.
- Start on all fours with hands under shoulders and knees under hips. Find a long, neutral spine.
- Engage your abs to prevent your back from sagging into extension.
- Keeping a 90-degree bend in your knee, lift one leg into hip extension by contracting your glute. Your thigh should end up about parallel to the floor.
- The magic here is to ensure the movement is pure hip extension, not lumbar hyperextension. The movement is smaller than you think. Lower with control and repeat.
The prevalence of anterior pelvic tilt among athletes shows how even modern training can accidentally reinforce bad posture. One study found that 16.2% of amateur athletes had an anterior tilt combined with poor body stability. The researchers pointed out that this wasn't just an isolated issue; it was part of a larger kinetic chain dysfunction. This really drives home the need for a balanced approach that pairs strengthening with mobility.
By consistently applying this two-step strategy—release, then strengthen—you're methodically re-educating your neuromuscular system. You're teaching the tight muscles to relax and the weak ones to activate, creating a more balanced force couple around your pelvis.
Sample Weekly Corrective Exercise Schedule
To make this practical, it's best to weave these exercises into your weekly routine rather than doing them all at once. Consistency is what creates lasting neuromuscular change. Here is a sample schedule you can adapt to fit your life.
| Day | Focus | Sample Exercises |
|---|---|---|
| Day 1 | Mobility & Awareness | Kneeling Hip Flexor Stretch (2 sets), Quad Foam Rolling (2-3 min/side), Pelvic Curls |
| Day 2 | Core Strength | Dead Bug (3 sets), Quadruped Glute Lifts (3 sets), Pelvic Curls |
| Day 3 | Active Recovery | Light walk, Kneeling Hip Flexor Stretch, Quad Foam Rolling |
| Day 4 | Mobility & Awareness | Kneeling Hip Flexor Stretch (2 sets), Quad Foam Rolling (2-3 min/side), Pelvic Curls |
| Day 5 | Core Strength | Dead Bug (3 sets), Quadruped Glute Lifts (3 sets), Pelvic Curls |
| Day 6 | Active Recovery | Light walk or stretching |
| Day 7 | Rest | Listen to your body and rest |
This schedule provides a balanced mix of releasing tight muscles and activating underused ones, with plenty of time for recovery. Remember to listen to your body and adjust as needed. The goal is progress, not perfection.
Integrating Postural Awareness Into Your Daily Life
Corrective exercises are absolutely essential for laying the groundwork to fix an anterior pelvic tilt, but lasting change happens outside of that 30-minute workout window.
You can be incredibly diligent with every stretch and glute bridge, but if you spend the next eight hours in a seated position with a passively tilted pelvis, you’re basically hitting the undo button on all that hard work. True postural correction is about weaving mindful alignment into the fabric of your everyday life.
It’s all about turning that newfound anatomical awareness into a habit. We’re retraining your brain and body to find—and hold—a neutral pelvic position while you sit, stand, walk, and even lift. These small, consistent adjustments are what make your workout gains stick.
Mindful Sitting at Your Desk
Prolonged sitting is a notorious culprit behind anterior pelvic tilt, but you can actually turn your chair into a tool for postural practice. Instead of letting your pelvis dump forward into a passive arch, you can actively create a supportive, stable base.
Start by sitting with your feet flat on the floor, knees bent at roughly a 90-degree angle. Scoot yourself back in the chair until you can feel your ischial tuberosities ("sit bones") making solid contact. From here, think about gently lifting your pubic bone up toward your belly button, just enough to bring your pelvis to a more level position.
Here’s a great anatomical cue: Imagine your pelvis is a bowl of water. If you tilt it forward (anterior tilt), water spills out the front. If you tuck it way under (posterior tilt), water spills out the back. Your goal is to keep that bowl perfectly level. This simple cue helps you self-correct throughout the day without overthinking the anatomy.
Standing with a Supported Spine
Just like with sitting, your standing posture can either reinforce old patterns or help you build new, better ones. I see it all the time—people with an anterior tilt often stand with their knees in hyperextension and their lumbar spine deeply arched.
To find a more balanced stance, first soften your knees. They shouldn't be bent, just not locked. Feel your weight distribute evenly across both feet. Now, bring back that pelvic bowl imagery. Gently engage your lower abdominals to level your pelvis. You should feel a subtle engagement in your glutes and a wonderful sense of length through your lumbar spine.
The connection between mind and body is the cornerstone of lasting postural change. It's not about brute force but about developing a subtle, internal awareness that allows you to make micro-adjustments throughout the day, reinforcing new, healthier movement patterns.
This isn't about holding a rigid, tense posture. It’s about finding an efficient, stacked alignment where your muscles are doing just enough work to support your skeleton. You can really deepen this practice through specific mind-body connection exercises that sharpen this internal feedback loop.
Lifting with a Neutral Core
Lifting objects—whether it's a heavy box or a wiggly toddler—is a moment where poor alignment can easily lead to strain or injury. Lifting with an anterior pelvic tilt puts a huge amount of compressive force right on your lumbar spine.
Before you even think about lifting, set your posture first.
- Stand close to the object, feet about shoulder-width apart.
- Hinge from your hips and bend your knees, keeping your spine long and neutral.
- Take a breath and brace your abdominals to increase intra-abdominal pressure, stabilizing your core and pelvis.
- Drive the movement through your powerful glutes and quadriceps to lift, keeping the object close to your body.
By making these small adjustments a habit, you begin to retrain your entire neuromuscular system. Your body gradually learns that a neutral pelvis is its strongest, most stable position, and over time, that becomes your new default.
Alright, once you start digging into this work, questions are bound to come up. That’s a good thing! It means you're paying attention to your body. Let's tackle some of the most common questions I hear from clients when they first start their journey to correct an anterior pelvic tilt.
How Long Does It Take to Fix Anterior Pelvic Tilt?
This is the big one, and the honest answer is: it depends on your unique anatomy and habits. How long it takes depends on how pronounced your tilt is, how consistently you practice the exercises, and how well you bring this newfound awareness into your everyday life.
Most people start to feel a real difference—less discomfort, better proprioception—within 4 to 6 weeks of consistent work. But creating a lasting change in your natural, resting posture? That’s a longer game, often taking several months of dedicated practice to overwrite years of established neuromuscular patterns.
Remember, we're gently re-educating muscles and nerves. Think consistency over intensity. Slow and steady really does win this race.
Can I Still Do Squats and Deadlifts with APT?
Absolutely, but with a huge focus on your form first. When done right, big compound lifts like squats and deadlifts are fantastic for building strength in the posterior chain—your glutes and hamstrings—all key players we need to support a neutral pelvis.
The risk comes from performing these moves with your pelvis already out of alignment. If you're dropping into a squat with an exaggerated lumbar arch, you're not just reinforcing the problem; you're putting a ton of unhealthy shear and compressive stress on your lumbar vertebrae.
First things first: you must be able to activate your core and hold a neutral pelvis in foundational movements like the Pelvic Curl and Dead Bug. Once you can control your lumbopelvic position without significant load, you can start to layer that control into more complex lifts.
This way, you're building strength on a solid, stable foundation, not on a faulty one.
Is It Possible to Over-Correct into a Posterior Tilt?
It’s possible, but it’s pretty rare for someone starting with a significant anterior tilt. Over-correction usually happens when someone is constantly and consciously "tucking" their tailbone, which can lead to a flat-back posture. And that comes with its own set of issues, like reducing your lumbar spine's natural ability to absorb shock.
This is exactly why our focus is always on finding a neutral pelvis. We’re not trying to trade one imbalance for another. The goal is always balance.
By systematically inhibiting the tight muscles (like your hip flexors) and activating the weak ones (your glutes and abs), you'll naturally guide your pelvis back to its happy, anatomical middle ground, not swing it past the mark.
When Should I See a Professional for My Pelvic Tilt?
A self-guided program like this can be incredibly powerful. But there are definitely times when bringing in a professional is the smartest and safest move.
You should book an appointment with a physical therapist or a certified movement specialist if you're experiencing:
- Persistent pain, especially if it's sharp or radiates down your hip or leg (sciatica).
- Any numbness or tingling, as this could signal nerve impingement.
- You've been consistent for several weeks but are seeing zero improvement in your symptoms or alignment.
A professional can give you a personalized assessment, pinpoint the exact anatomical drivers of your tilt, and rule out any other underlying issues. Their hands-on guidance and manual therapy can be a game-changer for releasing stubborn tissues and making sure you're getting the most out of every single exercise.
At WundaCore, we build strength from the inside out, always with an anatomy-first approach. Our on-demand Pilates classes and patented equipment are designed to help you find balance, improve your posture, and move through life with more confidence. Ready to start your journey? Explore our programs at WundaCore.com.