Pelvic Tilt Exercises for Core Strength and Better Posture
It often starts quietly. A subtle ache in your lower back after a long day hunched over a desk, or just a general feeling that your spine feels… stuck. More often than not, this nagging discomfort is tied directly to your pelvic alignment.
This is where pelvic tilt exercises come in. They aren't about aggressive crunches or heavy lifting; instead, they offer a simple yet profound way to reconnect with your deep core musculature and find lasting relief.
The True Power of a Simple Pelvic Tilt

Most of us move through our days completely disconnected from the muscles that support our spine. We sit for hours, stand with our hips jutting forward, and lift things without a second thought for our core. Over time, these habits can create an imbalanced pelvis, leading to an excessive forward tip known as an anterior pelvic tilt.
This isn't just a posture problem—it directly affects your spinal health. When your pelvis tips forward, it deepens the natural curve in your lumbar spine (lordosis), compressing the vertebrae and putting a constant strain on the surrounding muscles and ligaments. This is one of the main culprits behind chronic low back pain and that persistent ache that just won’t quit.
More Than Just an Exercise
I like to think of the pelvic tilt less as a traditional "exercise" and more as a re-education for your body. It's a small, precise movement that teaches you how to consciously control your pelvic position. By mastering this subtle motion, you start rebuilding the neuromuscular connection with your deep abdominal and spinal stabilizer muscles.
The goal isn't to muscle through hundreds of reps, but to cultivate a deep level of awareness. When you understand the anatomy behind the movement, it transforms from a simple motion into a powerful tool for postural correction and pain relief.
Think of your pelvis as the foundation of your torso. If that foundation is tilted or unstable, everything stacked on top of it—your lumbar spine, thoracic cage, even your cervical spine and shoulders—gets thrown out of alignment. Restoring control here sends a positive ripple effect through your entire musculoskeletal system.
Why Anatomy is the Key
To really get the most out of pelvic tilts, you have to understand what you're moving and why. It’s not about forcefully jamming your back into the floor or just squeezing your gluteus maximus. The magic happens when you isolate specific muscles to create a gentle, controlled rocking of the pelvis.
This guide will focus heavily on the underlying anatomy because that is what elevates the pelvic tilt from a passive stretch to an active, core-strengthening movement. By learning to activate the right muscles, you unlock the ability to:
- Stabilize your lumbar spine: This provides immediate support and can dial down discomfort by decompressing spinal segments.
- Improve your posture: You'll learn how to find and maintain a healthy, neutral pelvic position throughout your day.
- Build a stronger core: This tiny movement is the true starting point for all effective core training, teaching the correct muscle firing patterns.
This foundational knowledge sets the stage for better movement patterns, reduced pain, and a stronger, more intelligent core that supports you in everything you do.
The Core Anatomy Behind Your Pelvic Tilt
To really get the most out of a pelvic tilt, we need to look under the hood. This isn't just about "sucking in" or squeezing your glutes; it's a precise, coordinated movement led by a team of deep stabilizing muscles. When you understand how this team works together, you unlock the exercise’s true power for building core strength and easing back pain.
The absolute star of the show here is the transverse abdominis (TrA). Think of it as your body’s own built-in corset. It’s the deepest layer of your abdominal wall, with fibers that wrap horizontally around your midsection from your lower ribs down to your iliac crest. When you engage your TrA, it naturally cinches your waist, increasing intra-abdominal pressure and creating incredible stability for your lower back.
The Abdominal Team Effort
While the TrA is the one that really initiates a deep, controlled posterior pelvic tilt, it doesn't work in isolation. A few other key abdominal muscles jump in to support the movement:
- Rectus Abdominis: This is your "six-pack" muscle, running vertically from your pubic bone to your sternum. It helps pull the pubic bone upward during the tilt, but its role should be secondary. Over-reliance on it leads to a crunch-like motion rather than a subtle, deep tilt.
- Internal and External Obliques: Running diagonally along your sides, these muscles assist in pulling the rib cage down and the pelvis up, contributing to the tilting motion and adding rotational stability. This is what keeps your hips from twisting out of alignment as you move.
When these muscles fire in the right sequence, they create that gentle rocking motion that draws your pubic bone up toward your navel—the very essence of a posterior tilt.
Research using EMG wire electrodes has actually confirmed the TrA's lead role. One study found that the transverse abdominis showed significantly more activation during a posterior pelvic tilt compared to other ab muscles, even in something as simple as standing. It's the true powerhouse behind this movement.
The Unsung Heroes of Spinal Support
The abdominal group isn't the only team on the field. For a pelvic tilt to be truly stable and effective, you need backup from the muscles along your spine and at the base of your core.
Think of it like a finely tuned orchestra. The abdominals might be the strings, but the percussion and woodwinds are just as vital for the complete piece. Without them, the movement lacks depth and control.
Two crucial supporting players are:
- Lumbar Multifidus: These are small but mighty muscles that attach to the vertebrae of your spine. They provide what we call segmental stability, supporting each individual vertebra. As you tilt, the multifidus helps control your lower back, preventing you from over-flexing or extending the lumbar spine.
- Pelvic Floor Muscles: This group of muscles forms a supportive sling—like a hammock—at the base of your pelvis. They have a special relationship with your deep abs; they co-contract with the transverse abdominis. As you exhale to engage your TrA, your pelvic floor should gently lift, providing foundational support from below.
Together, this entire system of muscles creates a cylinder of stability all around your midsection. Learning how to activate your transverse abdominis is a skill, but it’s one that pays huge dividends in core strength. You can dive deeper with our complete guide on how to activate your transverse abdominis for more detailed techniques. Mastering this connection is what turns a simple pelvic tilt into a powerhouse exercise for building a truly resilient core.
Mastering the Foundational Supine Pelvic Tilt
This is where the real work begins. The classic supine (lying on your back) pelvic tilt isn't about chasing reps or feeling a burn. Think of it as a deep dive into proprioception—your body's innate sense of its position in space. By focusing on tiny, controlled movements, you're building the mind-muscle connection that makes every other core exercise that much more effective.
The goal here is small and specific: an isolated rocking motion in the pelvis, driven entirely by your deep core muscles. We want to leave the legs (quadriceps and hamstrings) and glutes out of the conversation for now. This is all about awareness.
Finding Your Starting Position
Let's get set up. Lie on your back on a mat in a supine position, bend your knees, and plant your feet flat on the floor about hip-width apart. Let there be a natural lordotic curve in your lower back; you should be able to just slide your fingers into the small space between your lumbar spine and the mat. Your arms can rest comfortably by your sides.
Before you move, just take a moment to breathe. Notice the points of contact between your body and the floor: your feet, your sacrum (that bony plate at the base of your spine), your thoracic spine, and the occiput (base of your skull). This position establishes a neutral spine, and that's our home base.
Syncing Breath with Movement
The magic of a perfect pelvic tilt happens when you pair the movement with your breath. This coordination is what helps you tap into the deep core muscles, especially the transverse abdominis, in the right sequence.
Here’s the rhythm we’re looking for:
- Inhale: Let your belly rise naturally. The small space under your lower back stays right where it is. This is your neutral position.
- Exhale: As you breathe out, gently draw your navel in towards your spine. You’ll feel this action initiate a posterior pelvic tilt, causing your pubic bone to rock slightly upward as your lumbar spine gently flattens toward the mat.
- Inhale: Slowly release the contraction. Let your pelvis rock back to its neutral starting point, re-establishing that small space under your low back.
This subtle flow is a perfect illustration of the connection between your abdominals, lumbar spine, and pelvic floor.
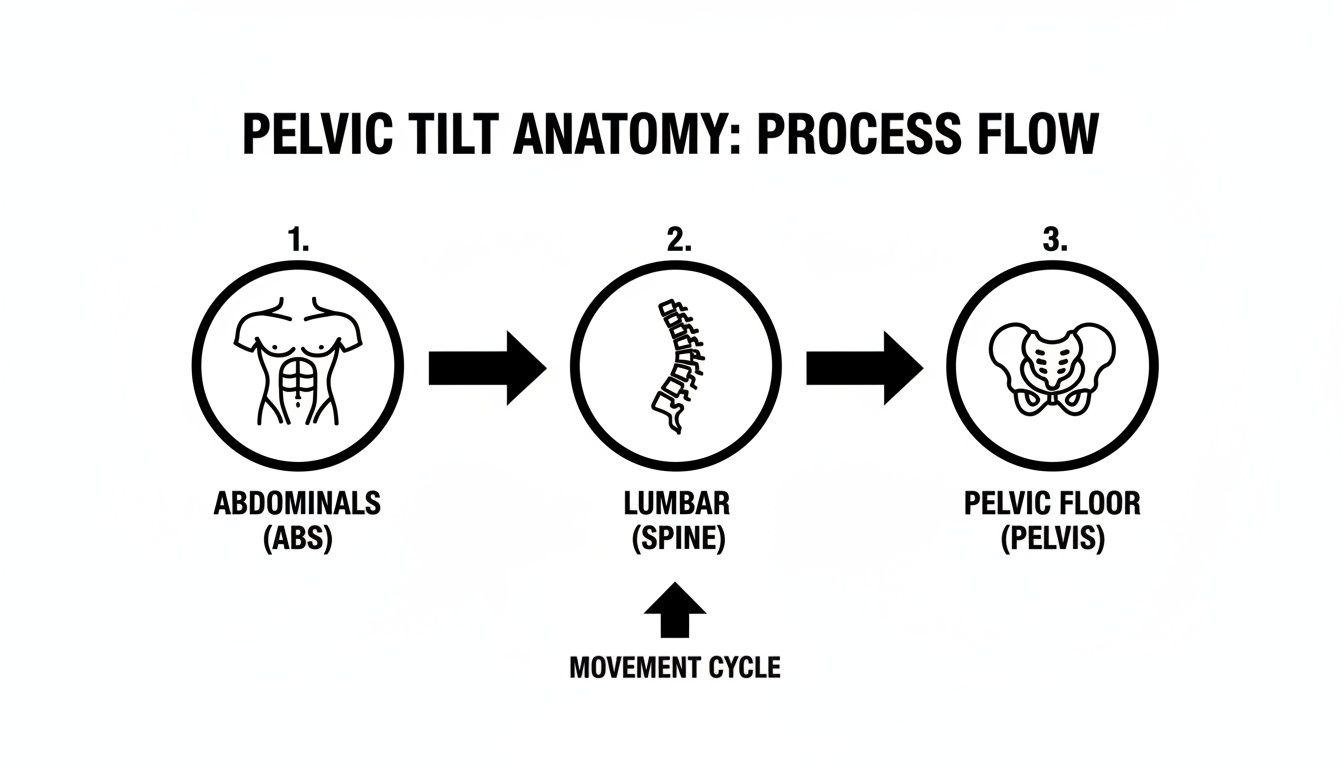
As you can see, initiating with the abdominals has a direct effect on the lumbar spine, all while being supported by the pelvic floor. It’s a beautiful system of checks and balances.
Troubleshooting Common Roadblocks
It's completely normal for other, bigger muscles to try and take over during this exercise. Just noticing these habits is the first, most important step toward building true core control.
The most common mistake is recruiting the gluteus maximus. If you feel your butt muscles squeezing hard and your hips lifting off the mat, you've gone too far. The movement should be small, originating from deep within your abdomen, not from a powerful hip drive.
Feeling a little lost? This quick guide can help you figure out what’s happening and how to fix it.
Beginner Pelvic Tilt Troubleshooting Guide
| Common Mistake | What It Feels Like | How to Correct It |
|---|---|---|
| Glutes Firing | Your butt muscles are squeezing hard; your hips might lift slightly. | Keep your glutes relaxed. Imagine your navel pulling away from your waistband on the exhale. |
| Holding Your Breath | You feel tense and can't complete the movement smoothly. | Make your exhale audible, like a gentle "haaa" sound. This ensures you're breathing and engages the deep core. |
| Neck & Shoulder Tension | Your jaw is clenched, and your shoulders are creeping up toward your ears. | Consciously relax your upper body. Let your neck, jaw, and shoulders remain completely passive. |
These little adjustments make a huge difference. Focus on getting the basics right, and you'll build a much stronger foundation.
Mastering fundamental movements like this one is key. Remember, the goal is always quality over quantity. Five perfectly executed pelvic tilts are far more valuable than twenty sloppy ones. For more ideas on where to go next, you can explore other essential Pilates mat exercises for beginners to build out your practice.
Advancing Your Practice with New Positions and Props
Once you’ve really nailed the feeling of the pelvic tilt lying on your back, it’s time to take that newfound awareness off the floor. Challenging your core in different relationships to gravity is how you turn a simple exercise into a functional movement that supports you all day long.
Think of it like this: the supine tilt is learning the alphabet. Now, we're going to start forming words and sentences. This is where we bridge the gap between the mat and real life, improving how you stand, sit, and move without even thinking about it.
Taking the Tilt Off the Floor
Moving into new positions asks your core to stabilize your spine without the feedback of the floor pressing against your back. This is a huge step in building true, functional strength.
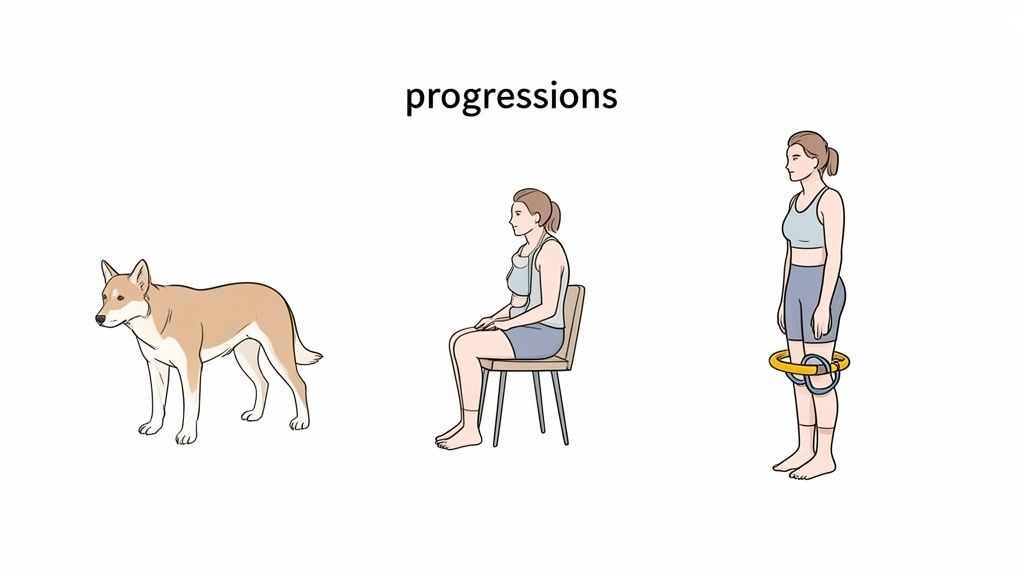
Here are three key ways to level up your tilt:
- Quadruped Pelvic Tilt: Get on your hands and knees with a flat back. In this all-fours position, your abdominal wall is working directly against gravity. When you exhale and perform a posterior tilt (like a gentle "cat" stretch), you’ll feel a much deeper pull from your abdominals to support the weight of your organs and stabilize the lumbar spine.
- Seated Pelvic Tilt: This is an absolute game-changer if you sit at a desk. Perch on the edge of a chair, feet flat on the floor. Place your hands on your iliac crests to feel the movement as you rock your pelvis back (posterior tilt) and forth (anterior tilt). It’s an amazing way to find your neutral spine by balancing on your ischial tuberosities ("sits bones") and reset your posture in the middle of a long workday.
- Standing Pelvic Tilt: This is the final frontier—integrating the tilt into an upright, weight-bearing position so it becomes second nature. Stand with soft knees and find that neutral pelvic position. This simple act of alignment can take so much strain off your low back when you're standing in line or prepping dinner.
Adding Props for Deeper Engagement
Bringing simple props into the mix adds a whole new layer of challenge and awareness. They give you something to press against, helping you wake up and feel specific muscles more intensely.
A prop isn't a crutch; it's a tool for communication. It gives your body tactile feedback, helping you find and activate muscles that might otherwise stay dormant.
Try adding these to your routine:
- Resistance Ring Between the Knees: Squeezing a ring (or even a firm pillow) while doing a supine tilt instantly lights up your hip adductors (inner thighs). Since these muscles have fascial connections to your pelvic floor and deep abdominals, this simple addition makes the entire core contraction feel deeper and more connected.
- Resistance Loop Around the Thighs: Place a loop just above your knees and gently press outward. This activates the muscles on the outside of your hips, like the gluteus medius and minimus. These hip abductors are crucial for stabilizing the pelvis and preventing unwanted lateral movement, keeping the tilt clean and precise.
Using props like bands does more than just add resistance; it sharpens your body awareness. If you’re looking to add bands to your home practice, our guide on the best resistance bands for Pilates can help you find the right ones. These variations build on that solid foundation you've created, adding layers of strength that translate directly into better posture and a smarter, more resilient core.
Finding Your Neutral Pelvis (And How to Keep It)
Mastering the pelvic tilt on your mat is a fantastic start, but the real magic happens when you take that awareness out into the world with you. The ultimate goal here is to find and maintain a neutral pelvis—that sweet spot between an excessive anterior tilt (arched back) and posterior tilt (tucked tailbone). Think of it as your postural home base.
Finding your neutral pelvis is a bit like tuning a guitar. An anterior tilt creates excessive lumbar lordosis and instability. A posterior tilt flattens the natural lumbar curve, which can strain other areas. A neutral pelvis is that perfectly tuned spot where your anterior superior iliac spines (the bony points on the front of your hips) line up on the same vertical plane as your pubic symphysis. This is where your spine can stack with optimal efficiency.
This alignment takes a huge amount of stress off your lumbar spine and, crucially, allows your deep core muscles to function as effective stabilizers. It's the starting position that makes every other movement stronger and safer.
Taking Your Neutral Pelvis into the Real World
Body awareness isn't something you just switch on for a workout; it's a skill you build, moment by moment. You can practice finding your neutral alignment all day long, turning ordinary situations into mini postural resets.
- Waiting for your coffee? Most of us stand with our hips shoved forward into an anterior tilt. Try this instead: soften your knees, gently engage your low abdominals, and think about your tailbone lengthening down toward the floor. See? You just found neutral.
- Stuck in a long meeting? Slouching in a chair usually puts you in a posterior tilt. To fix it, scoot to the edge of your seat and find your "sits bones" (ischial tuberosities). Rock your pelvis forward and back a few times until you feel balanced right on top of them. That's your neutral seated position.
It’s worth noting that a small, natural tilt is totally normal and different for everyone. In fact, clinical research has shown that healthy populations have an average anterior pelvic tilt of around 9.6 degrees in males and 11.7 degrees in females. Knowing these baselines helps movement professionals spot significant postural issues and tailor pelvic tilt exercises for the best results. You can discover more insights about these clinical measures of pelvic tilt.
Listen to Your Body—It Knows Best
While pelvic tilts are generally very safe, it's so important to listen to your body. You need to learn the difference between the satisfying feeling of muscle engagement and actual pain. Feeling your deep abs working is great. Feeling a sharp, pinching, or radiating pain in your back or hips is not.
Pain is your body’s signal to stop and check in. It’s telling you that you might be pushing too far, using the wrong muscles, or that there’s an underlying issue that needs attention.
If you have a diagnosed spinal condition like a disc herniation, spondylolisthesis, or severe osteoporosis, you absolutely need to chat with your doctor or physical therapist before you start. They can give you modifications or let you know if this exercise is right for you at all. The goal is to build strength and awareness, not to push through pain. Arming yourself with this knowledge is the key to creating long-term spinal health.
A Few Common Questions About Pelvic Tilts
As you start to dial in this movement, some questions are bound to pop up. Let's tackle the most common ones so you can feel completely confident in your practice.
How Often Should I Be Doing Pelvic Tilts?
When you’re just starting out, the goal is really to re-establish that neuromuscular connection. For that, aim for 10-15 mindful repetitions every day. The focus here isn't on a punishing workout, but on rebuilding the conversation between your brain and your deep core—especially that elusive transverse abdominis.
Once you feel more confident and in control, you can weave pelvic tilts into your warm-ups 3-5 times a week before other workouts. Just remember, quality and consistency always win over speed or high reps.
Can This Really Help My Lower Back Pain?
For a huge number of people, the answer is a definite yes. So much of the low back pain we experience is tied directly to our posture, particularly that all-too-common anterior pelvic tilt that creates compression in the lumbar spine.
By strengthening the deep core muscles that produce a posterior pelvic tilt—like your transverse abdominis and obliques—you're essentially building a natural, muscular corset. This supports your lower back, creates space between the vertebrae, and helps you find a more balanced, neutral pelvic position. For many, this simple shift can dramatically dial down chronic strain and pain.
That said, if you're dealing with a specific spinal condition, it's always best to chat with your doctor or physical therapist before jumping into any new exercises.
Isn't a Pelvic Tilt Just a Bridge?
Great question! They're related, but they're two very different movements. Think of a pelvic tilt as a small, hyper-focused rotation of the pelvis in the sagittal plane. You're isolating those deep abdominals while your thoracic spine and sacrum remain in contact with the floor. It’s all about subtle control.
A bridge, which you might also hear called a pelvic curl, starts with that posterior pelvic tilt. But from there, it continues into sequential spinal articulation. You continue to peel your spine off the floor, one vertebra at a time, until your hips are lifted. The bridge is a much bigger movement that brings the gluteus maximus and hamstrings to the party in a big way as primary hip extensors.
The pelvic tilt is the ignition for the bridge. It's the foundational piece of control that makes the bigger, more complex movement both safer and more effective.
Ready to put these movements into a smart, guided routine? At WundaCore, we pair expert instruction with our specially designed props to help you find a much deeper core connection. Check out our Wunda On Demand classes and see how you can transform your movement right from your living room. Discover the WundaCore difference today.