Pilates Reformer Beginner Exercises: An Anatomical Guide
Starting your Pilates reformer journey can feel both exciting and intimidating. The machine, with its springs, straps, and moving carriage, is a powerful tool for physical transformation, but its true potential is unlocked not just by moving, but by understanding how you move. This guide demystifies the process by focusing on the anatomy behind the movements, providing a clear blueprint for foundational exercises.
We will explore eight essential pilates reformer beginner exercises, revealing precisely which muscles you are targeting in each one. You will learn how to activate deep stabilizing muscles and why each movement methodically builds a stronger, more aligned, and resilient body from the inside out. This isn't about simply going through the motions; it's about building an intelligent connection to your body's musculoskeletal system and discovering a quality of strength you may have never experienced before.
Think of this article as your anatomical map for a safe and effective practice. Whether you are using a classical studio reformer or an at-home setup with props like the WundaCore Resistance Ring, these detailed instructions provide the anatomical insights needed to build your confidence and master the fundamentals. You will gain the knowledge to perform each exercise with purpose and precision.
1. Footwork on the Reformer
Footwork is the quintessential starting point for nearly all Pilates reformer beginner exercises, and for good reason. It serves as a foundational movement that teaches core principles of Pilates, including alignment, breath, and control, all while building functional strength in the lower body. This series of exercises involves lying on the carriage and pressing against the footbar, which may sound simple, but its anatomical benefits are profound.
Why It's a Beginner Essential
Footwork is more than just a leg exercise; it's a full-body diagnostic tool. It warms up the major muscles of the legs, including the quadriceps (front of thigh), hamstrings (back of thigh), gluteal muscles (buttocks), and calves, while simultaneously demanding deep core engagement to stabilize the pelvis and spine. This integration establishes the mind-body connection crucial for more complex movements later on. Performing these controlled presses helps beginners understand how to maintain a neutral spine, preventing excessive lumbar extension or flexion.
Anatomy Insight: The primary goal is to maintain a stable pelvis using your deep abdominal muscles, specifically the transverse abdominis which wraps around your midsection like a corset. As you press the carriage, this muscle contracts to prevent the lumbar spine from arching. This ensures the work is isolated in the legs (hip and knee extensors) and glutes, not transferred into lower back strain.
How to Perform Footwork
Footwork is typically performed in several positions to target different muscle groups. Common variations include:
- Heels on Bar: With feet parallel and hip-width apart, place your heels on the footbar. Inhale to prepare, and exhale to press the carriage away by extending your legs. Inhale to return with control. This position emphasizes the hamstrings and gluteus maximus.
- Arches on Bar (Pilates V): Bring your heels together and toes apart, forming a small "V" shape. Place the arches of your feet on the bar. This position activates the adductors (inner thighs) and external rotators of the hip.
- Toes on Bar: Place the balls of your feet on the bar with heels lifted high. This variation focuses heavily on the gastrocnemius and soleus (calf muscles) and builds strength in the intrinsic muscles of the feet.
For those practicing at home with props that mimic a reformer, like the WundaCore, you can simulate this movement by anchoring resistance bands to a sturdy object. You can explore more detailed guidance on a variety of Pilates reformer movements by reading up on the essentials of a Pilates reformer exercise. A great starting point is 2-3 sets of 8-10 repetitions in each foot position.
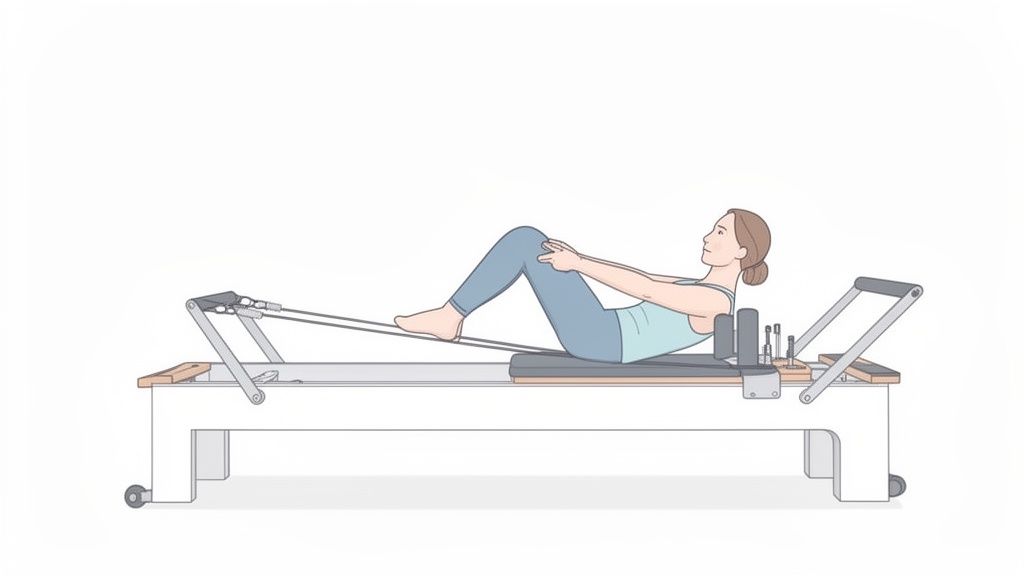
2. Hundred Preparation (Modified)
The Hundred is one of the most iconic Pilates exercises, renowned for its deep core engagement and endurance-building properties. The Hundred Preparation is a modified version specifically designed for beginners, breaking down this challenging movement into manageable steps. This adaptation focuses on mastering the crucial coordination of breath and abdominal contraction without putting undue stress on the cervical spine (neck) or lumbar spine (lower back).
Why It's a Beginner Essential
This exercise is fundamental for teaching beginners how to properly engage their core while coordinating movement and breath. It isolates the deep abdominal muscles, particularly the transverse abdominis, which acts as a natural corset to stabilize the lumbar spine. By keeping the legs in a supported position (like tabletop) and limiting the upper body lift, the Hundred Prep builds foundational core strength and stamina safely, preparing the body for the full expression of the exercise later on.
Anatomy Insight: The key is to initiate the head and shoulder curl from your upper abdominals (rectus abdominis) while the deeper transverse abdominis draws inward to maintain a stable, imprinted spine. This prevents the powerful hip flexors (psoas and iliacus) from taking over, which can cause the lower back to arch and lead to strain. The arm pumps engage the triceps and latissimus dorsi to add a dynamic stability challenge.
How to Perform Hundred Preparation
With a light spring setting (one red or blue spring), lie on the carriage with your head on the headrest and hands in the straps.
- Starting Position: Bring your legs into a tabletop position, with knees bent at a 90-degree angle directly over your hips. Keep your spine in a neutral or slightly imprinted position.
- The Movement: Inhale to prepare. Exhale as you lift your head and shoulders off the carriage, performing a thoracic flexion. Simultaneously, press your arms down by your sides, hovering a few inches above the carriage.
- The Breath and Pumps: Begin pumping your arms vigorously up and down. Inhale for a count of five pumps and exhale for a count of five pumps. Start with 30-50 pumps and build up to 100.
- Modifications: If you feel any strain in your sternocleidomastoid (neck muscles), rest your head on the headrest and focus solely on the arm movements. You can also place your feet on the footbar for more lower back support.
3. Leg Springs Work - Single Leg Stretch
Transitioning from the footbar, Leg Springs Work introduces a different type of resistance that challenges stability and control in new ways. The Single Leg Stretch using leg springs is a core-centric movement that builds functional leg strength while enhancing coordination. This exercise involves lying supine on the carriage and using a spring attached to one foot to create resistance as you move the leg, teaching deep core engagement against the pull of the spring.
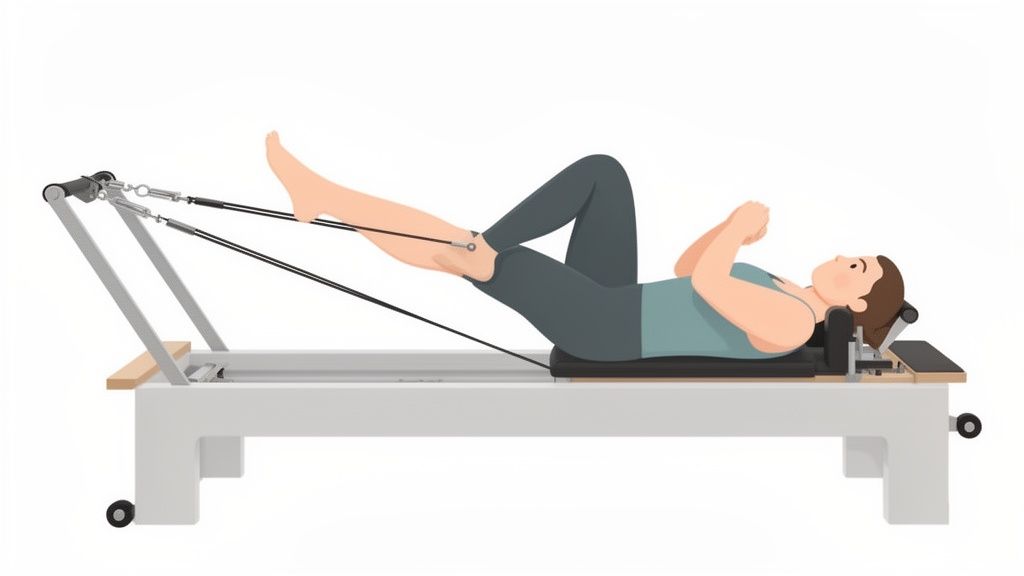
Why It's a Beginner Essential
The Single Leg Stretch is fundamental for teaching pelvic stabilization while the limbs are in motion, a key principle in many Pilates reformer beginner exercises. The spring’s constant tension forces the abdominal muscles to work harder to keep the pelvis and lower back from moving. It isolates and strengthens the hip flexors and quadriceps of the moving leg while demanding isometric stability from the gluteal muscles of the stationary leg. This unilateral work is excellent for identifying and correcting muscle imbalances between the right and left sides of the body.
Anatomy Insight: This exercise trains the deep core muscles, particularly the transverse abdominis and obliques, to act as anti-extension and anti-rotation stabilizers. As one leg moves against the spring's resistance, these muscles must fire to prevent the pelvis from tilting or rotating, protecting the lumbar spine and sacroiliac (SI) joints.
How to Perform Single Leg Stretch
Proper form is crucial to reaping the benefits and preventing strain. The focus should be on controlled, deliberate movement originating from the core.
- Setup: Lie on your back with your head on the headrest. Place one foot into the strap or handle attached to a leg spring. Your other foot can be placed on the footbar or extended long on the carriage.
- Execution: Inhale to prepare. Exhale as you press the leg with the spring away from your body, extending it until it is straight but not hyperextended at the knee. Inhale as you control the eccentric return, resisting the pull of the spring.
- Breathing: Your breath should guide the movement. Exhale on the effort (concentric phase of hip extension) and inhale on the return (eccentric phase of hip flexion).
For those using home equipment like the WundaCore, attaching a resistance band to a secure anchor point can effectively replicate the spring tension. We recommend starting with a light spring for 3-4 sets of 8-10 repetitions on each leg.
4. Chest Expansion with Handles
Chest Expansion is a powerful postural exercise that directly counteracts the effects of modern-day slouching over desks and phones. Performed kneeling or standing on the reformer, this movement involves pulling straps with handles straight back past your hips, strengthening the muscles of the upper back and opening the chest. It’s one of the most effective Pilates reformer beginner exercises for building shoulder stability and upper body awareness.
Why It's a Beginner Essential
This exercise is fundamental for teaching beginners how to engage their posterior chain correctly while maintaining a stable core and pelvis. Chest Expansion strengthens key postural muscles, including the posterior deltoids (back of shoulders), rhomboids (between shoulder blades), and latissimus dorsi (large back muscles), which are often weak and underused. By learning to pull the straps without arching the back or shrugging the shoulders, you build the foundational strength and control needed for more advanced upper-body and full-body movements.
Anatomy Insight: The movement focuses on scapular retraction, where you draw your shoulder blades together and down your back. This action is powered by the rhomboids and mid-trapezius, while the latissimus dorsi assists in pulling the arms back. Crucially, the transverse abdominis must remain engaged to prevent the rib cage from flaring and the lumbar spine from hyperextending. It's a lesson in integrating core stability with upper body mobility.
How to Perform Chest Expansion
The kneeling variation is the ideal starting point for beginners as it provides a more stable base.
- Starting Position: Kneel on the carriage facing the footbar, holding a handle in each hand with your arms straight in front of you at hip height. Maintain a tall, upright spine.
- The Movement: Inhale and engage your core. As you exhale, pull both handles straight back past your hips, keeping your arms straight and your palms facing inward. Focus on squeezing your shoulder blades together.
- The Return: Inhale as you control the eccentric return of the carriage, bringing your arms back to the starting position with resistance. Avoid letting the springs snap the carriage back.
For those practicing at home with equipment like the WundaCore, you can simulate this by kneeling and using resistance bands anchored in front of you. Aim for 2 sets of 8-10 repetitions, focusing on slow, controlled movements.
5. Spine Stretch Forward (Reformer Version)
The Spine Stretch Forward is a classic Pilates exercise adapted beautifully for the reformer, providing a deep, controlled stretch for the entire posterior chain. This movement focuses on spinal articulation, which is the ability to move the spine bone by bone. Performed while sitting on the carriage and pressing against the footbar, this exercise uses light spring tension to add both support and gentle resistance, making it one of the most effective pilates reformer beginner exercises for improving flexibility and core control.
Why It's a Beginner Essential
For many beginners, moving the spine with precision can be challenging. Spine Stretch Forward teaches you how to create length and space between each vertebra, which is crucial for spinal health and preventing back pain. It directly counteracts the effects of prolonged sitting by opening up the back body and stretching the hamstrings and erector spinae muscles. This exercise is not just a passive stretch; it requires deep abdominal engagement to control the forward roll and the return, reinforcing core stability while mobilizing the spine.
Anatomy Insight: The goal is to initiate the movement from the crown of your head, sequentially flexing the cervical, thoracic, and finally the lumbar spine. Your deep core muscles, particularly the transverse abdominis and obliques, work eccentrically to control the forward flexion and concentrically to stack the spine back up, resisting the spring tension on the return. This prevents collapsing into the stretch.
How to Perform Spine Stretch Forward
This exercise should feel like you are peeling your spine off an imaginary wall one vertebra at a time, and then stacking it back up with equal control.
- Setup: Sit tall on the carriage facing the footbar with your legs extended and the balls of your feet against the footbar. Start with your knees bent if your hamstrings are tight.
- The Movement: Inhale to sit up tall, creating axial elongation. Exhale and drop your chin to your chest, then begin to roll your spine forward sequentially. Reach your arms forward as if you are diving over a large beach ball.
- The Return: Inhale at the deepest point of your stretch. Exhale and draw your navel to your spine, using your abdominal muscles to stack your vertebrae back up to the starting position, one by one.
To get the most out of this foundational Pilates movement, aim for 4-6 slow, controlled repetitions. Focus on the quality of the articulation rather than how far forward you can reach. Resisting the springs on the way up is key to building core strength.
6. Bridge Lift with Leg Springs
The Bridge Lift with Leg Springs elevates a classic Pilates mat exercise by adding dynamic resistance from the reformer's springs. This powerful movement involves lying on your back, lifting the pelvis into a bridge, and using leg straps to control leg movements against spring tension. It’s a fantastic exercise for isolating and strengthening the posterior chain, which includes the glutes, hamstrings, and spinal extensors.

Why It's a Beginner Essential
This exercise is invaluable for beginners because it teaches pelvic stability under a dynamic load. While the glutes and hamstrings are the primary movers holding the bridge, the core must remain deeply engaged to prevent the lower back from arching. The leg springs add a challenge that improves neuromuscular control and builds functional strength that translates directly to activities like walking, running, and climbing stairs. It’s an excellent way to connect with and activate the gluteal muscles effectively.
Anatomy Insight: The primary focus here is concentric contraction of the gluteus maximus and hamstrings to maintain hip extension (the bridge). Your transverse abdominis and obliques must work isometrically to stabilize the lumbar spine and pelvis, preventing unwanted movement as the legs move against the spring resistance. The adductors (inner thighs) also engage to keep the knees aligned.
How to Perform the Bridge Lift with Leg Springs
Proper form is crucial to protect the lower back and maximize glute engagement. Start with a light spring to master the coordination before increasing the load.
- Setup: Lie on your back with your head on the headrest and place your feet into the straps. Position your feet over the footbar, knees bent. Press through your heels to lift your hips into a bridge position, creating a straight line from shoulders to knees.
- Movement: Inhale to prepare. Exhale as you extend your legs straight out, pressing against the spring tension while keeping your hips lifted and stable.
- Return: Inhale as you slowly bend your knees to return to the starting position with control, maintaining the height of your hips throughout.
For those using home equipment like the WundaCore, you can mimic this by lying on your back, placing your feet in resistance bands anchored securely, and lifting into a bridge. For a deeper dive into the foundational movement, you can explore the principles of the shoulder bridge exercise. A good starting point is 2 sets of 8-12 repetitions.
7. Side-Lying Leg Series (Intro Version)
The Side-Lying Leg Series introduces lateral movement, a crucial plane of motion often neglected in traditional workouts. This series of exercises targets the muscles on the side of the hip and thigh while challenging core stability from a new orientation. Lying on your side on the carriage and moving one leg against spring resistance helps build balanced strength around the hip joint, which is essential for gait, stability, and injury prevention.
Why It's a Beginner Essential
This series is fundamental for developing hip stability and lateral core strength. It specifically isolates and strengthens the hip abductors, such as the gluteus medius and minimus. Strong hip abductors are vital for stabilizing the pelvis when you walk, run, or even stand on one leg. For beginners, this exercise teaches how to maintain a stacked, neutral alignment of the spine and pelvis while the leg moves, preventing the torso from rocking back and forth.
Anatomy Insight: The primary focus is on strengthening the gluteus medius, a key pelvic stabilizer located on the side of the hip. When this muscle is weak, it can contribute to an unstable pelvis and lead to compensatory issues in the lower back and knees. Engaging the obliques is also critical to prevent the waist from collapsing into the carriage, ensuring the spine remains long and supported.
How to Perform the Side-Lying Leg Series
This series includes several distinct movements. You will perform all repetitions on one side before switching to the other. Common variations include:
- Leg Lifts/Lowers: Lie on your side with your bottom leg bent and foot against the shoulder rest. The top leg is straight with the strap around the foot or ankle. Exhale to lift the top leg toward the ceiling (hip abduction), keeping the pelvis stable. Inhale to lower it with control (hip adduction).
- Forward/Backward Sweeps: Keeping the leg at hip height, exhale to sweep it forward (hip flexion) and inhale to sweep it back (hip extension). The key is to keep the torso completely still.
- Circles: Draw small, controlled circles with the leg, first in one direction and then the other. This movement challenges hip mobility and stability simultaneously.
For those using home equipment like the WundaCore, resistance bands can be looped around the ankles to recreate the spring tension. A good starting point is 1 set of 8-10 repetitions for each movement on both sides, focusing on controlled, precise execution.
8. Rowing Series Beginner (Back Strengthening)
The Rowing Series is a collection of seated movements that are foundational for building upper back strength, improving posture, and enhancing core control. Using the reformer's straps and handles, these exercises mimic the motion of rowing, providing dynamic resistance that challenges the muscles of the back, shoulders, and arms. This series is more than just a back exercise; it's a lesson in how to maintain a tall, supported spine while moving the limbs.
Why It's a Beginner Essential
For beginners, the Rowing Series is an incredible tool for developing postural awareness and counteracting the effects of modern-day slouching. It directly targets the rhomboids, latissimus dorsi, and posterior deltoids, which are often weak and underutilized. The series teaches you to initiate movement from your back rather than your arms, a crucial skill for more advanced Pilates reformer beginner exercises. By maintaining a seated position on the moving carriage, you are constantly engaging your deep core musculature to stabilize your torso.
Anatomy Insight: The key is to draw the shoulder blades (scapulae) toward the spine and down the back as you pull the straps. This action, known as scapular retraction and depression, activates the mid-back muscles (rhomboids, mid-trapezius) and prevents the upper trapezius from overworking, which can lead to neck tension. The core acts as the anchor for the entire movement.
How to Perform the Beginner Rowing Series
The series typically progresses through several arm positions, but beginners should master the first before moving on. Start sitting tall on the carriage, facing the footbar, with legs extended.
- Low Row: Begin with arms straight in front, palms facing down, and hands at about hip height. Inhale to sit tall. Exhale as you pull the handles back, bending your elbows and squeezing your shoulder blades together. Keep your spine long and shoulders away from your ears.
- Middle Row (Preparation): Once comfortable with the low row, you can progress to a middle row position where the hands start and pull back at chest height. This variation engages the back muscles from a slightly different angle.
- Chest Expansion: Another common variation involves pressing the arms straight back past the hips, opening the chest and strengthening the triceps and posterior deltoids simultaneously.
A good starting point is one set of 8-10 repetitions for each variation you attempt, focusing intently on form and control over speed. Resist the springs on the return to get the full benefit of the exercise.
Reformer Beginner Exercises: 8-Point Comparison
| Exercise | 🔄 Implementation Complexity | ⚡ Resources & Setup | 📊 Expected Outcomes | Ideal Use Cases | ⭐ Key Advantages + 💡 Tips |
|---|---|---|---|---|---|
| Footwork on the Reformer | Low — basic carriage press mechanics | Reformer, footbar, variable springs; quick setup | Builds leg strength, alignment, core stabilizers | Beginner warm-ups, baseline assessments, home reformer sessions | ⭐ Teaches core mechanics and safe leg loading. 💡 Use heavier spring to stabilize carriage; emphasize smooth control. |
| Hundred Preparation (Modified) | Low–Moderate — breath coordination adds nuance | Reformer, light springs, optional head support or pillow | Core endurance, breath timing, reduced neck load | Beginners learning Pilates breathing, gentle core conditioning | ⭐ Safely builds core endurance and breathing patterns. 💡 Keep legs bent/tabletop or support head if needed. |
| Leg Springs Work — Single Leg Stretch | Low–Moderate — coordination with springs | Reformer with leg-spring attachments; careful spring tuning | Core integration, hip flexor strength, coordination | Beginners progressing hip mobility and unilateral control | ⭐ Accessible resistance for core + leg work. 💡 Start with one spring, focus on hip-driven movement. |
| Chest Expansion with Handles | Moderate — requires posture and shoulder control | Reformer handles, moderate springs; kneeling option eases setup | Upper-back strength, improved posture, shoulder mobility | Desk workers, postural correction programs, functional upper-body work | ⭐ Directly counteracts forward slouching. 💡 Begin kneeling, engage core to avoid lumbar arching. |
| Spine Stretch Forward (Reformer Version) | Low — controlled articulation practice | Seated on carriage, footbar, light springs; low equipment fuss | Increased spinal flexion mobility, hamstring lengthening | Mobility-focused sessions, older adults, cool-downs | ⭐ Gentle vertebra-by-vertebra mobilization. 💡 Start with bent knees if hamstrings are tight. |
| Bridge Lift with Leg Springs | Moderate — coordination of pelvis lift + springs | Reformer with leg springs; correct spring setup important | Glute/hamstring strength, pelvic stability, bone-loading benefits | Lower-body strength programs, menopause wellness, functional training | ⭐ Highly effective for glute activation and pelvic stability. 💡 Master bilateral bridge before single-leg progressions. |
| Side-Lying Leg Series (Intro Version) | Moderate — balance and proprioception needed | Reformer side-lying setup, leg springs; alignment attention required | Lateral hip strength, pelvic stability, improved gait mechanics | Hip-stability training, aging populations, balanced lower-body work | ⭐ Targets often-neglected lateral hip muscles. 💡 Stack body and move from the hip, not momentum. |
| Rowing Series Beginner (Back Strengthening) | Moderate–High — multiple levels and coordination | Reformer handles, adjustable spring positions; progressive setup | Systematic back strengthening, shoulder stability, posture correction | Postural rehab, desk-worker programs, upper-body progressions | ⭐ Comprehensive back and shoulder strengthening progression. 💡 Start with low row; progress only after mastering form. |
From Movement to Mastery: Integrating These Exercises into Your Practice
You have now journeyed through a foundational repertoire of Pilates reformer beginner exercises, each one a building block for a stronger, more aligned, and resilient body. From the grounding sensation of Footwork to the expansive strength of Chest Expansion, you’ve explored movements that do more than just tone muscles; they re-educate your neuromuscular system. The eight exercises covered in this guide were intentionally selected to provide a balanced, full-body introduction that respects and prioritizes anatomical precision.
The true power of this practice lies not in simply going through the motions, but in the mindful application of Pilates principles. By focusing on the deep anatomical cues, such as engaging your transverse abdominis during Leg Springs or stabilizing your scapula in Rowing, you transform a workout into a profound conversation with your body. This approach ensures you are building strength from your core outward, protecting your joints, and correcting postural imbalances that may have developed over years.
Crafting Your Beginner Reformer Routine
To translate this knowledge into a consistent practice, start with a "less is more" philosophy. Your initial goal is not to perform every exercise perfectly but to build a strong mind-body connection. Here is a practical framework to get you started:
- Frequency: Aim for 2-3 sessions per week. This consistency allows your body to adapt and your neural pathways to strengthen without causing burnout or over-fatigue.
- Duration: Begin with shorter, focused workouts of 20-30 minutes. This makes it easier to fit into a busy schedule and helps you maintain high-quality form throughout.
- Exercise Selection: Choose 3-4 exercises from the list to create a mini-flow. For instance, you could pair Footwork, Hundred Preparation, Bridge Lift, and Spine Stretch Forward for a well-rounded session focusing on core, glutes, and spinal mobility.
- Progression: Once you feel confident and strong in your initial selections, begin to integrate the other exercises. You can gradually build up to a 45-60 minute routine that incorporates all eight movements for a comprehensive, head-to-toe workout.
The most critical takeaway is to prioritize quality over quantity. A single, perfectly executed repetition where you feel the precise muscular engagement is infinitely more valuable than ten rushed ones. Remember the detailed cues and common mistakes we discussed for each exercise. This anatomical intelligence is what differentiates Pilates from other fitness modalities and delivers its signature long, lean, and powerful results. Your journey with these Pilates reformer beginner exercises is the start of a deeper understanding of your own body's potential for graceful, efficient, and pain-free movement.
Ready to enhance your home practice with the precision of a reformer, without the space and expense? The WundaCore is a revolutionary prop designed to mimic the resistance and feedback of Pilates equipment, allowing you to deepen your connection to these exercises and accelerate your results. Explore how the WundaCore can bring the studio experience right into your living room.