Master the Shoulder Bridge Exercise for a Stronger Core and Spine
The shoulder bridge is a cornerstone of any good Pilates practice. It’s one of those fundamental movements that strengthens your glutes and hamstrings, gets your spine moving, and connects you to your deep core. The magic isn't just in lifting your hips; it's in how you lift them—peeling your spine off the floor one vertebra at a time to create a strong, straight line from your shoulders (scapulae) to your knees (patellae).
This controlled articulation is what makes the shoulder bridge so incredibly effective for both building muscular strength and improving spinal mobility.
A Deep Dive into Shoulder Bridge Anatomy
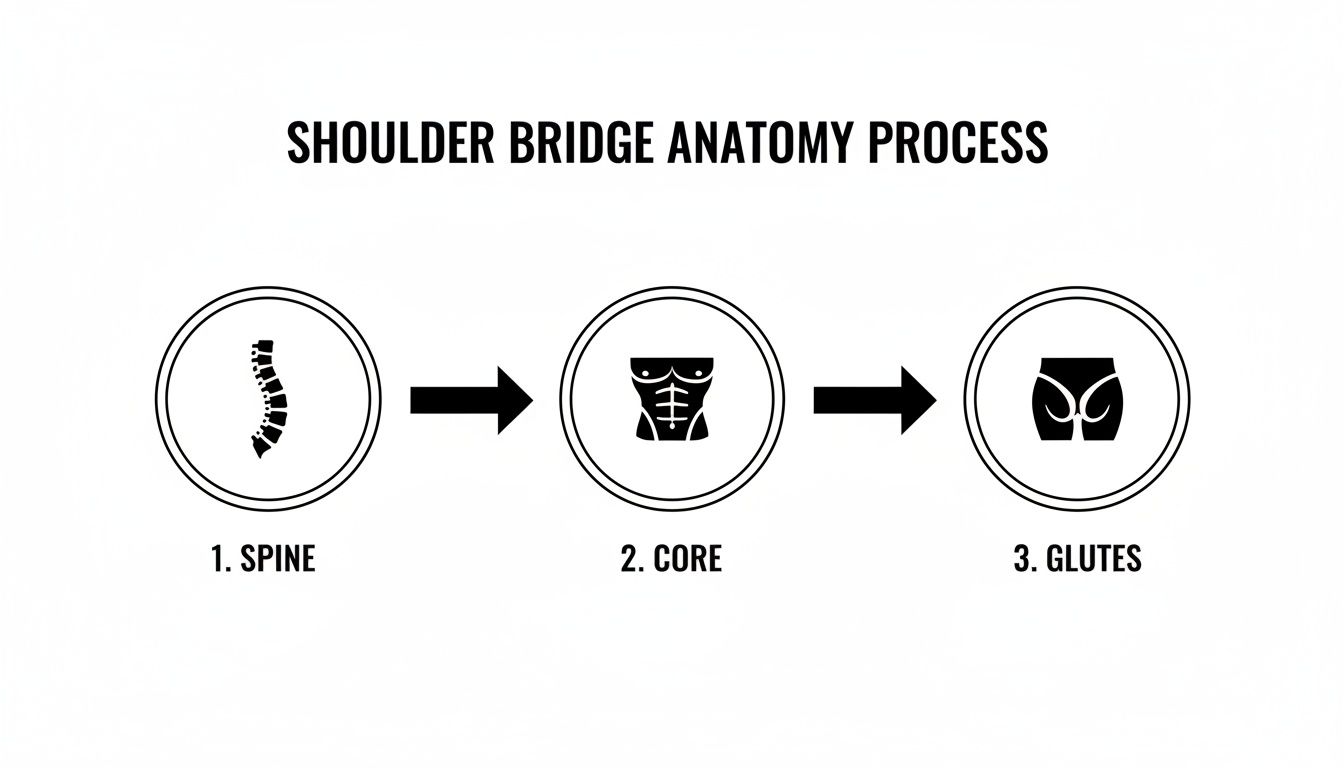
To truly get the most out of the shoulder bridge, it helps to visualize the complex biomechanics happening under the skin. This isn't just a simple hip lift. It's a beautifully coordinated effort from a whole team of muscles working in sync to stabilize, lift, and control your body.
When you understand this muscular teamwork, you can perform every repetition with intention, targeting specific muscle groups and ensuring the work is felt in all the right places.
Think of it as an orchestra of movement. Your gluteal muscles are the powerful brass section driving the lift, your hamstrings provide the steady rhythm for hip extension, and your deep core muscles are the conductor, ensuring every muscle group activates in perfect harmony. If one section is out of tune, the entire movement pattern can feel off.
The Primary Movers: Your Glutes and Hamstrings
The real power behind the shoulder bridge comes from your posterior chain—the group of muscles running along the entire backside of your body, from your heels to the base of your skull.
-
Gluteus Maximus: As the largest muscle in the human body, the gluteus maximus is the main driver of hip extension—the action of lifting your pelvis up toward the ceiling. Strong gluteal muscles are essential for powerful, pain-free movement in everyday life, from climbing stairs to extending your hips when rising from a chair.
-
Hamstrings: Located on the posterior thigh, your hamstrings (biceps femoris, semitendinosus, and semimembranosus) are the glutes' essential partner in hip extension. They also play a crucial role in flexing the knee and stabilizing the knee joint throughout the entire range of motion. If you feel your hamstrings cramping, it's a classic sign they're working overtime to compensate for underactive glutes.
The Core Stabilizers and Support System
While your posterior chain provides the power, it's your core musculature that brings control and protects your spine. This is what transforms a basic hip thrust into a mindful, anatomically intelligent shoulder bridge.
Your transverse abdominis, the deepest abdominal muscle, acts like a natural corset, wrapping around your midsection to stabilize your lumbar spine. Simultaneously, the muscles of the pelvic floor engage from below, providing a stable foundation for the entire pelvic girdle. You can learn more about activating these deep muscles by exploring different ways to strengthen your pelvic floor.
The shoulder bridge isn't just about building brute strength; it's about creating smarter neuromuscular patterns. By focusing on the sequential, rolling articulation of the spine, you're teaching your body to move with precision and stability. That translates directly into better posture and reduced strain on the lumbar spine in your daily life.
To get a clearer picture of what's firing, let's look at the key muscles involved.
Key Muscles Activated in the Shoulder Bridge
This table breaks down the primary and secondary muscles that get to work during a shoulder bridge, along with their specific biomechanical roles.
| Muscle Group | Role in Exercise | Benefit of Activation |
|---|---|---|
| Gluteus Maximus | Primary mover for hip extension (lifting hips) | Builds powerful glutes for better posture and athletic performance. |
| Hamstrings | Assists with hip extension and stabilizes the knee joint | Strengthens the posterior thigh and prevents glute/hamstring imbalances. |
| Transverse Abdominis | Deep core stabilizer; supports the lumbar spine | Creates intra-abdominal pressure to protect the lower back and improve stability. |
| Pelvic Floor | Provides a stable base for the pelvis and core | Enhances deep core connection and supports pelvic organ health. |
| Erector Spinae | Controls the sequential rolling of the spine (articulation) | Improves spinal mobility and conscious control over each vertebra. |
| Adductors (Inner Thighs) | Stabilize the femurs and pelvis, preventing knee abduction | Helps maintain proper leg alignment and engages the inner thigh muscles. |
Understanding this muscular teamwork helps you focus your mind on the right spots, turning a simple exercise into a full-body neuromuscular experience.
Scientific studies using electromyography (EMG) confirm just how effective this exercise is. In a standard two-legged bridge, the gluteus maximus activates at around 27% of its maximum voluntary isometric contraction (MVIC). But when you progress to a single-leg variation, that activation shoots up to 40%. This shows how simple biomechanical modifications can significantly increase muscle recruitment.
How to Perform the Perfect Shoulder Bridge
Let’s move past a simple hip lift and master the articulating shoulder bridge from an anatomical perspective. Think of this as your personal coaching guide to getting the movement just right, breaking down the setup, the flow, and the breath you need to maximize muscular engagement.
Proper form starts before you even think about lifting. It’s all about creating a stable, aligned foundation so you can generate power and control from the correct muscle groups.
The Foundational Setup
Getting your starting position dialed in is non-negotiable for an effective shoulder bridge. It’s the difference between targeting your glutes and core versus just straining your lumbar spine or overworking your hamstrings.
Start by lying supine (on your back). Bend your knees and place your feet flat on the floor, about hip-width apart (in line with your ischial tuberosities, or "sitting bones"). Your heels should be close enough to your sitting bones that you can graze them with your fingertips.
Now, let's set up the upper body. Rest your arms long by your sides with your palms facing down. Gently press your triceps and palms into the mat to create a stable base of support through your shoulder girdle. Keep your chest open and let your shoulders relax away from your ears.
Take a moment here to find a neutral spine. This isn't a flat back; it's the small, natural lordotic curve under your lower back. You should have just enough space to slide a blueberry underneath without squashing it. This neutral position is your starting point and your finishing line.
The Art of the Roll Up
The real magic of the shoulder bridge is in its sequential, mindful movement. I always tell my clients to visualize their spine as a string of pearls; you want to lift one pearl at a time off the mat, starting from the coccyx (tailbone) and moving up.
Take a deep breath in to prepare. As you exhale, gently initiate a posterior pelvic tilt, feeling your lumbar spine press into the mat. From there, start pressing through your heels and contracting your glutes to peel your spine off the floor, one vertebra at a time: lumbar, then thoracic.
Keep lifting until your body forms a straight line from your shoulders to your knees. Your hips should be fully extended, but maintain abdominal engagement to keep your ribs from flaring—avoid the temptation to hyperextend your thoracic spine. At the very top, your weight should be resting securely across your scapulae, never on your cervical spine (neck).
This diagram shows the key anatomical checkpoints during the lift.
As you can see, the movement initiates from the pelvis, engages the core for stability, and finishes with a powerful gluteal contraction at the top.
The Controlled Descent
The eccentric phase (the lowering) is just as important as the concentric phase (the lift). This is your chance to improve spinal mobility and deepen your neuromuscular connection to your core.
Hold the top position and take a breath in. As you exhale, begin to soften through your sternum and slowly roll your spine back down to the mat, starting from the thoracic spine. Imagine placing each vertebra down with deliberate, individual control.
- Upper Back: First, feel the thoracic spine melt toward the mat.
- Mid-Back: Next, your middle back makes contact.
- Lower Back: Finally, your lumbar spine and sacrum return to that starting neutral position.
The goal is to maintain a smooth, fluid motion without dropping your pelvis all at once. Syncing this movement with your breath—exhaling as you roll up and exhaling as you roll down—helps you maintain control and engage your deep abdominals throughout. When you perform each rep with this level of intention, the shoulder bridge transforms from a simple glute lift into a powerful tool for building true neuromuscular control.
Improve Spinal Health and Build Core Stability
The shoulder bridge is a true powerhouse for anyone looking to build a resilient core and fight back against the stiffness that settles in from modern life. It's so much more than just a glute toner—its real magic is in that mindful, rolling motion that systematically awakens and strengthens the deep multifidus and erector spinae muscles supporting your spine.
This deliberate articulation is what makes it so incredibly valuable. As you peel your spine off the mat one bone at a time, you're actively creating space between each vertebra. Think of it as a gentle massage for your back, helping to decompress the spinal column and ease the tension that builds up from hours of sitting.
Building a Supportive Inner Structure
Beyond just moving your spine, the shoulder bridge is exceptional for firing up the deep core muscles that act as your body's natural corset. This movement trains your transverse abdominis and pelvic floor to co-contract, creating a stable, supportive cylinder around your entire midsection.
This internal support system is absolutely critical for protecting your lumbar spine. When these deep muscles are strong and switched on, they create intra-abdominal pressure that takes a huge amount of load off your lumbar vertebrae during everyday activities.
Imagine lifting a heavy box of groceries, playing with your kids on the floor, or going for a run with a stable, supported pelvis that doesn't tilt or shift. These are the tangible, real-world benefits of consistently practicing the shoulder bridge. It’s a foundational tool for long-term spinal health.
This focus on deep muscle engagement and spinal articulation is central to building true functional strength. You can explore a variety of other movements that build on these principles in our guide to Pilates exercises for core strength.
Proven Benefits for Back Pain Reduction
The link between this exercise and a healthier back isn't just wishful thinking; it's well-documented. Shoulder bridges are a go-to in physical therapy and rehabilitation precisely because they strengthen the core and mobilize the spine in a safe, controlled way. In fact, research consistently shows that bridging exercises can lower the incidence of back pain by reinforcing the body's own stabilizing muscles.
Randomized controlled trials have even shown that targeted spine movements like the shoulder bridge can improve spinal curvatures and overall posture. It's been a trusted exercise in physiotherapy ever since Pilates was first brought into clinical settings. You can discover more insights about its clinical applications and how it's used in rehabilitation.
Ultimately, by building a stronger, more mobile foundation, you're not just doing an exercise—you're investing in a more durable, pain-free back.
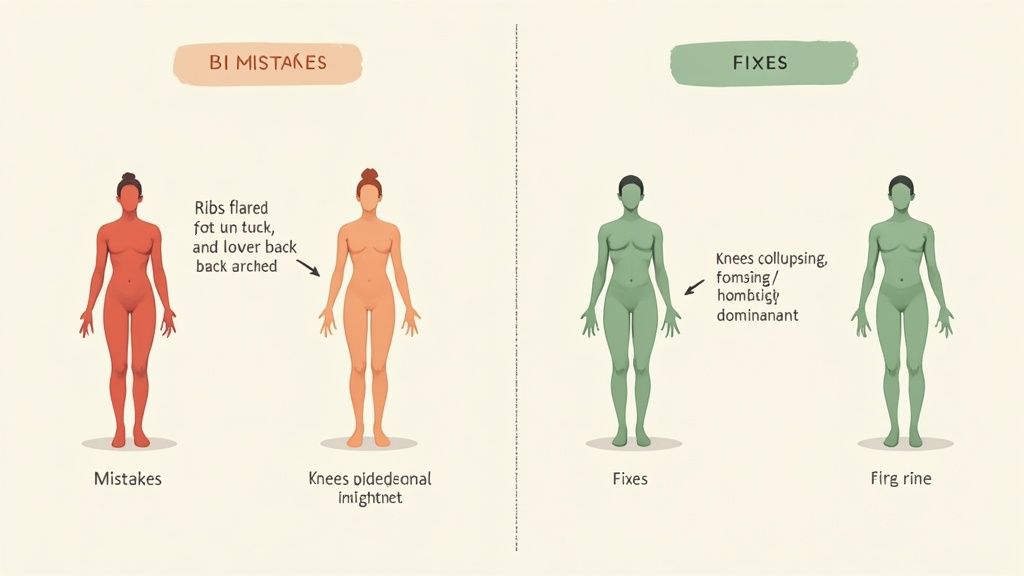
Common Mistakes and How to Fix Them
Even with the best intentions, it's easy to let small form errors creep into your shoulder bridge, which can quickly shift the work away from your glutes and put unnecessary compressive forces on your spine. If you’re feeling the burn in all the wrong places, this troubleshooting guide will help you refine your technique.
Think of it this way: a perfectly executed bridge distributes the load across your strong glutes and hamstrings. A faulty one forces your lumbar spine and neck to pick up the slack, and they are not designed for that kind of work.
Let's dive into the most common missteps I see and how to correct them with some simple, anatomy-focused cues.
Mistake 1: Overarching the Lower Back
This is probably the most frequent error I see. It's that tendency to push the hips up as high as possible, causing hyperextension in the lumbar spine. This happens when you stop using your glutes at the top and instead recruit your spinal erector muscles to gain extra height, leading to compression in your vertebrae.
The Fix:
- Imagine Your Hip Bones: As you lift, think about drawing your anterior superior iliac spines (the bony points at the front of your hips) gently toward your lower ribs. This cue helps keep your ribcage down and your pelvis in a slight posterior tilt, ensuring the work stays in your glutes.
- Focus on a Straight Line: Your goal is a strong, straight line from your shoulders to your knees, not the highest bridge in the room. Stop the lift the moment you feel your lumbar erectors start to take over.
Mistake 2: Hamstrings Taking Over
Do your hamstrings scream or even cramp during a shoulder bridge? That’s a classic sign of synergistic dominance—they are overcompensating for glutes that haven't quite woken up yet. While your hamstrings are essential synergists in this movement, they shouldn't be the prime mover.
The Fix:
- Check Your Foot Placement: Try moving your feet an inch or two closer to your hips. This small adjustment can change the angle of knee flexion, making it biomechanically easier for your glutes to initiate the lift.
- Pre-Activate Your Glutes: Before you lift, consciously contract your glutes. Hold that isometric contraction as you start to peel your spine off the mat, ensuring they fire first.
Remember, the goal is to re-establish proper neuromuscular firing patterns. Think of it as waking up a sleepy muscle. By consciously engaging your glutes before the movement starts, you're re-educating that mind-muscle connection.
Mistake 3: Ribs Flaring Out
Another common issue is letting the ribcage pop up toward the ceiling at the top of the bridge. This not only encourages that dreaded lumbar hyperextension but also disengages your abdominal muscles, which compromises your core stability. Anatomically, it means you've lost the connection between your pelvis and ribcage.
The Fix:
- Use Your Exhale: As you lift your hips, perform a strong exhale, as if you're blowing out birthday candles. This action naturally engages your transverse abdominis and helps keep your anterior ribs knitted together and down.
- Keep Your Abs Engaged: Maintain a gentle isometric contraction in your abdominals throughout the entire movement. This creates the core stability needed to support your spine and keep the movement honest and effective.
Progress Your Practice with These Variations
Once the classic shoulder bridge feels like second nature, it's time to introduce new challenges that keep your muscles adapting and your progress moving forward. This is where the real fun begins.
By adding simple variations or props, you can turn this foundational movement into a highly versatile tool that adapts to your evolving strength and stability needs. You'll start to layer on complexity and demand more from your entire core and stabilizing muscles.
Adding Resistance for Glute Activation
One of the most effective ways to level up your shoulder bridge is by grabbing a resistance band. Placing a loop band around your thighs, just above the knees, instantly changes the dynamic of the exercise.
As you lift your hips, the band forces you to actively press your knees outward (hip abduction) to maintain that crucial hip-width alignment. This external rotation directly targets your gluteus medius, the muscle on the side of your hip responsible for pelvic stability. A strong glute medius is a game-changer for improving balance and preventing knee valgus (knock-knees). You can dive deeper into this by exploring other powerful exercises for the gluteus medius.
This simple addition provides immediate, proprioceptive feedback. If you feel the band pulling your knees inward, it's a clear signal to fire up those outer hip muscles and reclaim your alignment.
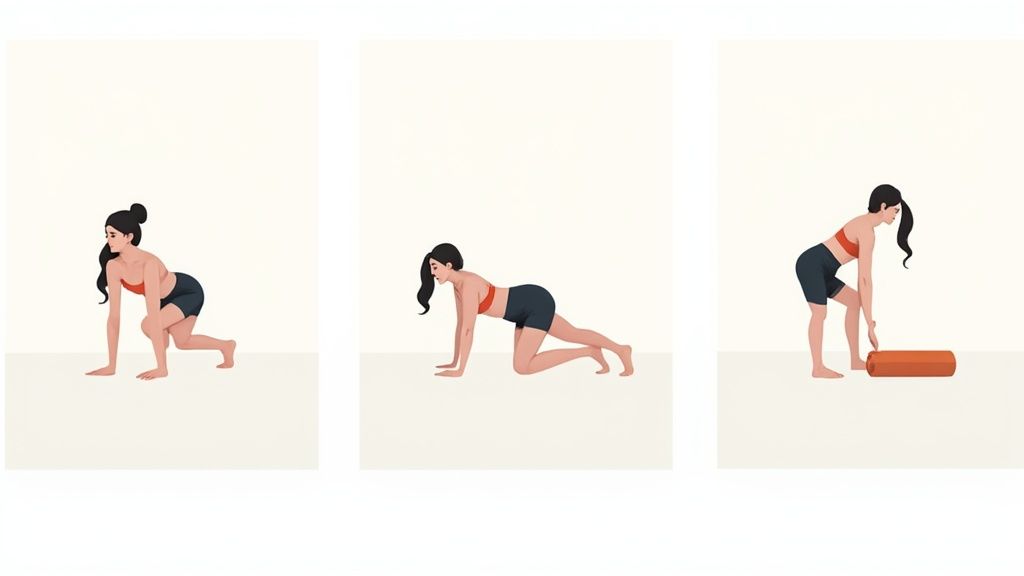
Introducing Unstable Surfaces
Ready to challenge your neuromuscular system on a whole new level? Performing your bridge on an unstable surface forces hundreds of tiny stabilizer muscles to switch on and work overtime. It’s a fantastic way to build deep, functional strength.
-
Foam Roller Bridge: Try placing your feet on a foam roller instead of the floor. The roller's tendency to move requires immense control from your hamstrings and deep core to keep it steady as you lift and lower.
-
Stability Ball Bridge: For an even greater challenge, place your feet on a large stability ball. This variation demands exceptional balance and coordination, turning the bridge into a full-body stability drill.
With these variations, the goal is less about how high you can lift and more about maintaining perfect, unwavering form against instability.
The Single Leg Shoulder Bridge
The single-leg bridge is the ultimate test of unilateral strength and pelvic stability. By removing one foot from the floor, you force the glute and hamstring of the standing leg to handle the entire load. Meanwhile, your core, particularly the obliques and quadratus lumborum, works furiously to prevent pelvic drop and keep your hips level and square.
To do it, set up for a standard bridge, then extend one leg straight out at roughly a 45-degree angle. Focus on keeping your thighs parallel as you lift and lower your hips, intensely resisting the urge for the lifted hip to drop. This variation is brilliant for exposing and correcting any strength imbalances between your left and right sides.
Shoulder Bridge Progression Pathway
The table below breaks down how each of these progressions shifts the biomechanical focus of the exercise, helping you choose the right challenge for your goals.
| Variation | Primary Challenge | Main Muscles Targeted |
|---|---|---|
| Banded Bridge | Resisting adduction (knees pulling in) | Gluteus Medius, Gluteus Maximus |
| Foam Roller Bridge | Maintaining balance on an unstable surface | Hamstrings, Transverse Abdominis |
| Single Leg Bridge | Unilateral strength and pelvic stabilization | Gluteus Maximus, Hamstrings, Obliques |
Each variation builds on the skills of the last, creating a clear and intelligent path to advance your shoulder bridge from a basic movement into a sophisticated strength and stability tool.
Your Shoulder Bridge Questions, Answered
Even a seemingly simple exercise like the shoulder bridge can spark a few questions. Getting clear on the anatomical details is the best way to build confidence and ensure you’re moving safely and effectively. Let's dig into some of the most common things people ask.
What Is the Difference Between a Glute Bridge and a Shoulder Bridge?
This is a great question, and the answer comes down to one key anatomical detail: spinal movement.
A glute bridge is a pure hip hinge. Your spine stays completely neutral, lifting and lowering like a solid plank. The primary goal is glute isolation and hip extension strength.
The shoulder bridge, on the other hand, is a classic Pilates exercise that introduces spinal articulation. You intentionally peel your spine off the floor one vertebra at a time on the way up, and then roll it back down with that same sequential control. This approach still fires up the glutes and hamstrings, but it adds the incredible benefits of spinal mobility and a much deeper core connection.
How Often Should I Do the Shoulder Bridge Exercise?
For general fitness and to maintain spinal health, incorporating the shoulder bridge into your routine 3-4 times per week is a fantastic goal. A good place to start is with 2-3 sets of 10-15 controlled reps.
Because it’s a bodyweight exercise, it’s gentle enough to do often. I love using it in a warm-up to activate the glutes and mobilize the spine before a bigger workout, or as a cool-down to gently decompress the spinal column after a long day.
Why Do I Feel This in My Hamstrings More Than My Glutes?
If you’re nodding along to this one, you’re not alone! This is a classic case of synergistic dominance, and it almost always means your hamstrings are working overtime to compensate for underactive glutes.
First, check your foot position. Try scooting your heels a little closer to your hips to change the lever arm.
Before you lift, give your glutes a conscious isometric squeeze to establish the mind-muscle connection. As you lift, really focus on driving down through your heels—that can help facilitate glute activation. If you're still feeling it mostly in your hamstrings, try adding a resistance band just above your knees. Pushing out against the band will help recruit your gluteus medius, which can help the gluteus maximus fire more effectively.
Is the Shoulder Bridge Safe if I Have Lower Back Pain?
For many people with general, non-specific lower back pain, the shoulder bridge can be incredibly therapeutic. By strengthening the glutes and deep core muscles, you’re building a better support system for your entire lumbar-pelvic region. The key, however, is to move with absolute precision and avoid any hyperextension in your lower back.
Start with a much smaller range of motion—maybe just a pelvic tilt without lifting fully. Your main focus should be on maintaining that deep core engagement. If you have a specific diagnosis (like a disc herniation or spinal stenosis) or feel any sharp pain, it is absolutely essential to check in with your doctor or physical therapist first.
For those managing other health considerations, it's always wise to consult specialized resources, like guides for safe cardiac rehab exercises at home, to ensure your routine is appropriate for you.
Ready to progress your practice with tools designed for mindful movement? The WundaCore collection, including our patented Resistance Ring and Loop, provides the perfect resistance and support to deepen your shoulder bridge and unlock your full potential. Explore the collection at https://wundacore.com.