Your First Pilates Reformer Beginner Workout: An Anatomical Guide
A complete pilates reformer beginner workout isn't just a random set of exercises; it's an intentional series of movements designed to build deep core strength, improve your alignment, and forge a powerful mind-body connection. This guide will help demystify the machine and give you an anatomy-focused introduction to start your journey safely and effectively.
Understanding Your Body On The Reformer
Welcome to the world of Pilates, where every movement is thoughtful and precise. If you're new to the reformer, it can look a little intimidating. But it’s actually an incredible tool for building foundational strength, especially when you're just starting out. The machine’s spring-based resistance supports your body while it challenges your musculoskeletal system, creating a safe environment to learn correct form.
The growth of Pilates has been undeniable. The global Pilates and Yoga Studios Market was valued at $160.03 billion and is projected to soar to $323.83 billion by 2032. This massive interest shows just how many people are discovering the benefits of this mindful movement practice. You can dig into the numbers and explore more insights on the growth of the Pilates industry to see just how big this is.
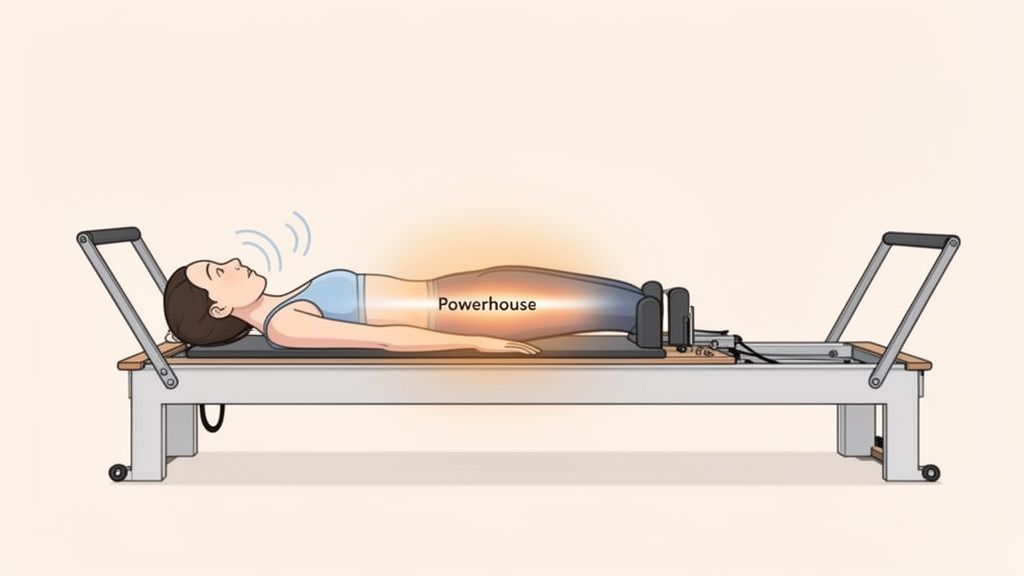
Meet Your Powerhouse
Before we start moving, it’s critical to understand where the movement should come from. In Pilates, we call this your “Powerhouse.” Think of it as a deep cylinder of muscles providing 360-degree support around your spine and pelvis.
This anatomical center includes:
- Deep Abdominal Muscles: Specifically the transversus abdominis, which acts like a natural corset to stabilize your lumbar spine, alongside the internal and external obliques.
- Pelvic Floor: These sling-like muscles provide crucial support from below.
- Multifidus and Erector Spinae: Deep back muscles that work in partnership with your abs to support your posture segment by segment.
- Diaphragm: The primary muscle of respiration, which forms the top of your core cylinder.
- Hips and Glutes: Including the gluteus maximus, medius, and minimus, which are the engines that power and stabilize your lower body movements.
Every single exercise on the reformer should originate from an engaged Powerhouse. This is the anatomical secret for building functional strength that translates into better posture and less strain on your joints in daily life.
Finding Your Neutral Spine
Another core concept you’ll hear a lot about is the neutral spine. This refers to the natural, S-shaped curvature of your vertebral column—a slight inward curve at the lumbar (lower back) and cervical (neck) regions, and an outward curve at the thoracic (upper back) region.
Lying on the reformer carriage gives you instant proprioceptive feedback. You should feel a small space under your lower back, just enough to slide a few fingers through, while your sacrum (the bony plate at the base of your spine) and the back of your ribcage stay grounded.
The goal isn't to force your back flat against the carriage by tucking the pelvis. Instead, focus on engaging your deep core muscles, especially the transversus abdominis, to maintain this natural alignment throughout each exercise. This is what protects the intervertebral discs and ensures you’re working the target muscles.
Maintaining a neutral spine while moving the carriage is one of the first and most important challenges in any pilates reformer beginner workout. It teaches your body to stabilize from its center, a neuromuscular skill that helps prevent injury and improves movement efficiency.
If you're interested in building these foundational skills before you even hit the studio, check out our guide on how to start Pilates at home.
Getting to Know Your Reformer Anatomy
Before you even think about moving, let's get acquainted with your new workout partner: the reformer. Think of it less as a machine and more as an intelligent system designed to support, challenge, and guide your body. Understanding how it works is your first real step in a successful pilates reformer beginner workout. Every part gives you constant feedback on your alignment and muscle engagement.
The main moving part is the carriage, which is the padded platform you'll be lying, sitting, or standing on. It glides back and forth along the frame, and its movement is driven entirely by your muscles working against the resistance of the springs. This controlled motion is precisely what makes Pilates so incredible for building both concentric (shortening) and eccentric (lengthening) muscle strength.
Key Components and Their Functions
At the front, you'll see the footbar. This is an adjustable bar where you'll place your feet or hands for foundational exercises that target the entire kinetic chain of the leg. You can change its position to fit your femur length, which is key for keeping your hip, knee, and ankle joints properly aligned and avoiding any strain.
Tucked just under the footbar are the springs—the heart of the reformer's resistance system. Each spring is color-coded to indicate a different level of tension. As a beginner, you'll quickly learn that more springs don't automatically mean a harder workout. Sometimes, using fewer springs decreases external support, forcing your deeper stabilizing muscles to work harder to maintain control.
It's a classic rookie mistake: thinking heavier springs mean a better workout. In reality, a lighter spring load often demands way more control from your Powerhouse to stabilize the carriage, making the exercise a much deeper challenge for your core proprioception and stability.
At the back end of the carriage, you'll find two cushioned shoulder blocks. These give you a stable surface to press your shoulders against, providing tactile feedback that helps you maintain thoracic stability and prevent the carriage from being moved by momentum. They are absolutely crucial for keeping the work out of your cervical spine and upper trapezius muscles.
Your Pre-Workout Setup Checklist
Taking a minute to create a safe and ergonomic setup is non-negotiable. Before you start, quickly run through these adjustments to tailor the machine to your body's biomechanics. This guarantees you'll maintain proper form and squeeze the most benefit out of every single movement.
- Adjust the Footbar: Set it so your knees are bent at roughly a 90-degree angle when your feet are on the bar and your pelvis is in a neutral position.
- Position the Headrest: Most reformers have an adjustable headrest. For most supine exercises, you'll want it flat to keep a long, comfortable cervical spine unless your instructor tells you otherwise.
- Select Your Springs: Your workout guide will tell you which springs to use. Always make sure the carriage is completely still before you change them—you don't want to catch your fingers!
Learning the ins and outs of your equipment is a huge part of your Pilates journey. And if you're exploring setting up a practice at home, you can discover more about different types of Pilates equipment for your home to see what fits your space and goals.
Your Foundational 30-Minute Reformer Workout
Alright, let's get into the workout. This routine is your starting point—a complete, 30-minute reformer workout designed to flow smoothly from one movement to the next.
Our goal here isn't speed; it's precision and getting in tune with your muscles. Every exercise has a specific job, targeting key muscle groups to build a strong, balanced foundation for everything that comes next.
Before you jump on, let’s make sure your reformer is set up correctly. This isn’t complicated, but getting it right is key to a safe and effective session.
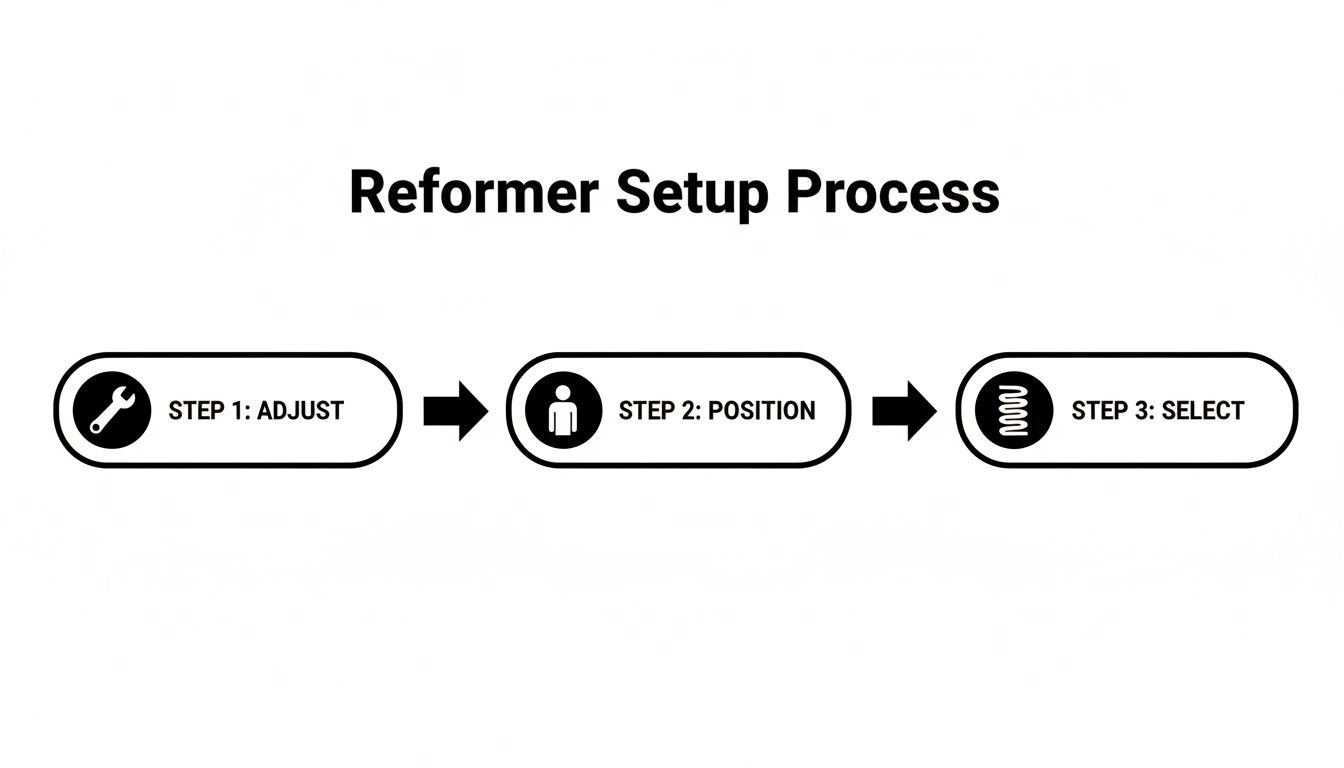
Think of it in three simple actions: adjust the footbar for your body, position yourself correctly on the carriage, and then select the right springs. Nail these steps, and your body will be aligned and supported from the very first press.
For a quick overview of what's ahead, here's a look at the workout sequence.
Beginner Reformer Workout at a Glance
| Exercise | Suggested Springs | Reps/Duration | Anatomical Focus |
|---|---|---|---|
| Footwork Series | 1 Red, 1 Blue | 10 each | Quadriceps, Hamstrings, Gluteals, Calves |
| The Hundred | 1 Red | 100 pumps | Transversus Abdominis, Rectus Abdominis, Obliques |
| Leg Circles | 1 Red | 8 each direction | Hip Joint Mobility, Adductors, Abductors, Obliques |
| Stomach Massage | 1 Red, 1 Blue | 10 reps | Spinal Articulation, Rectus Abdominis, Hip Flexors |
This table maps out our journey, from warming up the lower body to challenging your core and spine. Now, let's break down each movement.
The Gentle Warm-Up Footwork Series
This isn't just about waking up your legs. Footwork is where we align the entire lower kinetic chain, from the hip joint down through the knee and ankle. It’s where you first establish that crucial mind-body connection with your Powerhouse.
Setup:
- Springs: 1 Red, 1 Blue (or 2 full-resistance springs)
- Position: Lie on your back, shoulders snug against the blocks. Place the balls of your feet on the footbar, hip-width apart. Find a neutral spine.
Execution (10 reps each position):
- Toes: Take a breath in to get ready. As you exhale, press the carriage out by extending your knees, feeling your quadriceps and glutes fire up to drive the movement. Inhale with control as you guide the carriage back home, resisting the pull of the springs. The key is to keep your ankles completely stable and avoid pronation or supination of the foot.
- Arches: Next, shift your feet so the arches press right onto the bar. This small change in foot placement engages the intrinsic muscles of the feet and involves the hamstrings more in both the press and the return.
- Heels: Finally, place your heels on the bar and dorsiflex your feet. This variation really targets the gluteus maximus and hamstrings, helping you connect with the entire posterior chain of your legs.
The Hundred For Core Endurance
The Hundred is a true Pilates classic. It’s designed to build deep abdominal strength and stamina by challenging the isometric hold of the rectus abdominis and obliques, all while you coordinate your breath with your movement.
Setup:
- Springs: 1 Red (or 1 full-resistance spring)
- Position: Lie on your back and take hold of the straps, keeping your arms long by your sides. Lift your legs into a tabletop position—that’s knees bent at a 90-degree angle, with femurs perpendicular to the floor.
Execution: Inhale to prepare. On your exhale, lift your head and shoulders off the carriage, creating thoracic flexion while gazing toward your navel. Extend your arms long and start pumping them up and down. The movement should originate from the shoulder joint, engaging the latissimus dorsi and serratus anterior.
Breathe in for 5 pumps and out for 5 pumps. Keep going until you complete a full cycle of 100 pumps.
The real trick here is to avoid letting your stomach puff out, which indicates a dominance of the rectus abdominis. Instead, focus on deepening the engagement of your transversus abdominis—your body’s natural corset. You do this by drawing your navel toward your spine with every exhale. This protects your lumbar spine and makes the exercise so much more effective.
Leg Circles For Hip Mobility
I love this exercise because it's all about lubricating the hip joint (femoroacetabular joint) and improving your range of motion. It also seriously challenges the stability of your pelvis, forcing your deep core muscles, especially the obliques, to stay switched on to prevent lumbar rotation.
Setup:
- Springs: 1 Red (or 1 full-resistance spring)
- Position: Lie on your back with the straps on your feet. Extend your legs straight up toward the ceiling. Let your sacrum feel heavy and stable on the carriage.
Execution:
- Lower your legs down toward the footbar, using your core to control the descent.
- Circle them out to the sides, feeling the work in your adductors (inner thighs) as you draw them back together, then bring them back up to the starting position.
- Do 8 circles in this direction.
- Now, reverse it. Go out to the side (abduction), down, and then back up to the center for another 8 circles.
The challenge is to keep your pelvis and torso absolutely still. All the movement should be isolated in the hip joints, with your obliques and deep abdominals firing to prevent any rocking from side to side. It’s harder than it looks!
The growing interest in this kind of integrated fitness has led to a boom in equipment options. In fact, the broader Pilates equipment market, which includes reformers, was valued at $276.48 million and is projected to hit $564.85 million by 2032. This just shows the rising demand for systems that support smart, effective workouts like this one. You can read more about the growth of the Pilates equipment market to see how the industry is expanding.
Stomach Massage For Spinal Articulation
This series is fantastic for teaching you how to move your spine bone by bone (vertebra by vertebra) while challenging your core control. It puts the focus squarely on your rectus abdominis for flexion, and the deep hip flexors (iliopsoas) for movement.
Setup:
- Springs: 1 Red, 1 Blue (or 2 full-resistance springs)
- Position: Sit on the carriage facing the footbar. Place your heels on the bar and lightly grip the front edge of the carriage with your hands.
Execution (10 reps): Begin with a rounded lumbar and thoracic spine, like you’re making a "C" curve. Inhale as you press the carriage out, extending your legs. Exhale as you resist the springs on the way back in, deepening that spinal flexion. Really imagine you are pulling your abdominal wall back and away from your femurs as the carriage closes.
Mastering Your Form for Safe and Effective Movement
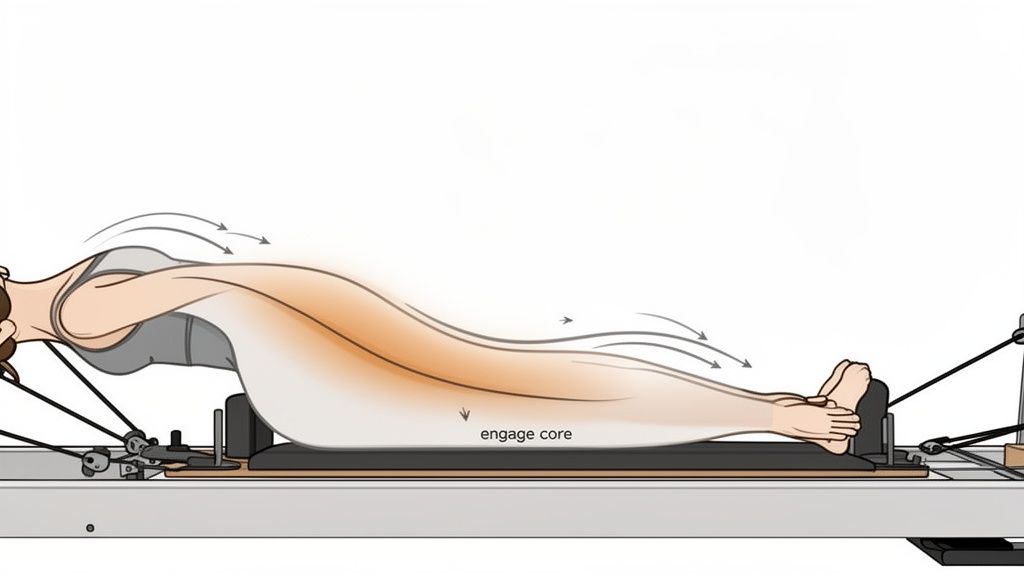
When you're just starting out on the reformer, remember this one rule: how you move is always more important than how much you move. Quality trumps quantity every single time. This precision starts with a few key anatomical ideas that will keep you safe and make every single exercise work for you, not against you.
First up is the neutral spine. Think of a straight, clean line running from the top of your head all the way down to your tailbone. Keeping this alignment is your best defense against back strain because it distributes force evenly across your vertebrae and intervertebral discs.
Next, we need to talk about your deep core, especially the transversus abdominis. This muscle is like your body's built-in corset, wrapping around your middle to keep your pelvis and lower back stable. To fire it up, just gently draw your belly button in toward your spine upon exhalation—no breath-holding allowed!
Avoiding Common Beginner Mistakes
As you get the hang of things, a few common habits will probably pop up. Just spotting them is half the battle in building better neuromuscular patterns and keeping yourself injury-free.
One of the biggest mistakes I see is people holding their breath. Proper breathing is what feeds your muscles with oxygen and actually helps you engage your core via the diaphragm. A simple cue to remember is to exhale on the effort—the concentric phase of contraction—and inhale as you control the eccentric return.
Another classic is tensing up the neck and shoulders, an over-recruitment of the upper trapezius and levator scapulae. This usually happens when the core checks out, forcing these smaller, weaker muscles to do a job they weren't designed for.
If you feel tension creeping up toward your ears, take a second. Consciously depress and retract your scapulae (shoulder blades). Then, check in with your powerhouse—is it still working to support you? This tiny self-correction can make a world of difference.
Safety and Carriage Control
Controlling the reformer's carriage isn't just a suggestion; it's a non-negotiable part of staying safe. You should never let the carriage slam back into the stopper. When that happens, it’s a clear sign you've lost muscular control, which can put a ton of shearing force on your joints.
Think of every movement as having two distinct parts: the concentric phase (push-out) and the eccentric phase (controlled-return). That return is just as important as the push. Resisting the springs on the way back in is what builds eccentric muscle strength, which is the secret sauce for creating those long, lean muscles.
This focus on joint-friendly movement is a huge reason why Pilates has become so popular. The global pilates reformer market, valued at $628.88 million, is expected to hit $1,107.25 million by 2032. This isn't just a fad; it points to a major shift toward smarter, more sustainable fitness. You can read more about the rising demand for pilates reformers to see how this fits into the bigger wellness picture. By mastering your form, you're tapping right into the core benefits that are driving this entire movement.
How to Build Consistency and Progress Your Practice
You did it! Your first reformer workout is a huge step, but the real magic happens when you build a sustainable practice. Consistency is what unlocks that deeper strength, better posture, and the mind-body connection we're all after. The goal isn't to push yourself to exhaustion; it's about creating a habit that truly nourishes your body and fits into your life.
A great place to start is aiming for 2-3 reformer sessions per week. This rhythm gives your muscles the time they need for recovery and adaptation—the process of muscle protein synthesis is when the real strengthening occurs. Spacing out your workouts also gives your nervous system time to build new motor pathways, which is why the movements start to feel more fluid and natural over time.
Creating a Balanced Weekly Schedule
The best way to make a routine stick is to weave it into a life you already enjoy. A balanced week doesn't have to be rigid, but it might look something like this:
- Monday: Pilates Reformer Workout (Focus on strength and alignment)
- Tuesday: Active Recovery (A brisk walk or some gentle stretching feels great)
- Wednesday: Pilates Reformer Workout (Maybe focus more on mobility today)
- Thursday: Rest Day
- Friday: Something that gets your heart rate up (Cycling, swimming, or even dancing)
- Saturday: Pilates Reformer Workout (A full-body flow to round out the week)
- Sunday: Rest Day
This kind of schedule gives you a solid mix of strength, cardio, and recovery, which helps prevent overtraining while you build a strong foundation.
Signs You're Ready to Progress
Progress in Pilates isn't always about adding more weight—it's about deepening your control and challenging your stability. You'll know it's time to move on when the exercises you're doing feel less demanding and you can maintain perfect form without a huge struggle.
Here's a key indicator I always look for: you can complete all your repetitions while keeping your core fully engaged and your torso completely still. That's a huge sign you've mastered the foundational stability needed for more complex movements.
When you hit that point, you can start making small, intentional changes to your routine. Think about these simple progressions:
- Increase Spring Resistance: If an exercise feels too easy, try adding a lighter spring (like a blue or yellow) to your current setup. This increases the challenge on your muscles as they work concentrically.
- Decrease Spring Resistance: This one might sound backward, but a lighter spring can actually make an exercise harder. It forces your deep stabilizing muscles to work overtime to control the carriage eccentrically, which is fantastic for building stability and control.
- Challenge Your Balance: Try moving from a bilateral exercise to a unilateral variation. For instance, attempting Footwork with just one leg at a time is a fantastic way to challenge your pelvic stability and highlight any muscular imbalances.
Beyond the physical changes, remember to celebrate the "non-scale victories." These are often the most rewarding signs of progress. You might suddenly notice you're standing taller, that nagging lumbar ache has disappeared, or you just feel more centered and aware as you move through your day. Building this kind of lasting change is a journey, and you can explore more strategies for staying consistent with your exercise routine in our detailed guide.
Your Beginner Reformer Questions, Answered
It's totally natural to have questions when you first start out on the reformer. Honestly, understanding the why behind the work is just as important as the movements themselves. It helps build that crucial neuromuscular connection we're always talking about in Pilates. Let's tackle some of the most common questions I hear from new clients.
How Often Should I Get on the Reformer as a Beginner?
When you're just starting, aiming for 2-3 sessions a week is the sweet spot. This isn't about pushing yourself to exhaustion; it's about giving your body, especially those deep core stabilizers like the transversus abdominis and multifidus, time to adapt, recover, and get stronger.
Think of it as teaching your nervous system a new language. Consistent, quality practice is what leads to real progress and helps you build a habit that sticks.
Can I Actually Lose Weight with Reformer Pilates?
While Pilates is famous for creating long, lean strength and incredible posture, it can absolutely be a powerful tool in your weight management plan. As you build more lean muscle, you naturally increase your resting metabolic rate—meaning you burn more calories even when you're not working out.
Plus, the focus on core strength and proper alignment often gives the body a more toned, streamlined appearance. Exercises like Footwork get your large muscle groups—like your gluteals and quadriceps—firing, which definitely contributes to your overall energy expenditure. For the best results, I always recommend pairing your practice with balanced nutrition and some cardio you enjoy.
The real magic of Pilates isn't just "burning calories." It's about building a body that works better. The toned physique is a wonderful side effect of creating a more efficient, resilient, and functionally strong system from the inside out.
What if Something Feels Painful or Just...Wrong?
This is a big one. It's so important to know the difference between the satisfying burn of a muscle working hard and a sharp, jarring pain. You should never feel pinching or shooting pain. If you do, stop immediately.
More often than not, that kind of discomfort is a sign that your form needs a little tweak or the spring tension is off. It might be loading a joint, like the hip or vertebrae, instead of challenging the intended muscle. For example, if your lower back aches during leg work, it's a good clue that your transversus abdominis isn't quite engaged enough to keep your pelvis stable. Remember, Pilates should challenge your muscles, never compromise your joints.
Ready to bring the core-strengthening, posture-improving benefits of Pilates into your own home? WundaCore provides the expertly designed tools and on-demand classes you need to build a consistent, effective practice. Discover our collection and start moving with intention today.