How to strengthen rotator cuff muscles: An Anatomy-Focused Guide
To build truly resilient shoulders, the secret isn't just about lifting heavier—it's about understanding the intricate anatomy you're working with. Lasting strength comes from learning how to properly activate and stabilize the small, deep muscles of the rotator cuff. This guide provides a plan that goes beyond generic exercises, focusing instead on controlled, anatomy-informed movements to build a functional shoulder from the inside out.
Your Path to Building Stronger Shoulders
If you're looking for a clear, anatomy-driven plan to take care of your shoulders, you've come to the right place. This guide is all about understanding how your shoulder is designed to work, because that's where lasting strength comes from.
Many common shoulder issues arise not from a lack of overall strength, but from a significant muscular imbalance. Often, the large, powerful "global" muscles like the deltoids or pectorals completely take over, leaving the smaller, crucial rotator cuff muscles weak and unsupported.
Think of your rotator cuff as the dedicated support crew for your shoulder joint (the glenohumeral joint). While the big muscles are the star performers creating powerful arm movements, this crew of four smaller muscles is constantly working behind the scenes. Their primary job is dynamic stabilization—keeping the head of your arm bone (the humerus) perfectly centered in its shallow socket with every single reach, lift, and twist you make.
We'll start by digging into the vital role these muscles play in stabilizing the joint. You'll learn to pick up on the subtle signals your body sends when it needs more focused attention, like:
- A distinct clicking or popping sound (crepitus) during certain movements.
- A feeling of weakness when you lift things out to the side or overhead.
- A dull, deep ache inside the shoulder, especially at night.
- A noticeable limit in your range of motion compared to the other side.
From Awareness to Action
Once you know what to look for, we’ll dive into specific, foundational exercises designed to wake up and fortify each of those four rotator cuff muscles. With detailed movement cues and smart progressions rooted in WundaCore principles, you'll have an actionable weekly program you can start right away.
The goal here isn't just about building raw strength—it's about improving neuromuscular control. We're essentially teaching your brain and muscles to communicate better, creating smooth, stable, and pain-free movement patterns.
By truly understanding the anatomy behind these movements, you can target these muscles with incredible precision. This is how you build durable, resilient shoulders from the ground up, giving you the power to move with confidence and freedom.
Getting to Know Your Rotator Cuff
Before we jump into any exercises, it's really important to understand what we're working with. A little anatomy knowledge goes a long way in making your movements more intentional and effective.
Think of your shoulder joint like a golf ball sitting on a tee. The "ball" is the head of your upper arm bone (the humerus), and the "tee" is a surprisingly shallow socket on your shoulder blade called the glenoid fossa. This design gives you an amazing range of motion—you can throw, reach, and lift in almost any direction—but it also makes the joint inherently unstable.
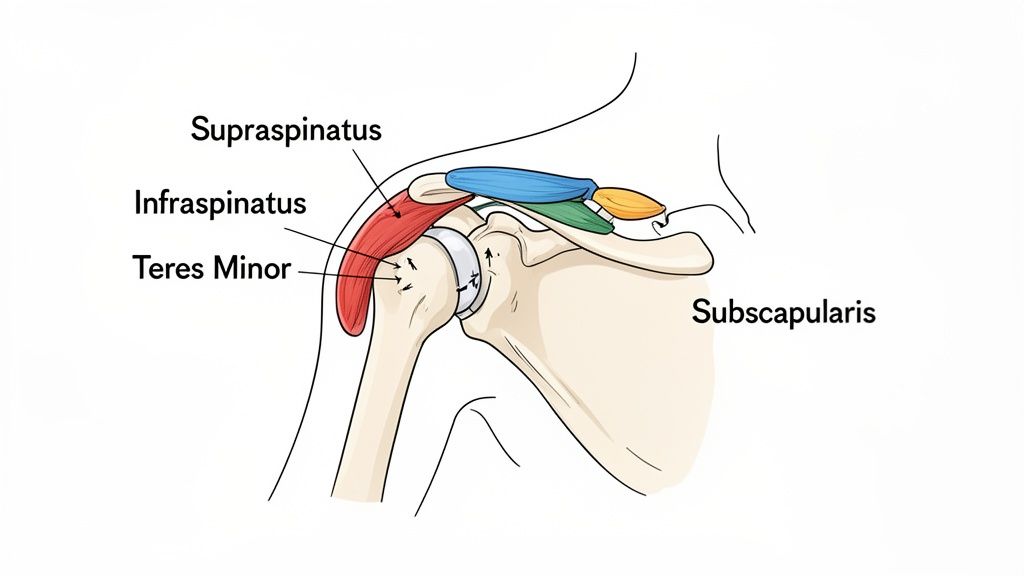
This is where your rotator cuff comes in. It’s not one single muscle, but a team of four smaller muscles and their tendons. They originate on the shoulder blade (scapula) and wrap around the head of the humerus, forming a dynamic "cuff" that actively pulls it into the glenoid socket. Their main job is to keep that ball centered and secure as your arm moves.
Meet the SITS Muscles
A great way to remember the four muscles is the acronym SITS. Each one has a very specific origin, insertion, and action. Knowing these details helps you target them much more effectively.
-
Supraspinatus: This muscle sits in the supraspinous fossa, a groove on the top of the shoulder blade. Its tendon passes under a bony arch (the acromion) to attach to the top of the humerus. Its key role is to initiate the first 15-30 degrees of lifting your arm out to the side (abduction). Think of it as the muscle that gets the movement started before the powerful deltoid muscle takes over.
-
Infraspinatus: Located in the infraspinous fossa on the back of your shoulder blade, this is a primary external rotator. Every time you turn your arm outward—like reaching to grab your seatbelt—the infraspinatus is hard at work.
-
Teres Minor: This smaller muscle sits just below the infraspinatus on the lateral border of the scapula. It's the infraspinatus's key partner, assisting with external rotation. It’s also crucial for decelerating the arm, like after you throw a ball, preventing the humeral head from shifting forward.
-
Subscapularis: The largest and strongest of the group, this muscle occupies the subscapular fossa on the front of the shoulder blade, between the scapula and your ribcage. It is the primary internal rotator of the humerus, responsible for turning your arm inward, like when you tuck your shirt in behind your back.
Why Imbalances Are So Common
In a perfect world, these four muscles would work together in a balanced force-couple. But our modern lifestyles often throw them out of whack.
Repetitive overhead movements—whether you’re a swimmer, a painter, or just someone who regularly puts things away on high shelves—can put a lot of stress on the supraspinatus tendon as it passes through the tight subacromial space.
Even more common is the impact of poor posture. That classic slumped-forward position at a desk shortens the muscles in your chest (pectorals) while over-stretching and weakening the muscles on your back, including the infraspinatus and teres minor.
This constant forward slump puts the subscapularis (the internal rotator) in a chronically tight, short position while the external rotators on your back get weak and sleepy. This classic imbalance is a huge reason why so many of us end up with shoulder pain.
When the SITS muscles are weak or out of balance, they can't stabilize the head of the humerus properly. The "ball" can start to ride up or shift around in the socket, leading to pinching of the tendons (impingement syndrome) and inflammation. This is why a generic "shoulder day" at the gym often misses the mark.
A smarter plan—one that knows how to strengthen rotator cuff muscles both individually and as a team—is what you need. By focusing on the specific functions of each SITS muscle, we can restore balance, build true stability, and create strong, resilient shoulders ready for anything.
Gauging Your Current Shoulder Stability
Before we jump into any exercises, it’s really important to get a clear picture of where you’re starting from. Think of this as a quick personal check-in. It’s all about building body awareness and learning to spot the subtle signs of instability that often fly under the radar in daily life.
So, how can you tell if your rotator cuff really needs some attention? The signals can be surprisingly quiet at first. It’s not always about sharp, sudden pain, but more about how your shoulder feels and functions during simple, everyday movements.
Listening to Your Body’s Cues
Recognizing the early hints of weakness is the very first step toward building a more resilient, happy shoulder. Start paying close attention to these common indicators:
- Difficulty with Lateral Lifts: Does lifting a full grocery bag or a gallon of milk out to your side feel surprisingly hard or trigger a deep ache? This can point to weakness in the supraspinatus, the muscle that gets that whole movement started.
- Nighttime Discomfort: Do you find yourself dealing with a dull, nagging ache in your shoulder when you lie down to sleep, especially if you’re on that side? This is a classic sign that the rotator cuff tendons are feeling stressed or inflamed.
- Clicking or Popping Sounds: When you reach overhead or rotate your arm, do you hear or feel a "click"? While it isn't always a red flag for damage, consistent clicking can suggest some instability—the head of your arm bone isn't tracking as smoothly as it should in its socket.
These simple observations are incredibly valuable clues. They help you pinpoint specific weaknesses, which means you can approach the exercises we're about to cover with much more purpose and intention.
What True Shoulder Stability Feels Like
So what are we aiming for? Solid shoulder stability is all about smooth, controlled movement without having to call in backup from other muscles. When your rotator cuff is doing its job correctly, your arm feels securely anchored in its socket, which allows for a beautiful, fluid range of motion.
On the flip side, a huge sign of instability is compensation. This is what happens when bigger muscles—like your neck (the upper trapezius) or upper back—jump in to help out a weaker rotator cuff.
For example, if you try to lift your arm out to the side and your entire shoulder hikes up toward your ear, that’s your upper traps overworking. It's your body's clever—but ultimately inefficient—way of making up for a lack of stability right where you need it most.
A stable shoulder separates arm movement from neck and torso movement. The goal is to isolate the motion within the shoulder joint itself, keeping the shoulder blade gently anchored down and back without tension.
A Simple Self-Check for Rotation
Here’s a gentle test you can do right now to assess your external and internal rotation. These are key jobs of the infraspinatus, teres minor, and subscapularis. This isn't for self-diagnosis, but simply to help you feel for any imbalances.
- Stand with your elbows bent at 90 degrees and gently tucked into your sides.
- Slowly rotate your forearms outward, like you’re opening a book. The key is to keep your elbows glued to your ribs. Notice how far you can go before your shoulders shrug or your chest puffs out.
- Return to the start, and then slowly rotate your forearms inward toward your belly.
Compare the range and ease of motion between your right and left sides. Is there a big difference? Does one side feel tighter or noticeably weaker?
This awareness is such a powerful tool. It’s directly connected to your body's sense of joint position—a concept you can dive into deeper by learning about what proprioceptive training is and how it sharpens your movement control. By taking a moment to gauge your stability now, you can choose the right starting point for your body and track your progress much more effectively.
Foundational Exercises for Rotator Cuff Strength
This is where the real work begins. Now that we understand the anatomy, we can start building a more resilient rotator cuff with intentional, focused movement. We're going to dive into the foundational exercises that isolate and strengthen each of the four 'SITS' muscles, building stability from the inside out.
The absolute key here is flawless form. If you rush through reps or grab a weight that's too heavy, you'll just be encouraging the bigger, more dominant muscles to jump in and take over. That completely defeats the purpose. Our goal is mindful execution—connecting your brain directly to the specific muscle you want to work.
Mastering External Rotation for Infraspinatus and Teres Minor Strength
External rotation is arguably one of the most vital movements for shoulder health, especially in a world that keeps us hunched forward. This single action directly targets the infraspinatus and teres minor—the two muscles on the back of your shoulder blade that are responsible for rotating the humerus outward in the glenoid socket.
Think of strengthening these muscles as hitting a postural reset button. They help counteract the constant internal rotation from daily life.
The WundaCore Loop is your best friend for this. Its fabric design gives you smooth, consistent resistance without slipping or digging in, so you can focus entirely on the quality of the movement. For more great ways to use bands, you can explore other exercises with resistance bands that support full-body conditioning.
How to Perform Banded External Rotation:
- Stand or sit with impeccable posture. Tuck a small, rolled-up towel or a WundaCore Block between your elbow and your side. This anatomical cue is a game-changer; it prevents the deltoid from hijacking the movement and ensures the rotation truly comes from the rotator cuff.
- Hold the WundaCore Loop with both hands, palms up, with your elbows bent at a sharp 90 degrees.
- Keeping that elbow pinned to your side, slowly rotate your forearm outward, pulling the band apart. The movement should feel small and incredibly controlled.
- Initiate the rotation from the back of your shoulder. Imagine your shoulder blade gliding gently toward your spine as the infraspinatus and teres minor contract.
- Pause for a second at the end range, then slowly return to the start. The magic is in the controlled 3-second eccentric (return) phase—that's where so much of the strength is built.
- Regression: If this feels like too much, do the exact same movement without a band. Just focus on the muscle contraction and control.
- Progression: Ready for more? Hold the peak contraction for 3-5 seconds before that slow, controlled return. You can also graduate to a WundaCore Loop with higher resistance.
Key Takeaway: The effectiveness of this exercise is all about control, not how far you can move. A small, precise movement that isolates the infraspinatus is infinitely better than a big, sloppy one that uses the wrong muscles.
Isolating the Supraspinatus with Side-Lying Abduction
Next up is the supraspinatus. As we covered, this is the muscle responsible for initiating the first 30 degrees of abduction (lifting your arm away from your body). It's a small muscle with a big job, which makes it especially vulnerable to injury.
Performing this exercise lying on your side is the best way to do it. It takes gravity out of the initial part of the lift and removes the temptation to cheat by shrugging your shoulder and using your upper traps.
How to Perform Side-Lying Abduction:
- Lie on your side with your hips and knees bent a little for stability. You can rest your head on your bottom arm or a pillow for comfort.
- Your top arm should be resting along your side. You can hold a very light weight (1-3 lbs) or no weight at all to start. Your palm should be facing the floor.
- Keeping your arm perfectly straight, slowly lift it toward the ceiling. Stop when your arm is at about a 45-degree angle from your body. Any higher, and your deltoid will likely take over—which is exactly what we're trying to avoid.
- Here’s the most important anatomical cue: keep your thumb pointing slightly toward the ceiling as you lift. This "full can" position rotates the humerus externally, creating more space in the subacromial joint and preventing the tendon from being pinched.
- Hold the top position for a beat, then lower the weight back down with a super slow, 3 to 4-second count.
- Regression: The best way to start is with no weight at all. Your only job is to feel the muscle at the top of your shoulder initiating the lift.
- Progression: Gradually increase the weight in tiny increments (1 lb at a time) or increase the hold time at the top of the movement.
This simple decision tree can help you figure out the right approach based on how your shoulder feels on any given day.
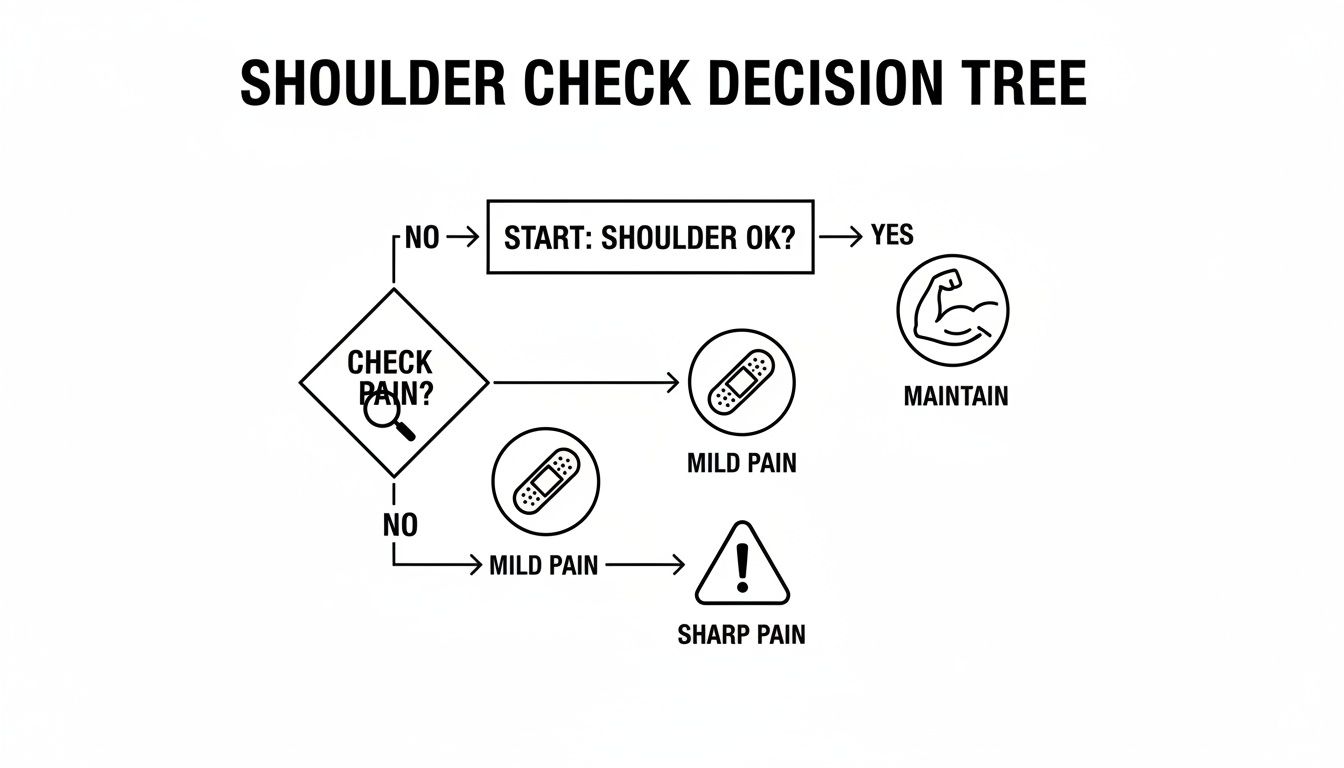
The flowchart is a great reminder that listening to your body is paramount. When things feel good, we maintain strength. If there's any pain, it's time to pause and assess.
Activating the Subscapularis with Internal Rotation
Last but not least, we need to show some love to the subscapularis, the powerful internal rotator on the front of the shoulder blade. A strong subscapularis is essential for creating a balanced force-couple with the external rotators we just worked.
We can use a similar setup to the external rotation exercise, just flipping the direction of the movement.
How to Perform Banded Internal Rotation:
- Anchor a resistance band at elbow height to something sturdy (a doorknob works well). Stand sideways to the anchor point.
- Grab the band with the hand that's furthest from the anchor. Place the WundaCore Block or a towel between that elbow and your side, and bend your arm to 90 degrees.
- Start with your forearm rotated open. This is your starting position.
- Keeping your elbow pinned to your side, slowly pull the band inward across your body, bringing your hand toward your belly button. This action internally rotates the humerus.
- Focus on feeling the contraction in the front of your shoulder and armpit area, where the subscapularis muscle is located.
- Slowly and with complete control, let the band pull your arm back to the starting position.
- Regression: Use a lighter band or simply perform the movement with no resistance, concentrating on that mind-muscle connection.
- Progression: Increase the band's resistance or slow down the eccentric phase even more, taking up to 5 seconds to return to the start.
To help you keep track, here's a quick summary of the foundational protocol.
Foundational Rotator Cuff Exercise Protocol
This table outlines the essential starting point for your rotator cuff program. Remember, the tempo is critical—the slow, controlled eccentric (lowering or returning) phase is where much of the magic happens.
| Exercise | Primary Muscle Target | Sets x Reps | Tempo (Seconds) | WundaCore Prop |
|---|---|---|---|---|
| Banded External Rotation | Infraspinatus & Teres Minor | 2-3 x 10-15 | 1-1-3 (Up-Hold-Down) | WundaCore Loop |
| Side-Lying Abduction | Supraspinatus | 2-3 x 10-15 | 1-1-4 (Up-Hold-Down) | None to start |
| Banded Internal Rotation | Subscapularis | 2-3 x 10-15 | 1-1-3 (In-Hold-Out) | WundaCore Loop |
Focus on mastering these movements with perfect form before worrying about adding more weight or reps. Quality over quantity is the name of the game.
The value of committing to these specific, anatomy-informed movements can't be overstated. Research has shown that exercise therapy is remarkably effective for rotator cuff issues, with studies indicating that 73-80% of patients improve without needing surgery. By integrating these foundational exercises into your routine, you're not just building muscle; you're restoring balance, improving joint mechanics, and making a real investment in the long-term health and function of your shoulders.
Creating Your Weekly Strengthening Routine
Knowing the right exercises is one thing, but consistency is what really builds lasting shoulder strength and resilience. A well-planned weekly routine takes the guesswork out of the equation and helps turn these movements into a powerful habit. This roadmap is designed to build you up progressively, making sure you get the crucial recovery time your muscles need to adapt and get stronger.
The goal isn't to blast your shoulders into submission every day. In fact, that's one of the fastest ways to backtrack. We're aiming for quality and consistency.
Structuring Your Week for Success
The sweet spot for dedicated rotator cuff work is 2-3 sessions per week, always on non-consecutive days. This schedule is non-negotiable—it gives the delicate tendons and muscles at least 48 hours to recover, repair, and prepare for the next challenge.
A sample week might look something like this:
- Monday: Rotator Cuff Session 1
- Tuesday: Rest or another activity (cardio, lower body)
- Wednesday: Rotator Cuff Session 2
- Thursday: Rest or another activity
- Friday: Rotator Cuff Session 3 (optional)
- Saturday/Sunday: Active recovery or pure rest
This rhythm prevents overuse and ensures you’re always working from a place of strength, not fatigue.
Don't mistake rest for inaction. Proper recovery is when the magic actually happens—it's the period where your muscles rebuild stronger than before. Skipping rest days is one of the fastest routes to burnout or injury.
The Art of the Warm-Up and Cool-Down
Jumping into strengthening work with cold muscles is a recipe for irritation. A proper warm-up increases blood flow to the shoulder joint, lubricates the tissues with synovial fluid, and gently gets the rotator cuff ready for what's ahead.
Your 5-Minute Pre-Session Warm-Up:
- Arm Circles: Do 10-15 slow, controlled circles forward, then backward. Start with small circles and gradually make them larger.
- Pendulum Swings: Lean forward, supporting yourself with one hand on a table. Let your other arm hang down and gently swing it forward and back, then side to side, and finally in small circles.
- Wall Push-Ups: Stand facing a wall and perform 10-15 slow push-ups. Really focus on feeling your shoulder blades glide across your ribcage (scapular protraction and retraction).
After your session, a brief cool-down helps ease your muscles back to a resting state and can improve flexibility. Gentle stretches like the cross-body arm stretch or a doorway chest stretch, held for 20-30 seconds each, are perfect.
Mastering Progressive Overload
To get stronger, you have to consistently challenge your muscles a little bit more over time. This principle is called progressive overload. For the rotator cuff, this doesn't just mean grabbing a heavier weight—there are smarter, safer ways to progress.
- Increase Repetitions: If 12 reps feel easy, aim for 15 with perfect form.
- Add a Set: Once you can comfortably complete 2 sets, progress to 3.
- Slow the Tempo: This is a powerful tool. Try increasing the eccentric (lowering) phase of an exercise from 3 seconds to 5 seconds. This significantly increases the muscle's time under tension without adding stress to the joint.
- Refine Your Form: Focus on an even deeper mind-muscle connection, ensuring zero compensation from other muscles.
The power of this consistent, progressive approach is well-documented. A standardized shoulder exercise program was shown to create clinically significant pain reduction within just six weeks, with patients reporting less pain at rest, at night, and during activity. The improvements in range of motion, especially for abduction and external rotation, highlight how a smart routine directly translates to better function in daily life. You can explore the full research findings on progressive shoulder programs to see just how effective this method can be.
If you really want to stay on top of your schedule and progress, using a health tracking smartwatch can be a great way to log workouts and recovery. This roadmap, combined with your own body awareness, is your key to building robust, long-lasting shoulder health.
Common Mistakes to Avoid for Shoulder Safety
When you're working to strengthen your rotator cuff, what not to do is just as critical as knowing which exercises to perform. The shoulder is an incredibly complex joint, and a few common errors can quickly lead to irritation or setbacks. Steering clear of these pitfalls is key to making sure your efforts build strength safely and effectively.
A classic mistake is piling on too much resistance too soon. This forces larger, more dominant muscles like the deltoids or traps to take over, completely bypassing the smaller stabilizing muscles we’re actually trying to target. It's a quality-over-quantity game. Interestingly, research comparing high-load and low-load rotator cuff programs found no major differences in pain reduction, which tells us that mastering the form is the real secret sauce.
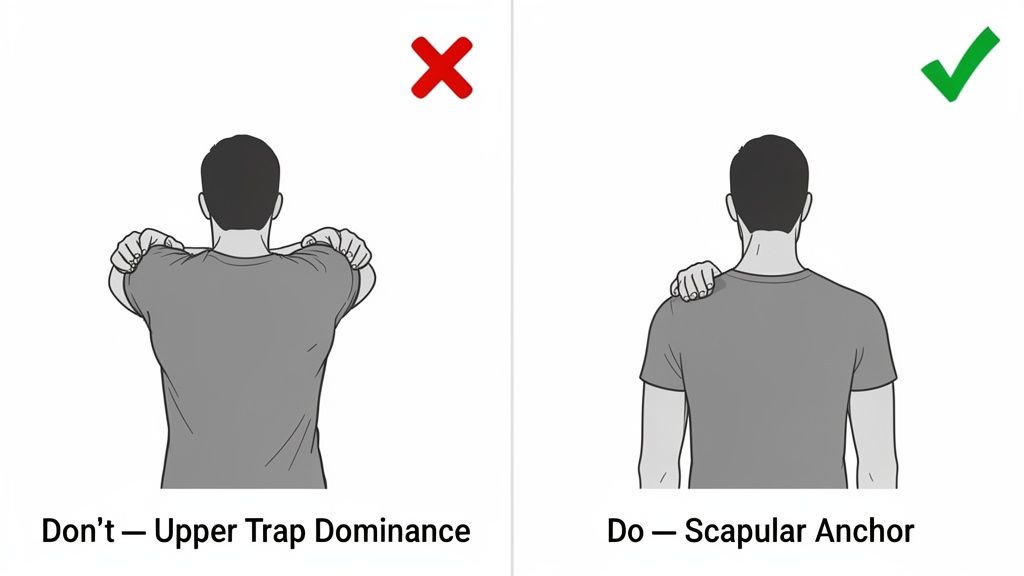
Letting Your Upper Traps Dominate
Another frequent error I see is letting the upper trapezius muscles—those big muscles between your neck and shoulder—initiate the movement. This often looks like a shoulder shrug or hike up toward the ear, especially during side-lying abduction exercises. This compensation pattern is a dead giveaway that the rotator cuff isn't firing correctly.
To fix this, focus on one simple cue: "keep your shoulder blade anchored down your back." This small mental adjustment makes a world of difference, helping isolate the intended rotator cuff muscle so it can finally do its job.
Rushing the Lowering Phase
Rushing through the eccentric (or lowering) portion of an exercise is a huge missed opportunity for building strength and resilience. This controlled lengthening phase is where you build significant tendon health and stability.
So, instead of letting a resistance band snap back or just dropping a weight, I want you to actively resist gravity on the way down. Slow it down. Control it. If you want to dive deeper, our guide on what eccentric muscle contraction is explains exactly why this is so critical for muscle development.
A crucial step before starting any exercise regimen, especially for the delicate rotator cuff, is a proper warm-up. Learn how to warm up before exercise to prepare your muscles and prevent injury.
Finally, you have to learn the difference between productive muscle fatigue and a genuine warning sign. A deep, localized burn in the muscle? That’s good—that’s the work. But sharp, shooting, or radiating pain is not. If you feel that, it’s time to stop immediately and check in with a healthcare professional. Listening to your body is your best tool for building stronger, more resilient shoulders for the long haul.
Your Rotator Cuff Questions, Answered
As you start paying more attention to your shoulders, a few common questions always pop up. It's smart to think about timelines for results, how to handle any discomfort you might feel, and the best way to weave this work into your existing routine.
How Long Until I Feel a Difference?
This is probably the number one question I get. While you might start to feel better function and less nagging discomfort in as little as 4-6 weeks, building real, lasting strength is a longer game.
Think of it this way: the most significant, meaningful strength gains really start to show up after about 3 to 5 months of consistent work, hitting these exercises two or three times a week. It’s a marathon, not a sprint, and patience is your best friend here.
Should I Exercise if My Shoulder Hurts?
Navigating pain is where you have to be your own best advocate. If you’re dealing with any sharp, severe, or radiating pain, that’s a hard stop. Your first move should be to check in with a healthcare professional before you do anything else.
For that low-level soreness or minor achiness, though, gentle movement can actually be incredibly helpful.
The golden rule is simple: always work within a pain-free range of motion. If an exercise causes even a tiny pinch, back off. You can reduce how far you move or ditch the resistance altogether. Sharp pain is your body’s non-negotiable signal to stop immediately.
How Does This Fit with My Pilates Routine?
Beautifully. These rotator cuff exercises are the perfect complement to a WundaCore Pilates practice. In fact, a good Pilates routine already lays the groundwork by building the scapular stability and control your shoulders need to be healthy.
You can slot these movements in as a targeted warm-up before your main session, or you can do them as a separate, focused workout on your off days. The core principles of control, stability, and mindful movement align perfectly with what you’re already doing in your On Demand classes.
Ready to build stronger, more resilient shoulders with a smart, anatomy-informed approach? Explore the WundaCore collection and our On Demand classes to get the tools and guidance you need. Start your journey at wundacore.com.